Over the past 70 years of its existence, this staple product of fix-it-your-selfers has been used by virtually every walk of life, for jobs that I’m sure the duct tape developers never imagined. So how can we use it for survival?

Here are 25 survival uses for duct tape, in no order whatsoever.
1. Repairing a cracked water bottle or a pierced hydration bladder. A little strip of DT is the next best thing to a bandage for an ailing water vessel. Just dry the surface before you try to tape your patch in place, most forms of duct tape don’t stick to wet surfaces.
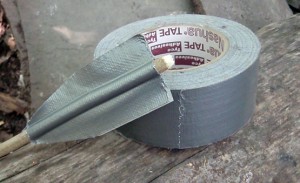
2. Survival arrow fletching. Tear off a few 5-inch pieces, and a long edge of one piece to the arrow shaft, fold the tape lengthwise, and stick the other long edge of that piece to the arrow. Repeat this process one or two more times; trim the vanes to shape with your knife; and you will have a serviceable arrow fletching.
3. Butterfly bandage strips. Cut two small strips of DT, and add a smaller strip across their centers (sticky side to sticky side) to create a makeshift butterfly suture.
4. Make cordage. Twist one or several lengths of duct tape into a cord or rope.
5. Patch a hole in canoe. I wouldn’t trust my life to this one, but it’s been done more than once.
6. Fashion a belt. When you are starving in the wild, and your pants start falling down, run a piece of DT through your belt loops and stick it to itself in the front. Overlap it about 4 or 5 inches and you’ll still be able to peel the belt apart when nature calls.
7. First aid sling. Fold a length of DT down the middle, so that it is half the original width and no longer exposing a sticky side. Use the strap to make a sling for a busted arm.
8. Leave a note. Write on it with a Sharpie, or use strips to form letters.
9. Handcuff alternative. If someone is acting up during a survival emergency, you can duct tape their hands together around a tree to prevent them from becoming a danger to themselves or others.
10. Mend shoes and clothing. You can skip the sewing class, if you have enough duct tape.
11. Repair your glasses. The tape on your glasses my look a little nerdy, but at least you’ll still be able to see.
12. Attach shelter elements. Just a few trash bags and some duct tape, and you have a survival shelter roof, or a sleeping bag cover, or a wind break, or…
13. Attach survival gear. Tape a spark rod to the side of your knife sheath, and you’ll always have a back-up fire source.
14. Make a hat. If you believe what you see on TV, the “Mythbusters” guys made a pretty nice looking hat out of duct tape on a recent episode.
15. Afix bandages. Place a sterile dressing over your wound, and strap it in place with DT. Hopefully you’re not too hairy where you got injured.
16. Fix your rain gear. Keep the dry stuff dry, and keep the water out, by mending your ripped rain gear with a few strips.
17. Make a drinking cup. Some creative folding and sticking can result in a cup you can drink from.
18. Make a spear. Strap your knife to a pole and you have a trusty spear to fend off beasts, or make one into your dinner.
19. Blister care. Cover the blistered area with a bit of cotton gauze, and tape over the cotton. Make sure that the duct tape fully covers the cotton and doesn’t touch the blister at all.
20. Mark a Trail. Use it to blaze a trail or signal for rescue, especially if your DT is brightly colored or reflective.
21. Make emergency repairs on your Bug Out Vehicle. Leaking hoses and windows that won’t stay up don’t stand a chance against the mending powers of duct tape.
22. Keep the feathers in your sleeping bag. If you have a hole in your down sleeping bag, the feathers will pour out faster than excuses from a politician. Patch the hole with DT.
23. Keep your tent closed. A damaged zipper could leave your tent door flapping in the wind. Stick the door shut, and keep the bugs and critters out.
24. Splint a leg. A broken ankle or leg can be stabilized with ample splint material, padding and duct tape. Pad the crotch of a forked branch with some cloth and duct tape to fashion a quick crutch to go with your splint.
25. Splint a broken tent pole or fishing pole. By taping a stick to the broken area of your tent pole or fishing rod, you might just get one last adventure out of it.
Tell us your best duct tape trick or survival strategy in the comments.


