Step-By-Step Guide For Performing CPR On An Adult

Everyone should know CPR. It can save lives in dire situations and is relatively simple to learn. Here’s a step-by-step guide that teaches you what you need to know.

Cardiopulmonary resuscitation (CPR) delivers oxygen to the brain and other major organs until medical professionals arrive and can better administer care. It can save the life of someone whose heart or breathing has stopped by nearly drowning or heart attack.

This is serious stuff. If you know CPR, you can save a life and keep a person from brain damage. It is, quite literally, a life and death matter. Plus, you could end up in one of those dramatic recreations like they used to feature on Rescue 911! which could be your 15 minutes of fame.

The Red Cross tells the story of a young boy who fell into a pool and was pulled out after going unconscious. After being saved by CPR, admitted to, and then released from the hospital, his father had this to say:

Myles was dismissed from the hospital the next morning and, despite everything that happened, was adamant about going to Worlds of Fun. This was the best Father’s Day gift I could have ever received, watching my wife, son and daughter reunited and healthy, playing together again! No days are taken for granted any longer!

For this reason, the American Heart Association recommends CPR be administered by bystanders and those formally trained alike. When death is on the line, it’s better to do something to try to help than nothing.

Here are some guidelines. If you’ve never been formally trained in CPR, perform hands on CPR only. This is 100-120 compressions per minute with no more than a 10 second break between cycles.

If you’re well-trained, perform CPR and rescue breaths. If you’re rusty, stick to compressions.

In 2010 the American Heart Association made a startling change to the recommended CPR steps, stating that compressions alone can be as successful as compressions and breaths together.

Let’s be honest and admit that’s kind of a relief. Basically kissing a complete stranger isn’t always the most pleasant experience.

Let’s take a look at these steps to CPR.

Check The Vitals Of The Person

Cardiopulmonary resuscitation (CPR) saves lives.

Perform the following steps:

  1. Check the scene for immediate danger. Make sure you are not putting yourself into harm’s way by going to the person. Is there a fire? Is there traffic? Live wires? If you are able to prevent danger, do so. If not, carefully pull the person to safety. Ideally you will place a blanket under the person to drag them.
  1. Check for consciousness. Tap the person on the shoulder and say loudly, “Are you OK?”. If they respond, CPR is not needed. In fact, it would be really odd, and possibly illegal if you began performing CPR on them.

You can apply first aid care or call 911 if you think it is still necessary.

  1. Call for help. If they do not respond and you are alone call for help. You want to get medical professionals on the scene as soon as possible. If someone is nearby, have them call and you can begin to perform CPR.
  1. Check for breathing. Unless you’re a trained professional do not take time to check for a pulse. Instead check for signs of breathing. See if the chest is rising and falling. Feel if there is air coming in and out of his or her mouth. If there is no signs of breathing follow these steps.

Begin Performing CPR

  1. Remember the acronym CAB. While administering CPR, use CAB to remember the correct order of the steps to CPR. The letters stand for compressions, airway, and breaths.
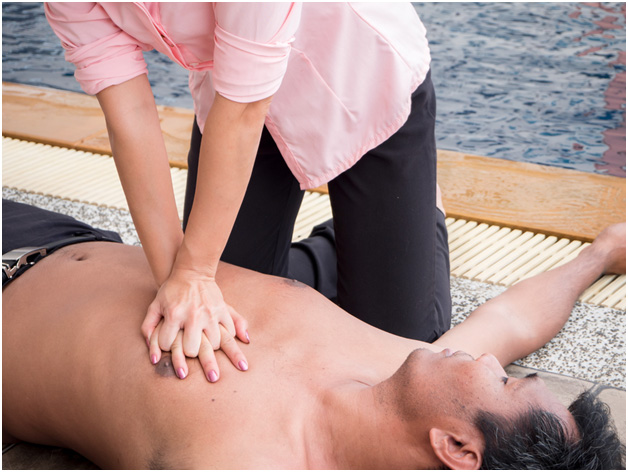
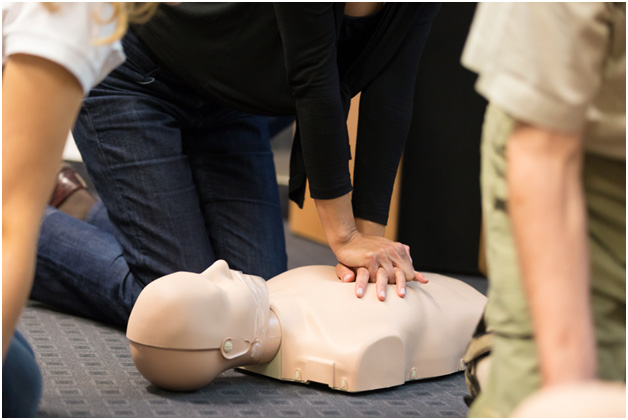
  1. Do compressions to restore blood circulation. Place the victim on his or her back. He or she must be lying as flat as is possible during compressions for safety. Slightly tilt their head back.

Put the heel of one hand on the breastbone 2 finger-widths above where the lower ribs meet. This will be right between the nipples. Put your other hand on top of the first, palm down. Interlock the fingers of your second hand with the fingers of your first hand. Position yourself directly over your hands. Keep your arms straight and rigid.

Perform 30 chest compressions pushing the chest down no more than two inches. Do this at the rate of 100-120 compressions per minute.

The rate of compressions would keep the beat to a song such as “Stayin’ Alive”. Sing that in your head to get the right rhythm if it helps. Or you could sing it out loud, which may either have a positive or negative effect on the person in question, depending on their preference for disco.

  1. Clear the airway. Place one palm on the victim’s forehead and lift his or her chin with your other hand. Gently pull back the head to look inside the mouth and see if there is any obstruction. If you see something obvious in the airway, such as a large football, remove that first.

Take no more than 10 seconds to look for signs of breathing. Is the chest moving up and down? Can you feel breath coming out of the mouth?

Learn CPR for survival

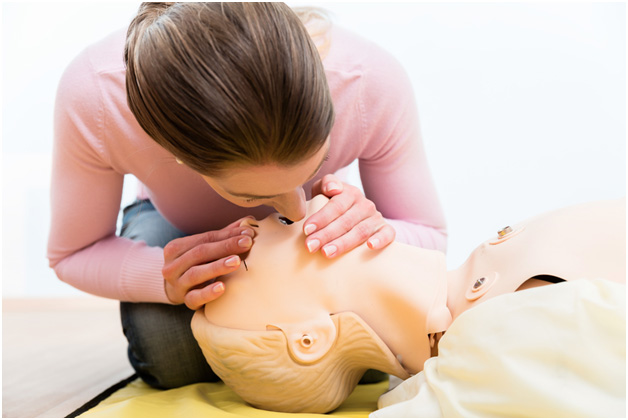
  1. Give rescue breaths. With the airway open, give 2 rescue breaths if you are trained in CPR. Give a one-second long rescue breath. If you see the chest rise, give a second breath. If it does not rise, tilt the head and lift the chin again. Then proceed to try your second breath.

If there is no sign of your breath entering the lungs, perform the Heimlich Maneuver. Straddle him or her with your face facing theirs. Place one fist just above the belly button and the other on top of the first hand. Thrust a few times. You are doing this to dislodge anything that may be blocking the trachea. If this is unsuccessful resume CPR.

https://youtu.be/vniHzDM9Ivs

  1. Begin again with CAB. Thirty compressions and 2 breaths are considered one cycle. After giving two breaths, resume compressions. Continue CPR until there is movement or help arrives. If you are taking turns performing CPR with another person, minimize breaks between switches.

Using an Automated External Defibrillator

  1. If you are too exhausted to continue, use an Automated External Defibrillator (AED) if one is available. This is used to jumpstart a person’s heart. Before you turn it on make sure there are no puddles or standing water near by.

Seriously. Using an AED in or around water can be a shocking experience. Yes, that was a terrible joke. No, we won’t take it back.

  1. Turn on the AED and follow the prompts.
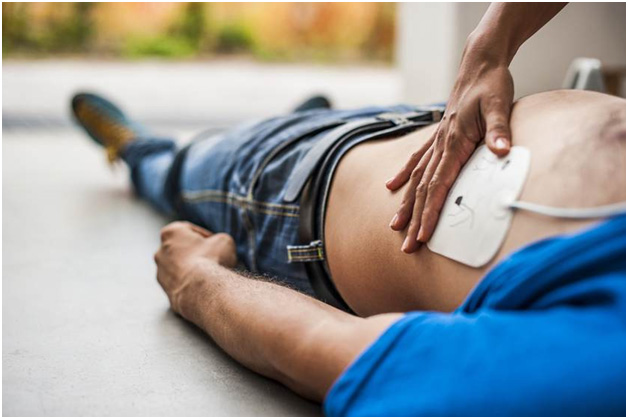
  1. Fully expose the chest. Make sure the chest is dry. If he has thick chest hair and you are able, shave spots where the AED pads go. Shave kits are included in most AED kits. Be sure not to cut the victim when you shave him, as this can interfere with rhythm analysis.

CPR is an important skill

  1. Remove any metal the person has on his or her body. Take off earrings, necklaces, piercings, and underwire bras. Also look for evidence of a pacemaker. This should be indicated by a medical bracelet. If you believe the person has a pacemaker you need to keep the AED pads at least 1 inch from the location of the pacemaker.
  1. Attach the sticky pads that are connected to electrodes to the victim’s chest. Follow the directions in the kit when determining pad placement.

learn cpr

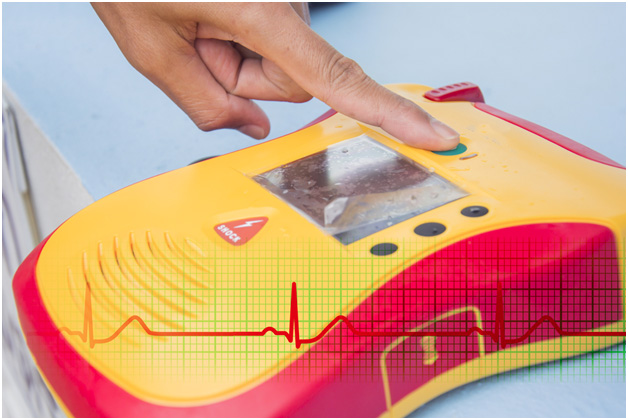
  1. Analyze and apply shock. First be sure that no one is touching the body. Press analyze on the AED, and it will tell you if shock needs to be administered.
  1. Leave sticky pads on the victim and resume CPR for another 5 cycles.

Put the Patient in Recovery Position

  1. Once the victim is stabilized and breathing normally, place him or her in the recovery position.

If any funny jokes came to mind while you were performing CPR, you can finally tell them. Although, come to think of it, most people probably won’t find them funny at this point, so maybe save them for later.

  1. This is a lateral recumbent or three-quarters prone position. Gently turn him or her to their side. Bend top knee and use it to keep the body from rolling onto its stomach. Bend both elbows and use them to prop up the body. This position allows victim to breathe more easily. The mouth is facing downward which prevents choking and suffocation.

Conclusion

How to save a life with CPR

This in-depth step-by step guide should instill confidence so that when a person is in danger and needing CPR, you will be able to administer it.

Ideally we would all take an accredited course that includes first aid, CPR, and AED. But remember that it is always better to try and help than to stand by and do nothing.

And if you do CPR on someone, you could also end up marrying them, just as happened to this couple:

Turns out learning CPR can saves lives and improve your love life.

This article originally appeared here at http://www.cprcertificationtrainingonline.com/how-to-perform-cpr/ and has been republished with permission.


How To Set Up Your Campsite

Camping with the family is supposed to be relaxing, but it can feel stressful if you don’t know how to pack, set up, and organize your campsite efficiently. After all, no one wants to spend all their time unpacking camping gear, looking for things, and hauling stuff around their campsite! Read on to learn how to efficiently pack and set up all your gear!

How to Pack Your Camping Gear for Easy Set Up at the Campground

Start your packing process with stackable rubber storage totes. You’ll need at least three (one for each camping “section” of your campsite, including the kitchen, sleeping, and living areas). Larger families or those with extensive gear will probably need more than one tote for each section. Once you arrive at your campsite, simply set each tote in the designated area you’ll need it in, such as the area around your picnic table for the kitchen tote, your tent area for your sleeping tote, and near your campfire pit for your living area tote. Color code your totes to remember where each one belongs.

Try this kitchen packing hack: Store your kitchen tools and utensils in a toiletry bag or other small bag to keep them organized and clean between uses at a dusty campground. You can hang them from a tree branch for easy access when you’re at your site.

In addition to your three “main section” totes, assign a smaller tote to each family member. This tote will hold that person’s clothing and personal items. Using totes for this purpose, instead of duffel bags or suitcases, saves space in your car or trailer since you can stack them.

Place items you’ll need at the ready in a mesh laundry sack (which can be re-purposed later for dirty clothes). These items may include swimsuits and towels you’ll want as soon as you arrive at the campground or jackets and boots if you’re camping in damp areas or in the off-season.

How to Find a Good Campsite and Set Up Efficiently

If you can reserve your campsite ahead of time, do so online as early as possible. Look at the campground map and note campsites that back up to the wilderness instead of other sites. In addition, look at the bathroom and shower locations (you may want to be close to one or you may want to be farther away from foot traffic). If you are camping at a campground that does not take reservations, arrive at the campground as early in the day as possible. When you arrive, look for a campsite that backs up to the forest or scenery to minimize noise from any neighbors.

Find a campsite with equal parts shade and sun to maximize your exposure and enjoy warmth in the mornings and cooler temperatures in the afternoon. Once you’ve selected a site, set up your sleeping area in the shade (so your tents don’t heat up during the day) on flat ground away from the fire ring and kitchen area.

Set up your kitchen adjacent to the fire ring and picnic table. You may want to consider setting up a screen dome or shade shelter over the table to reduce unwanted quality time with insects and mosquitos. Make sure you place your cooler in the shade.

How to Have a Safe Campfire

First, always make sure the campground permits campfires. Campfire policies can change seasonally, and they may be prohibited during peak forest fire danger periods. If campfires are permitted, make sure to gather sticks and wood from the ground around your site, taking care not to break branches off living trees. Dead wood is drier and better for burning.

If you need to buy firewood, buy it at your campground or at a local store. This practice saves space in your vehicle for your other gear, and it is far better for the environment. When you bring wood from home, you can unknowingly bring unwanted, non-native insects or parasites along with it.

Start your campfire with kindling or small sticks from around the campsite, combined with some newspaper or store-bought fire starter.

Always let your campfire start to die out one hour before bedtime. This is a great time to light a camping lantern and play a few rounds of cards or a board game. Of course, you should always put your fire completely out before leaving your campsite (for the day or at the end of the trip). To extinguish your fire quickly, separate the burned coals with a stick. Once they’re not touching, they will become cool to the touch within 15-20 minutes on average. After spreading the coals, ensure that the fire is fully out by throwing buckets of water or sand or them.


Source: eReplacementParts.com


Wilderness First Aid

Be Prepared Before Venturing to the Backcountry

One of the scariest things that can happen when you’re in the backcountry is an injury. Even a small blister can upend a backpacking trip, but imagine facing something more serious, like a broken leg, an allergic reaction, or a burn from the campfire, and not knowing where to start. Suddenly it’s abundantly obvious that getting to a hospital isn’t as simple as calling 911, and you wonder where you packed the first-aid kit – you did pack a first-aid kit, right? Having a first-aid kit and knowing how to use it are important parts of making any trip to the backcountry. Here are some tips to get you started.

Take a Course

If you plan on spending time in the backcountry, it’s important to take a course in wilderness medicine. You have three options when choosing a course.

Wilderness First Aid (2–3 days)

This course provides an overview of wilderness medicine, and it is designed for people who plan on taking mostly weekend trips. You’ll learn how to check for threats to life, how to care for wounds and fractures, and how to deal with an emergency in a deliberate way.

Wilderness First Responder (~10 days)

This course is usually required for people who want to work in the outdoors. The material is presented more thoroughly than the material in the short course, and the course covers a wider range of common wilderness injuries.

Wilderness EMT (one month)

If you want to be a ski instructor or expect to bounce between EMT work and time in the backcountry, this is a great option. In addition to the national EMT curriculum, the Wilderness EMT includes a component designed for providing remote care.

Don’t be intimidated by the fact that these are all classes; most wilderness medicine courses involve a lot of hands-on learning and scenarios, which provide plenty of chances to practice your skills. Be sure to take a class from a reputable program and keep your certification up to date. Most certifications have to be renewed every two to three years, and most of them include a CPR component. Renewing your certification may seem like a hassle, but it’s a great way to brush up on rusty skills and learn changes to the curriculum or protocols.

First-aid Kit

  • Gloves (2–3 pairs Latex or nitrile gloves are essential for anyone treating a patient; pack a few pairs so you won’t run out.
  • Band-Aids (10–20): These are great for small cuts and scrapes.
  • Ibuprofen and acetaminophen: Sometimes referred to as “Vitamin I,” ibuprofen is great for treating everything from headaches to aching feet.
  • Antihistamine and an EpiPen: Allergic reactions happen fast, so make sure you know where the EpiPen and Benadryl are located so you can retrieve them quickly.
  • Tweezers: Tweezers are great for removing splinters and ticks.
  • Moleskin (2 sheets): These are great for preventing and treating blisters.
  • Molefoam (1 sheet): Molefoam provides a fast way to pad a blister.
  • Athletic tape (1 roll): Athletic tape can be used for a number of injuries, including twisted ankles and blisters, and it can be used to tape gauze over larger wounds.
  • Duct tape: Instead of packing a roll, unwind some tape and wrap it around itself so you can remove pieces.
  • Gauze pads (2–3): These are perfect for burns and big cuts.
  • Gauze roll: Having two types of gauze may seem redundant, but the roll can be handy for wrapping any number of injuries.
  • Antibiotic ointment (3–5 packets): These come in small packets, which are a nice, lightweight option.
  • Ace bandage: These are bulky, but they are great for wrapping around splints if you’re dealing with a fracture or simply supporting a rolled ankle.
  • Trauma shears or a pocket knife: Scissors aren’t lightweight, but they are indispensible if you need to cut molefoam or remove clothing around an injury. If you opt to leave them behind, be sure to carry a pocket knife.
  • CPR face shield: This is a lightweight version of a CPR mask.
  • Paper and pencil: These are vital for recording information and taking notes on your patient.
  • Plastic bag: These are always useful, but if you’re disposing of biohazardous material, it’s especially important to have one in your kit.

One of the first things you learn in first-aid training is how to assess a situation to ensure your own safety and that of potential victims. When someone gets injured, your instinct will be to rush to help, but it’s important to take a minute to size up the situation first. These five steps will help you quickly gather important information about the situation before you approach the injured party.

1. Make sure the area around the patient is safe for you, the rescuer. This may be a quick decision if the patient simply fell, but consider the scene after an avalanche, a lightning strike, or a bear attack. If the thing that caused the injury is still a danger to others, keep yourself safe by waiting to approach the patient. There’s no sense in creating more patients.

2. Make a quick determination about what happened to the patient. This isn’t a diagnosis but an observation based on what the scene looks like.

3. Put on gloves! It’s crucial to ensure that none of the patient’s fluids (like blood) get on your skin. Gloves are the easiest solution for protecting your hands, and you should wear them at all times while treating a patient.

4. Make a quick scan of the area to count how many patients you’ll be treating. Maybe you’ve stumbled upon a boating accident with a raft full of people, or maybe you’re hiking with a friend who stumbled and fell to the ground.

5. Is the person alive or dead? This may seem basic, but it will give you a lot of information about what your next steps will be and how fast to make them. Sometimes you have to get closer to the patient to see if they are alive, which is why this step is last.

First-aid 101: Blister Prevention

Blisters are a much more likely to occur on a hiking or camping trip than are some of the other incidental injuries a person may incur. Learning how to treat them is a valuable skill that will pay off in dividends. Blisters are essentially burns caused by friction, and they are incredibly common on backpacking trips, especially if you’re wearing brand-new boots. The pre-cursor to a blister is known as a “hot spot.” It’s best to catch blisters at this stage, when they’re easily treated.

If you or your hiking partner discovers a hot spot, stop and take a look at the foot. Hot spots are usually red, and they will be slightly painful to the touch. They’re caused by the foot rubbing against either the boot or the sock, so to treat them, you need to relieve the friction. This is easy to do with moleskin. Simply cut out a circular piece about the size of the hot spot and tape it in place (athletic tape works well for this).

Have the person remove their boot and sock. Take out a square of Molefoam and cut a circle that covers the entire blister, plus a little extra. Round pieces are best because they don’t have any corners, which will peel.

Once you have a circular piece cut, fold the piece in half and cut out the middle, creating a foam donut. The inside hole should be large enough that it covers the entire blister.

Place the foam donut over the blister. If the extends out further than the foam, make a second donut and place it on top of the first. The goal is to create a ring around the blister that will protect it from rubbing against the boot.

If the blister has popped, apply some antibiotic cream inside the donut. If it hasn’t popped, leave it intact. A popped blister is no longer protected by the cushion of the fluid, and it’s an easy access point for infection-causing bacteria. Once the blister is surrounded by the donut of foam, wrap the area with athletic tape to keep the bandage in place.

Now that you know some of the basics, sign up for a wilderness medicine class in your area. Start by checking these three schools that offer nationally recognized certifications: SOLO, WMA, and NOLS WMI.
Source: Fix.com Blog


Survival on the Cheap: Preparing for an Emergency without Losing your Savings

By Guest Blogger –  Survival Life

Being prepared for any eventuality is one of the keystones of being a survivalist. However, if you’re just starting out, it can be a little overwhelming thinking of all of the supplies you need to be ready for three days, a week, a month or even more living on your own. Being prepared doesn’t have to cost a fortune though. In fact, re-using items and finding alternative (and affordable) sources for food, clothing and other essentials goes hand-in-hand with being a prepper. It’s a more modern variation of “living off of the land.”

How to stretch your prepping dollars

If you’re looking to start building your survival stockpile, below are a few hints to help you gather everything you need without breaking the budget. (And, remember: you don’t have to buy everything at once; a better plan is to build your stockpile gradually and thoughtfully. Your ideas about what you need will evolve over time.)

Tips for preparing for an emergency on a budget

1. Learn from the couponers. Although you may be buying different items (they’re buying baby food; you’re buying beans), there’s a lot to be learned from the extreme couponing crowd. Combining coupons with store specials can net you regular savings of 30 percent or more on non-perishable food items and toiletries. Take it a step further and join the grocery and drug store reward programs and you can find things like hand sanitizer, toothpaste and a host of other items for free that you can use in your survival kit. To learn more about couponing, check out sites like the KrazyCouponLady.com.

Surplus stores, stores that sell dented cans or half lots of boxed items, can also be good places to find non-perishable food items.  Learn how to create a price binder.

2. Be a regular at estate and garage sales. Estate and garage sales are other good places to find gear and supplies. Estate sales are especially good hunting grounds, since they feature an entire house full of goods. Some sales may require that you dig around in the attic a little bit, but there are often treasures to be found at cents on the dollar. Good things to look for at such sales are water containers, camping equipment and kitchen items. Some people also find good bargains on food at such sales. (I prefer to buy food directly from the grocery or market.) If you do look at food items, be sure to check the sell-by dates.

3. Shop off-season sales. Off-season sales are another good place to find seasonal gear like camping equipment and gardening supplies at prices that are 50 percent or even 75 percent off of their original price.

4. Host your own swap meet. If you know others that are interested in the survival life, you can combine preparing your stockpile with a social night by hosting a swap meet. Have everyone bring something extra from their stockpile and let the trading begin.

Review these 70+ survival items that cost less than $5!

Being prepared for any emergency or situation doesn’t have to be expensive or all consuming. Like other aspects of life, it’s all about smart shopping and always keeping an eye out for a bargain.
About the Author
At Survival Life our mission is to provide vast array of knowledge, tactics, and skills in the survival and preparedness fields, to any and all who wish to become more prepared for whatever may come. We strive to maintain a truthful and unbiased compendium of knowledge, both in original content, product reviews and survival tips, as well as curated articles from other top survival websites. Click here to visit our site and learn more.