Old-fashioned Pickling Recipe from the 1890s

Old-fashioned Pickling Recipe

We are sharing an old-school recipe from the 1890s for pickling vegetables. You know how much we love preserving traditions, so let’s get started.

First, we’ll make the brine with vinegar, sugar, salt, and a blend of spices like mustard seed, allspice, cloves, and black peppercorns. Then, we’ll chop up our favorite veggies, like cucumbers, onions, and green tomatoes, and pack them into sterilized jars. Pour the brine over the veggies, remove any air bubbles, and seal the jars tight.

Now, here’s the most important part: let these babies pickle for at least 3 weeks before opening and serving. Trust us, the longer they sit, the more flavor they’ll develop. And don’t be afraid to experiment with different veggies and spice blends – that’s what makes pickling so fun!

experiment with different veggies and spice blends - that's what makes pickling so fun

So go ahead and give this 1890s recipe a try, and let me know in the comments how it turned out. Cheers, and happy pickling!

Here’s a recipe from the 1890s for pickling vegetables:

Ingredients:

  • 1 quart of vinegar
  • 1 cup of water
  • 1 cup of sugar
  • 1 tablespoon of salt
  • 1 tablespoon of mustard seed
  • 1 tablespoon of celery seed
  • 1 tablespoon of whole allspice
  • 1 tablespoon of whole cloves
  • 1 tablespoon of whole black peppercorns
  • Vegetables of your choice (such as cucumbers, onions, and green tomatoes)

Instructions:

  1. In a large pot, combine the vinegar, water, sugar, salt, mustard seed, celery seed, allspice, cloves, and black peppercorns. Bring the mixture to a boil and then let it simmer for 10 minutes.
  2. While the brine is simmering, prepare your vegetables. Cut them into small pieces or slices, depending on your preference.
  3. Pack the vegetables into clean, sterilized jars. Make sure to leave enough space at the top of the jars for the brine to cover the vegetables completely.
  4. Once the brine has simmered for 10 minutes, remove it from the heat and carefully pour it over the vegetables in the jars.
  5. Use a knife or chopstick to remove any air bubbles from the jars. Then, seal the jars tightly with lids.
  6. Place the jars in a cool, dark place to pickle for at least 3 weeks before opening and serving. The longer the pickles sit, the more flavorful they will become.

Note: This recipe is from the 1890s and may contain outdated or unsafe canning practices. For safe and modern canning practices, please consult a reliable source such as the National Center for Home Food Preservation.

Pickled Vegetables
 

The Ultimate Guide to Yurts: The Versatile Solution for Survival, Camping, and Alternative Living

The Ultimate Guide to Yurts

Are you searching for a durable and versatile solution for your housing needs, whether it’s in a survival situation, camping trip, or an alternative to a traditional fixed house? Look no further than the ancient dwelling known as a yurt. In this article, we’ll explore the many benefits of yurts and why they are gaining popularity as a solution for a variety of housing needs.

Alternative to a Fixed House

Yurts have been a staple of nomadic cultures for centuries, offering a versatile solution for shelter in a variety of situations. In recent years, yurts have gained popularity as an alternative to traditional fixed homes and as a unique option for camping. Here are a few reasons why yurts can be a great choice in a survival situation, while camping, and as a permanent or semi-permanent home.

Survival

In a survival situation, having a portable and durable shelter is essential. Yurts are designed to withstand harsh weather conditions, with a sturdy frame and waterproof covering. They also provide ample space for storage and can accommodate multiple people, making them a practical option for survival. Additionally, yurts can be easily disassembled and reassembled, allowing you to move quickly and efficiently if necessary.

Camping

For campers and outdoor enthusiasts, yurts offer a unique and comfortable camping experience. With a spacious interior, yurts provide a comfortable sleeping area and can also serve as a common area for cooking, dining, and relaxation. Yurts also offer protection from the elements, allowing you to enjoy the outdoors without worrying about inclement weather.

Alternative to a Fixed House

For those looking for a more flexible and affordable housing solution, yurts can be a great option. They are eco-friendly and can be designed to be self-sufficient, with options for solar panels, composting toilets, and other sustainable features. Yurts also offer a unique and visually appealing design, making them a great choice for those who want a home that stands out. Additionally, yurts can be constructed on a permanent foundation, or can be designed to be portable, allowing you to move your home with you if necessary.

In conclusion, yurts offer a versatile and practical solution for a variety of needs, including survival, camping, and alternative housing. They are durable, comfortable, and eco-friendly, making them a great choice for those who want a unique and practical solution for their shelter needs.

yurts offer a versatile and practical solution for a variety of needs, including survival, camping, and alternative housing

Some perspectives on the benefits of yurts:

The Environmentalist

I’m all about living sustainably, and that’s why I love yurts. They’re made from natural materials like wood and canvas, so they’re environmentally friendly. And because they’re designed to be energy efficient, you don’t have to worry about wasting energy heating and cooling your home. Plus, their circular design makes them feel like you’re living in harmony with nature.

The Adventurer

I’m always on the go, and I need a home that’s just as adventurous as I am. That’s why I love yurts. They’re portable, so I can take my home with me wherever I go. And because they’re designed to withstand the elements, I can set up my yurt anywhere from the mountains to the beach. It’s the perfect way to live the nomadic lifestyle I’ve always dreamed of.

The Minimalist

I’ve always been a fan of simplicity, and that’s why I love yurts. They’re small, so you don’t have to worry about filling them up with stuff you don’t need. And because they’re circular, you don’t have any corners to clean or decorate. Plus, their natural materials and minimalist design give them a peaceful, calming vibe that I just love.

The Family Man

I’ve got a big family, and I need a home that can accommodate us all. That’s why I love yurts. They’re spacious, so we can all live comfortably. And because they’re designed to be open and airy, there’s plenty of room for everyone to move around. Plus, the circular design makes it feel like we’re all together in one big, happy family.

The Homebody

I’m all about coziness, and that’s why I love yurts. They’re warm and inviting, so you feel right at home as soon as you step inside. And because they’re made from natural materials like wood and canvas, they have a natural, rustic vibe that just feels right. Plus, with their circular design and skylights, you get plenty of natural light, which just makes the space feel even more inviting.

Relevant Resources:

Note: It’s important to keep in mind that the regulations for yurts can vary by region, so it’s essential to research local codes and regulations before installing a yurt.


Cast Iron Skillet – A Guide to Everything You Need to Know

Written by Marc Morgan

I love to cook on a cast iron skillet. My daily cooking skillets are all “vintage” cast iron — some as much as 100 years old — and will last forever if properly maintained. I prefer the older skillets (those made before 1950) because modern skillets are heavy and inferior in comparison. This article will teach you everything you need to know about buying, cleaning, cooking and maintaining old skillets.

My wife and I are not cast iron collectors (honest, really..), we only buy what we plan to cook with. Plus we want to have enough on hand so that when our three kids move out they don’t take our working set. So we’ve been amassing enough iron to have a set for each of them. But that’s not collecting, right? That’s just good planning. Preparing for the future. Oh, and then there’s bartering. In the future, when cast iron isn’t so easy to find, we’ll have plenty for trade. We’re preppers. Not collectors. Right? Yes. Right.

stoveWe have a variety of skillets (and a couple of round griddles) beside our stove that we cook with everyday, in sizes ranging from #5 – #10.

The #5 skillet is the perfect size for scrambled eggs, fried eggs, or warming up leftovers for 1 or 2 people.

The #8 skillet is our go-to skillet for meal preparation. It’s great for sauteing vegetables, browning meat, or baking bread. Cinnamon rolls, biscuits, cornbread. There’s nothing that doesn’t taste better when cooked in cast iron.

The #10 skillet is our favorite piece for oven-cooking bacon, burgers, or steaks.

The flat skillets are griddles and they make amazing tortillas or pancakes.

You’ll notice that a couple of the skillets on the rack are deeper than the others. Those are called chicken fryers and they are really handy when you’re wanting to fry fish or chicken or anything else that you want to deep fry.
wall02
We have some of our favorite pieces hanging on the wall just outside of the kitchen. Cast iron skillets (and trivets) make great decoration, but be sure that your wall can handle the addition of so much weight. I’ve heard stories of wallboard pulling away from wall studs when too much cast iron is hung for display. We like to say that these our bartering items for the future, but the truth is we have them hanging there just because they look pretty.
rack
And then there’s the overflow shelving. A few of the pieces on these shelves are ones that we use, but don’t have room for on the kitchen rack. My wife’s grandmother’s gumbo pot, and a really cool (admittedly modern) cast iron wok. But most of the cast iron here is skillets waiting for the day when our kids move out and take them with them. Our hope is that, after many years watching us cook on cast iron, seeing how easy and durable and nonstick it can be, and enjoying the food we cook on it that they will start out their new lives with an already-established appreciation for the usefulness and craftsmanship of old iron.

Why buy “vintage” cast iron?

Cast Iron SkilletCast iron used to be milled in the final stages of production, after being sand cast. This milling provided a very smooth, non-stick surface. As teflon came into vogue in the 1950s, lighter nonstick pans became available and the old fashioned cast iron cookware was abandoned to the point where most of the old manufacturers went out of business.

Modern manufacturing (pretty much limited to Lodge products) does not take this extra step of milling to a smooth finish after sand casting their pans. That leaves a rough, sand-cast surface that food will stick to. We’ve yet to find a modern pan that will stand up to the scrambled egg test; cooking a scrambled egg in it with nonstick results where the only clean up necessary is a quick wipe with a towel. No scraping necessary. The old, well maintained cast iron will perform that way every time.

What to buy

Prior to the 1950s nearly every kitchen used cast iron cookware. Because it is almost indestructible, there’s a lot of the vintage iron still around. Ask your parents if they have any that was passed down through the family. Look in antique stores, flea markets, garage sales, and estate sales. Ebay is an option too. Look for that vintage very smooth cooking surface, and avoid any pans with little chunks out of the cooking surface known as “pitting.”

Here are the vintage brands to look for: Griswold, Wagner Ware (NOT Wagner 1849 – this is cheap China stuff), Lodge (more on that later), Martin Stove and Range, Wapak Hollow Ware, Birmingham Stove & Range Co.

What is the best cast iron skillet? Who makes the best cast iron skillet? In my opinion it is Griswold. They do everything right. The size, thickness and the shape of their skillets are perfect. Even their “bargain brand” Victor, which is a little shorter in height with a thinner wall, is spectacular. Wagner is my second favorite. A little thicker than Griswold and not quite as comfortable. But with a smooth surface and cooks great. Both of these manufacturers produced a lot of cast iron skillets between 1880 and 1950, so you should be able to find them.

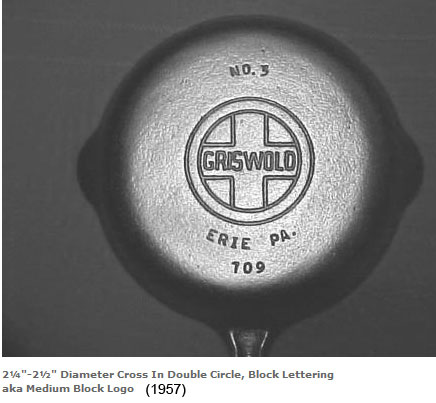
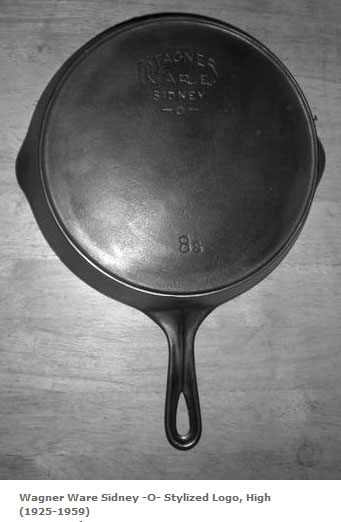
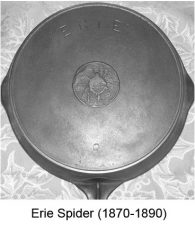
On the bottom of the pan is where the logo is. Griswold and Wagner used different logos over the years. Here is an image guide for each, so that you know the approximate date of a skillet.

Griswold:
ErieErie SpiderArtistic ErieGriswold slant logoGriswold double circleGriswold small block logoGriswold Medium block logoGriswold no ErieVictorVictor Fully Marked
Wagner:
Wagner BlockWagner ArcWagner Sidney O ArcWagner straight centeredWagner Sidney straight lowWagner sidney arc straight highWagner Ware StraightWagner Ware stylized logo centeredWagner Ware stylized logo

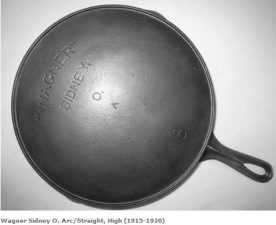
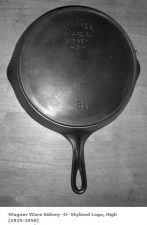
Each skillet will have a number on it. This number is not the size in inches, but rather the “standardized” size of the openings in the tops of wood burning stoves. The oldest pans will have a heat ring or a rim that protrudes from the bottom of the skillet to provide a tighter fit to the stove. Each foundry used slightly different measurements for the size, but here is a general size guideline.

Sizes:
#2 – 4-7/8″ #3 – 5-1/2″ #4 – 5-7/8″ #5 – 6-3/4″
#6 – 7-1/2″ #7 – 8-1/4″ #8 – 8-7/8″ #9 – 9-3/4″
#10 – 10-1/4″ #11 – 10-7/8″ #12 – 11-3/4″ #13 – 12″
#14 – 13″

I think that everyone should have a #5, #8 and a #10.

Cast iron skillet
Another skillet to look for is an unmarked (no logo) one that has three notches in the heat ring. These are old Lodge skillets. You will notice that they are a little thicker than the Griswold and Wagner. But they still have the super smooth cooking surface. The won’t be as expensive as the others and they are great for baking. Think cornbread or Chicago style deep dish pizza.

Twenty five dollars is a good price for a #5. Forty dollars or less is what I like to pay for a #8 skillet. I’ve paid as much as seventy on Ebay for a really nice one. You don’t find many #10s “out in the wild,” as in a garage sale, or antique store. Expect to pay as much as a hundred dollars on Ebay for a #10. Remember these skillets will last forever if you take care of them. So don’t think about them the same way as you would a modern skillet.

How to Restore a Vintage Cast Iron Skillet

When you buy cast iron at an antique store or on Ebay, it will probably be cleaned already, and ready to cook on. But if you find a bargain at a garage sale, estate sale or other place, you will typically have to clean it yourself. It sounds intimidating, and if you have seen some of the scary skillets that I have found at flea markets, you probably would not have bought them. But under the crud and rust, there is GOLD! Well not really gold. But a smooth cooking surface that will make you happy to cook on it every day.

So before I outline the right way of doing it, let me tell you how NOT to do it.

  • Oven Cleaner – you spray extra strength oven cleaner on a cast iron skillet and wrap it in a plastic trash bag. Seal it. Wait a day or two, and then (using rubber gloves) clean it from there. Don’t bother! This method is messy. It never gets everything off in one try. So you will have to do it as many as 4-5 times to get a clean skillet.
  • Fire Bake – make a large wood fire and put the skillet into it. Let it heat up really hot. Then let it fully cool, and then clean it. This method is not advised either. The only time you really want to heat up metal really hot, is when you want to shape it. Unless you are a blacksmith, don’t do this. You might warp the skillet, and it will not be as clean as you want it.
  • Drill and a Wire Brush – Don’t do this. If you use a wire that is hard enough to clean it, it is also hard enough to ruin the cast iron too.
  • Dish Washer – Ahhh no. If you want to cook on cast iron, understand that you will always have to manually clean it. Never use dish soap on cast iron.

The best way to clean a cast iron skillet is with electrolysis. Rust and gunk just comes right off and you’re left with a very clean surface. This method works well, but honestly, if you don’t plan to clean a lot of cast iron, it is not worth the investment.

For your average cast iron skillet buyer, vinegar and lye are the way to clean your new finds.

Vinegar gets rid of rust. Get a five gallon bucket and put fifty percent vinegar and fifty percent water in it. Soak the complete skillet for an hour or two, depending on how much rust is on it. Vinegar is a strong acid and will eat away at the iron if you leave it in too long. Set a timer to remind you. Do not leave it in vinegar longer than necessary.

Lye is how you clean all of the gunk off a skillet. Get another five gallon bucket and put twenty percent lye, and eighty percent water in it. Soak the complete skillet in there for one to two days. Lye is a extremely strong base. It will not hurt the iron at all. You can leave a skillet in for over a year (I have) and it will not harm the metal. But lye WILL severally damage your skin if you get it on you. Use rubber gloves and eye protection at all times when using lye. Be very careful not to splash.

After using vinegar or lye, rinse off your skillet really well with water. Then take it to a sink and turn your water to as hot as you can stand it with your rubber gloves still on. Rinse with the hot water, and apply a very gentle soap like Bar Keepers Friend. Then use a brass scrub brush (brass is a much softer metal than iron) and scrub off any residual gunk or rust from your skillet. Rinse well; iron is slightly porous and you want to make sure you get the cleaner out. Then while it is still hot with the water, wipe dry and heat on a burner on your stove top to fully dry it.

Next, apply a high temperature oil (like grape seed oil, peanut oil or just vegetable oil) generously all over the cast iron skillet. Put the oiled into a pre-heated 400 degree oven for fifteen minutes. Then you are done. You will have a nicely seasoned skillet that will cook like a modern non-stick skillet.

How to Cook With a Cast Iron Skillet

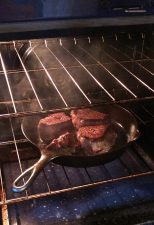
A great benefit of using a cast iron skillet is that you are not limited to the stove top. Since there are no plastic handles you can put it into the oven, also. This is my favorite way to cook steaks. My wife and I prefer a nice, thick, filet mignon cut. I rinse, and then dry steaks with a paper towel 30 minutes before I plan to cook, setting them out so that the meat warms up to room temperature. Go ahead and preheat the oven now to 375 degrees.
steak01 - heat the skillet upsteak02 - sear on one sidesteak03 - ready to flipsteak04 - perfectly searedsteak05 - put in ovensteak06 - perfectly cooked

Put a #8 on the stove top and add a little olive oil to the pan. Set the temperature to high. Now I will lightly cover the steaks with the olive oil so that the seasonings will stick to the meat. I usually just do a little salt, and a lot of pepper, making sure to cover on all sides. Now that the skillet is nice and hot, take the pan out of the oven and put it on the stove top burner at medium-high temp. It’s time to put your steaks on. You want to sear on one side for five to six minutes. Do not touch the meat as it is cooking. Be patient. You will see the rest of the steak close to the cooking surface is starting to change color too. It should be beautifully seared on one side now.

Now it is time to flip the steak, then take the whole skillet and put it onto the middle rack inside your oven. Set a timer for fifteen minutes. Now you need to be patient again. Do not open the oven to check on it. Let it cook.

After the timer goes off, go ahead and remove the skillet from the oven. Take the thickest steak and put it onto a cutting board. Go ahead and slice into it to check if it is cooked enough for you. At fifteen minutes of cooking in my oven it is a perfect medium-rare steak. Add another 5 minutes of cooking for each level of steak level you prefer. Next will be Medium. Then Medium-Well. After that you really shouldn’t cook it anymore because it starts to resemble a burger at that point. 😐

Once your steak is cooked to where you like it. Remove it from the skillet and let it rest on a cutting board for five minutes. If you leave it on the skillet, it will continue to cook. Now your steak is ready to serve. That is how to cook a delicious cast iron skillet steak!

A favorite side at our house is cast iron skillet corn. Which is really easy to make. I also use the #8 for this. Melt half a stick of butter in the pan. Then add half of an onion that you have chopped up pretty small. Cook the onions till they start to turn translucent. Then poor in a 16oz bag of frozen sweet corn. Stir occasionally till the corn is fully cooked and starting to caramelize. That is it. Serve with anything.

Additional cast iron skillet recipes:

  1. Cast Iron Skillet Cornbread
  2. Fried Chicken
  3. Burgers
  4. Chicken Fried Steak and Gravy
  5. Cast Iron Skillet Pizza
  6. Caramel Pecan Skillet Brownie
  7. Brown Sugar Cinnamon Apple Skillet Cake
  8. Dark Chocolate Chip Skillet Cookie
  9. Skillet Blackberry Cobbler

How to Clean a Cast Iron Skillet After Cooking

Most of the time after cooking something simple like an egg, you can literally take a paper towel and just wipe the skillet clean while it is still hot. I like to add a little EVOO (extra virgin olive oil) to the seasoning on the skillet and just set it on the rack beside my stove for cooling.

Sometimes, especially when natural sugar in the food has caramelized (like in corn, or onions) there is food residue left on the pan after cooking. That requires a different cleaning method. For example, the thick-cut bacon that we like contains a lot of sugar. After cooking a batch of bacon, a quick wipe with a paper towel won’t do. Than I set it aside to cool off. I will fill the skillet with water (which you never do when the pan is hot. This will crack cast iron) and I will set it on a burner to heat up. While the water is heating I use a metal spatula or a specifically designed scraper to remove the food that is stuck on the cooking surface. Once the water boils, carefully poor out and wipe down with a paper towel. Then add a generous amount of EVOO to the surface to re-season the skillet and let it cool before putting up.

Recommended Reading

If you are interested in the history of the foundrys or would like to see all of the cooking cast iron that was produced in the past. I recommend these two books: The Book of Wagner & Griswold: Martin, Lodge, Vollrath, Excelsior and The Book of Griswold and Wagner: Favorite Wapak, Sidney Hollow Ware. These are known as the Blue Book and the Red book in the cast iron world. Everyone owns them. Well, collectors do. But we aren’t collectors. Right? Right. We just happen to own them because we like books.
There is also a Brown book, Griswold Muffin Pans, which focuses more on muffin pan information.

If you found this article helpful/interesting, please Share it by clicking on the social media links. Thank you for helping us grow!


Marc Morgan is a computer geek in Houston, TX. He is an Army veteran and lived through hurricane Ike in a house with no power for five weeks. He created SurvivingPrepper.com to share his knowledge and to have a place where several of his friends can share their knowledge too. When he isn’t adding new information to his site, Marc enjoys hiking, fishing and anything else he can do with his wife.
 

Chart: When To Plant Your Survival Garden

When to Plant that survival garden.  A great idea for growing vegetables, salads and herbs right next to or on the way to where your bugout location might be.


A great guide to have handy:

Chart: When To Plant Your Survival Garden

How To Build Your Own Solar Thermal Panel From Recycled Trash

The guys at the Sietch have a great little idea here, making their own solar thermal collector with spare parts and trash readily available in any scrap yard  worldwide. This would be good if the SHTF and we had to live off the grid. Enjoy. Let us know if you build your own.

Materials needed:

Water
2 buckets
Drill (with both drill bits and screw bits)
Some scissors
A saw (a simple hand saw will do)
Some wood
A pane of glass.
The back of a small refrigerator.
12 feet of air pump hose used in fish tanks
Backing material (we used an old door mat)
A box of wood screws
Aluminum Foil
Role of duct tape
Angle Cutter (or hack saw)
Time: This project took about 3 hours of constructions time. It took a couple weeks to find all the parts.

Now onto the project. The first thing we did was collect all of the parts.

Our local dump has a coolant removal program that has refrigerators and dehumidifiers that they remove old freon from. With this in mind I found the perfect heat collector. The back of a fridge is basically a heat dispersal system, with a slight modification is can be used to collect large amounts of heat.

Make sure that the freon, or other coolant has been removed, and cut the grill off at the base, near the large coolant holder.

There was an old couch that had been run over by one of the large dump plows, the inside wood was the perfect size for the frame.

I found a pane of glass and an old rubber door mat that made the perfect backing and front.

The glass was a real find, and may be the only part of the panel that may need to be purchased. Make sure your glass is big enough to fit over your collector and have enough room to attach it to the frame.

The door mat was HUGE, so I had to cut it in half. Funny thing seems there was a lot of nasty black goo, and a metal sheet in the middle. Who knew. Remove the metal plate (or cut it in half as well) and leave the goo.

Once The backing was cut to size, it was time to start building the frame.

As you can see I sort of built the frame around the collector, leaving enough backing to hold it all together.

The frame is held on by building a similar frame on the back and driving large wood screws through the front frame, the backing and into the back frame.

I added some foil to the backing. The reason for this is that counter to what you would think, you do not want the backing to warm up. You only want the collector to absorb heat (it was so nice of the fridge company to paint it black for us). The foil will take any sun that was not absorbed by the collector on the first pass and bounce it back over the collector for another try at absorption. The glass cover will keep all the heat inside the panel for further absorption.

Light can pass through glass, but heat can not.

Notice how duct tape was used on the inside to seal all cracks, you could use caulk but I didn’t have any so I used the cheapest option. It worked well, and held the foil in place.

Next we cut some notches for the entry and return ports to the collector.

Note again the use of duct tape to seal cracks.

I got some air pump hose from the local fish store and attached them to the end of the entry and return ports.

The duct tape was applied to make sure it was a tight fit, it was later removed as it was not needed.

Next we attached the collector to the backing, using the mounting brackets that came on the fridge and some duct tape. If you wanted you could use some screws and wood, but I found the tape and the natural tension of the construction to be enough to hold it in place.

Lastly we attach the glass to the top. This serves to trap all the infrared radiation from the sun inside our panel where our collector will absorb it. Again light can pass through glass, but heat can not.

As you can see simple duct tape is enough to hold it on. I would recommend using some sort of mounting bracket however as after a couple days in the sun the tape started to droop allowing the glass to slide off. A few screws would solve this, but I am cheap so I just put new tape on.

Set your panel up at an angle so that it catches the most sun.

Here is the gross part, put one end of the hose into your bucket of cold water, and make sure it is at the bottom of the bucket, next grab the return hose and start sucking. That’s right, unfortunately you have to prime the panel by getting some water into it. This can be done without getting water in your mouth, but inevitably I sucked just a little too hard and ended up with a mouth full of nasty water. I would recommend having a friend do this part. 🙂

Set your cold water bucket (source) up higher than your warm water bucket (return) and the whole thing will gravity siphon. Due to the design of this collector (both ports return to the same location on the panel) it will not thermo siphon. For that to happen I would need to cut the long return pipe and have it exit at the top of the panel.

A word of warning, this panel works VERY WELL. We tested it on a very sunny day and within seconds the water coming out of the panel was hot enough TO SCALD. I burned my fingers. This very hot water is only formed when the water inside the panel is allowed to sit for about a minute without moving. If the water is moving (do to the gravity siphon) the water exiting the return pipe is about 110 degrees, and while hot, will not burn you.

The water does not flow through the panel very fast (as the pipes are very small) but that is sort of a good thing as it allows the water to heat up a lot on its journey through the collector. It does take a while to heat up a 5 gallon bucket of water, I ended up building an insulated return bucket that was all black and sealed on the top except for the port where the water tube enters. This kept the returned hot water hot long enough to be of use.

I let this guy run for a couple of hours one hot sunny day and heated up a five gallon bucket of cold water (measured at 70 degrees F) to over 110 degrees F. The temp that day was about 76 degrees F. If the water is allowed to sit in the panel for several minutes and then forced out (by blowing in one of the hoses) the water was measure at 170 degrees F. All in all we are much happier with the performance (and cost) of this panel. It performs much better than the previous one.

Our next modifications to this design will be to alter the return port so that it will thermo siphon, in this way the return hose can be fed into the source bucket and the water will continually circulate in the panel getting hotter and hotter. We have also talked about adding mirrors to the panel to concentrate more heat. Our goal is to boil water. This entire project cost less than five dollars, as I already had the screws, and the duct tape. The only thing I purchased was the air hose, which cost $3.76.

Enjoy the hot water.

[source]

No Gutters On Your House – Create a “Drain Barrel” (Rainwater Collection System)

Gutterless Rain Barrel - a


This is a great idea for capturing rainwater for your home, garden or even at your bugout location. It comes in handy in places where you may not be able to tap a well or water source directly.
 
I wanted to share instructions on how to build a “drain barrel” for those of you who may not have gutters on your house.  This project is most useful for those of us who have a clearly-defined gouge in our wood chips where the water pours off the roof.
 

Step 1:

 
Purchase three cedar decking boards and screw them together in the shape of a trough. Seal all joined edges with a clear silicone caulk.


Step 2:

 
Obtain containers in which the capture the rainwater; it would be best to find containers with about a 2″ opening.


Step 3:

 
Line up the containers and measure the distance between the center of the containers’ openings. Leave about 1/2″ per container for expansion.  Measure the diameter of the container’s opening and use a hole saw (attached to the drill) to make holes in the trough.


Step 4:

 
Purchase a 10′ length of PVC pipe. It should be slightly less in diameter than your hole. Count the number of holes and divide evenly. Cut the PVC into equal lengths.  Purchase a narrowing PVC conduit to glue to the top of your pipes.  Drill two holes in the widest part of the conduit and use a miter saw to remove the material between the holes. This will make a slit to help drain the water into the pipe and ultimately into your container.


Step 5:

 
Construct some simple “feet” to attach to the ends of the trough. If you drill a hole in the middle of the end of the trough, you will be able to swivel the trough up-side-down on the lag bolt to prevent snow from weighing the trough down during the winter.  Dig a hole on both ends for the “feet”, level the trough, and add concrete to prevent the structure from moving during a hard rain.


Step 6:

 
Rake the area under the trough so that you can remove the containers easily. Insert the PVC pipe, and add metal menders if you like to ensure the container’s slit stays level with the trough. When it rains, the water will be directed from the trough, into the PVC pipe and then into your container.  When the container is full, lift the PVC pipe out of the mouth of the container, remove the container, and water your plants.  When the container is empty, put it back under the trough and slip the PVC pipe back down into the mouth of the container.  If you like, you can purchase a rain barrel with which to pour the full containers.


How To Build Your Own Heavy Duty 275 Gallon RAIN BARREL

Heavy Duty 275 Gallon RAIN BARREL
My wife asked for a rain barrel for her flowers. Our water bill has added up again and again, so I started checking craigslist for possibilities. As luck would have it, I found a polytank that was original used for similac baby food storage. That was great, since I didn’t want to worry about chemicals in the tank killing the plants and garden. The seller offered to deliver for the $35 purchase price. Great deal!!

Step 1:

The first thing I did was to go to the hardware store and get connections so I could hook up my downspouts. I found black plastic tubing that was cheap and useful.

Step 2:

The shower drain is on the left along with the coupling to attach it to the black gutter pipe I got at the store. As you can see the pipe in the background has a square opening, meant to receive the end of a normal downspout from the house.

Step 3:

I couldn’t find a really good connection for the plastic. Most plumbing is meant to be screwed down and wouldn’t work. So, I used 3″ shower pan drain. It was a oversize screw type and I drilled a 3 1/8 hole, slipped the connection in and screwed on the retaining cap. Then I connected the downspout. The sizes were not the same, so I used a rubber connection meant for odd sized pipes. I used metal straps to hold both connections. And as a bonus, the shower drain cover acts as a large item filter for the tank.

Step 4:

I realized I needed a overflow for the water, just in case I filled the tank. (Which has happened twice in the last month!) So I added a second connection that simply goes to the other side and drains into the low ridge between my house and the neighbors, which leads to a sewer drain. So the final product is not the prettiest thing in the world, but it works great and helps to save me a little cash. All parts including the cinder blocks to support the tank were under $100. The tank is up a little to provide some water pressure for the hose. And actually, I may add two more blocks or a water pump soon, because the water pressure is still a little low.

Growing Your Own Vegetables, A Chart To Help.

Knowing what to do and when to plant is critical. This handy chart gives you the guidelines to planting your own vegetables. Good information to create your own survival garden.

growing-vegetables-chart