Guerilla Gardening: Why We Think It’s A Good Idea To Plant Some Preps Along Your Bug-out Routes

Guerilla Gardening is not done by gorillas.  In fact it is usually done by little old ladies who sneak into people’s yards when no one is home.  At least that’s what I do.
Plant fruits and vegatables along your bugout routes

My first act of gorilla gardening was for my friend Joe.  He’d worked for many years on building a home whenever he had money available and help from friends.  The place was a cluttered construction site for a long time.  But as the building was nearly completed, and the construction debris cleared away, there was room in a sunny spot for a small garden.  I knew Joe wanted to grow some of his own food and where he intended to put a garden so when he left town for a week, I made my move.

I collected some discarded 4×4’s and some left over fencing and piled them into my station wagon along with some garden starts and headed over to Joe’s.  It’s a lovely place at the end of a dirt road.  I got to work with my digging fork and turned sod, weeded and formed beds.  I dug holes and erected the posts and fencing.  Then I planted the seeds and starts, salad greens, squash, peas and beans to climb the fence and a bed for perennials like rhubarb, herbs and raspberries.  I watered it all from the rain barrel.  When Joe came home and found it he was delighted.  Since then his garden has expanded to 5 times the size of the original.

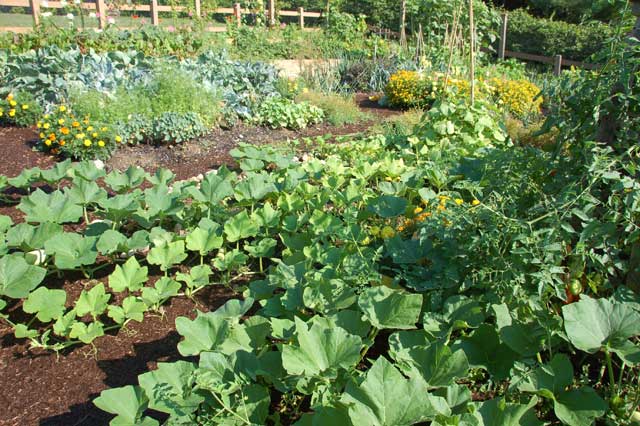
I live on a small lot in town.  The previous owner traveled often so his landscaping was concrete and grass.  Now after 5 years, there’s a native plant garden on the shady side of the house with vine maple and crabapple trees, salal, Oregon grape, red flowering currant, columbine and wild ginger.  In the sunniest part of the yard, right up against the sidewalk, I have my espaliered fruit trees with 10 different kinds of fruit grafted on to 4 trees.  There are 2 blueberry bushes and strawberry plants.  In the beds there are potatoes, squash, peas, salad greens, broccoli, cauliflower and winter greens.  A stately rhubarb fills out one corner and cosmos bloom by the fence.  What a delight to grow my own produce.  I planted greens last August to winter over so I’m eating chard, collards, kale and beets year round. The chard with their red and yellow stems brighten up the flower beds.

Gardening on a small lot

It took a while for me to figure out what grows best here in the Northwest and in my yard.  Then I had to get used to eating what I grow.  But now I’m totally addicted.  I take some with me when I travel.

This spring my elderly neighbor said she wasn’t going to garden this year.  My ears perked up.  I asked, and she said to “Garden as if it was your own.”  That garden has been under cultivation for decades so mostly what I’m doing is weeding and uncovering the volunteers.  There’s lettuce, chard and garlic in abundance.  I added a few squash and beans and covered them with a floating row cover to keep the deer and squirrels at bay.

Another friend is moving from Whidbey where he’s lived for thirty years.  He has a well-established landscape.  I’ve been weeding with him there getting his house ready to sell and hearing about his projects restoring an old house in Port Townsend where he’s planning to move.  Last week while in Port Townsend, I put a couple of big pots on his porch, filled them with potting soil and added salad starts and a couple of squash.  A friend 2 doors down said she’d keep them watered. My friend was touched to find them the next day.  I love guerrilla gardening.

[source]

Self-Watering Seed Starter – DIY

DIY Gardening Tip

Reuse old bottles to make this clever seed starter! A great way to start off your seeds now and be ready to plant soon.


How To Make Your Own Vertical PVC Planter

Short on space for your garden? Go vertical. Upright planters let those short on space still experience the joys of gardening. I’m so glad that there are options out there! The Owner Builder Network has put together a fantastic tutorial on how to make one of your own from PVC pipe.

Do It Yourself, How to make your own vertical garden in a small space.

Here’s a step by step guide on how to make your own vertical planter.

DIY Vertical Planter

Materials:

– Any length 100mm-150mm (4″ – 6″) diameter PVC or any other kind of pipe
– Potting mix and compost
– Plants (not large plants or bushes)
– Large pebbles of about the same size for added support/stability
– A drip irrigation pipeline (or you can simply water from the top and it will trickle down) *

Tools:
– A drill and circular drill bit OR
– A jigsaw if you don’t own the above
– A hacksaw (if pipe needs to be cut down)
– Marker pen

Materials and Tools

Important:

A minimum of 25% of your above ground height needs to be below ground, to ensure stability. e.g. if you want your planter to be a metre high then the overall length of your pipe must be 125cm (or more).

How to:

If you are using an off cut or leftover material from a previous job, then the size and height of your project have already been determined for you.

If you are buying the materials you need to decide on the height and width of the pipe. For a 100mm pipe it is recommended to have only one hole in a horizontal row so the plants have enough room for their roots to grow. For 150mm pipes you can have up to 3 holes in each horizontal row depending on which plants you choose (three holes for flowers only, the rest either one hole or two).

Using a marker pen, mark out the holes you want to cut for your plants using the guidelines above. The size of the hole directly depends on the plants type and size.

Using the markings, cut the planting holes using either a hand drill with circular drill bit or a jigsaw.

Cutting the holes...

Set up the pipe in a large pot or directly into the soil, using the pebbles for additional stability.

Set up the pipe in a large pot or directly into the soil.

Finally, put the compost and soil into your pipe and start planting.

Keep the water up to your plants and sit back and reap the rewards.

* Because the planters hold only a limited amount of soil, it is essential you keep the water up to your plants. If you are relying in watering only at the top of the pipe, you’ll find that the plants at the top will get plenty of water but those at the bottom will get a lot less dry. That’s fine if you plant accordingly, but the best solution is to insert a weeper hose into the main pipe. This can be purchased or simply made by using 1″ conduit drilled with weep holes down it’s length. Wrap this inner conduit in geo-fabric or weed-cloth to prevent it getting blocked over time.

[source]


Plant Now: Winter Sowing

Sowing The Seeds Of Love

[Source]

BELIEVE IT OR NOT, I start my summer garden in January, using a neat trick called “Winter-Sowing.” Winter-sowing is an outdoor method of seed germination (invented by Trudi Davidoff) which requires just two things: miniature greenhouses (made from recycled milk jugs) and Mother Nature. You can winter-sow your way to a beautiful garden, too…for pennies. Here’s how:

Make a Greenhouse. You can make a greenhouse from any container you like, so long as light can penetrate its walls. Like other winter-sowers, I use recyclables, including gallon-size milk- or water- jugs, and 2-Litre soda-pop bottles. With jugs and bottles, use a pen-knife to cut around the middle, almost all the way through. The uncut half-inch or so will serve as a hinge.

Next, punch out drainage holes in the bottom. A Phillips screwdriver, heated over a flame at the stove, will facilitate the hole-punching job. Punch out also a few holes along the top portion of the container. These extra holes increase air-ventilation. Ventilation, of course, is the key to preventing excess heat from building up in the greenhouse, and baking the seeds to death. If there is a cap on your jug or bottle, remove it. 

Select the Right Soil. It is essential to use a soil mix that drains well, and has a light, fluffy consistency. Pour the soil, preferably to a depth of 3 to 4 inches, into the bottom half of your container. Then moisten the soil thoroughly and let it drain.

Sow the Seeds . Sow your seeds on the soil surface, and then cover them with more soil, when necessary, to achieve the proper planting depth. Gently pat the mix down, so that seeds and soil make good contact. Then replace the lid, and secure it with a strip of duct tape, as illustrated.

If you live in a cold climate, as I do, plant your perennial and hardy annual seeds first. Should these sprout during a weird warm-spell in winter, they will not be harmed. Wait until March to plant your tender annuals. More details here: What Seeds Are Best For Prepping.

Remember to Label! For each sowing, indicate with a permanent marker (or a paint-pen) the seed variety and date sown. Do not omit this step, for there is nothing worse than finding, in spring, dozens of miniature greenhouses brimming with seedlings, and not knowing what they are!

Bring the Greenhouse Outdoors. Your greenhouse, once planted and labeled, is ready to brave the outdoor elements. Select a location that is safe from strong wind, but where sun, rain and snow will be freely admitted. My assorted greenhouses go on the patio table, out of the reach of Lily the Beagle who would otherwise knock them over. For further protection from tipping, I place them in a large plastic box, with drainage holes melted in the bottom.

Relax. Now sit back and let Mother Nature do her thing. As the weather chills and warms, your seeds will freeze and thaw. These natural actions loosen the seed-coatings. This is why advance soaking or nicking of hard-shelled seeds, such as Morning Glories and Sweet Peas, is not necessary when you winter-sow.

At the first kiss of spring, but while nights are still freezing, seedlings will begin to emerge. Now is the time to check for water. Open the tops, and if the soil appears dry, moisten thoroughly but gently, so as not to disturb tender root systems. Then close the tops again. On warm, sunny days, I open the tops for hours at a time, and let the seedlings enjoy the fresh spring air. The tops, of course, are closed at dusk.

I can’t tell you how advantageous winter-sowing can be. Last year I produced an entire garden’s-worth of perennials this way (far too many, in fact), without the need for light-systems, heating devices, or fancy seed-starting kits. And, unlike windowsill-germinated seedlings, which more often than not are frail and spindly, winter-sown seeds grow up to be strong, sturdy plants, completely prepared for glorious careers in the open garden.

If I were you, I’d give winter-sowing a try. Honestly, it’s the easiest, most cost-effective way to achieve a beautiful garden.

[Source]