OmegaMan Tested: EDC Survival Keychain by Survivalhax

EDC Survival Keychain

Field tested by our guest blogger, OmegaMan quoted: “A great little paracord keychain with a ear piercing whistle attached to a durable aluminum case filled with survival essentials!”

EDC Survival Keychain

“This is a great addition to any preppers’ everyday carry (EDC) or bugout bag. Here’s what you will be shocked to find inside the survival case: Fire striker bar & tinder, fishing swivels, fishing float & weights, fishing line & hook, 2 safety pins, a wire saw, and a knife!”

DETAILS:

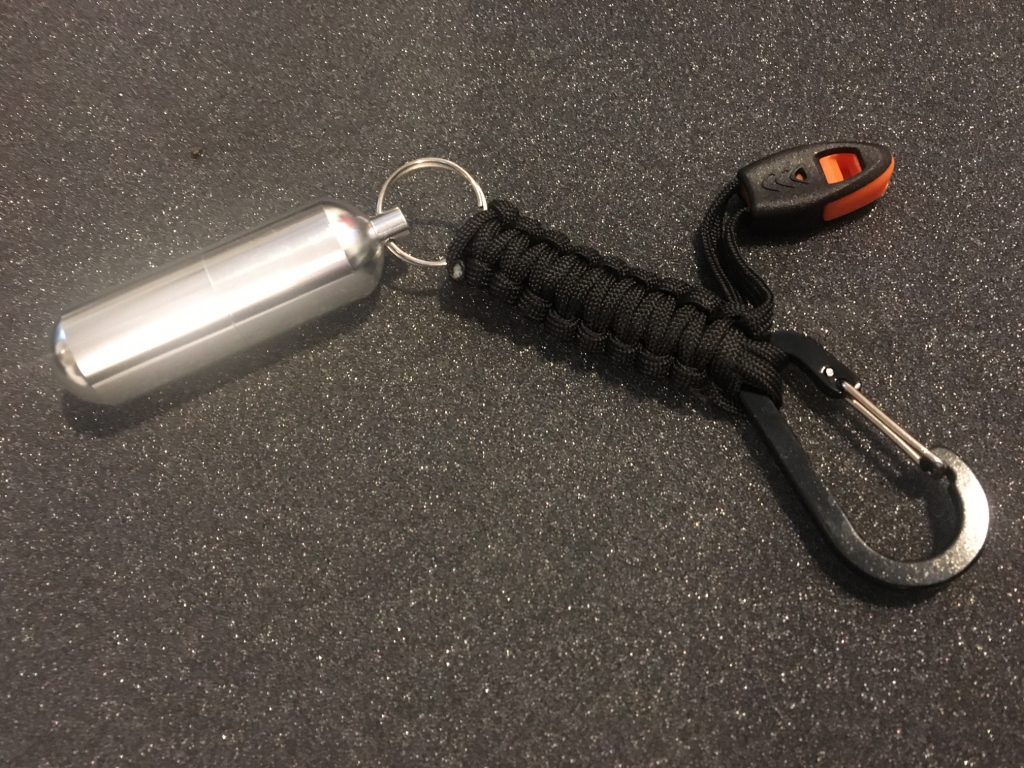
It’s a key chain, a survival kit, and a waterproof pill container all in 1.

The 10 in 1 Paracord EDC Keychain is a waterproof aluminum EDC (everyday carry) pill bottle.

A durable carabiner and 550 paracord are used so you can take this mini survival kit anywhere.

If you carry your car keys everywhere, you’ll have a much better chance of surviving the apocalypse.

No need for a bug out bag, this is small enough to fit in your pocket.

What’s Inside?

There are technically 11 separate pieces inside the canister. 

  • Fishing line
  • Hooks
  • Weights
  • Floaters
  • Sinkers
  • Swivels
  • Eye knife
  • Cotton tinder
  • Fire starter rod
  • Safety pins
  • Wire saw

The paracord is over 4 feet long when unraveled and has an emergency whistle attached to it.

Our goal was to make a reusable PSK (Personal Survival Kit) that gives you the ability to catch a fish, gut it, and cook it.  Sure there are easier ways to do this, but none that fit on your keychain.

What Can This Mini Survival Kit Do?

From nothing, you can make a Fishing Pole 

  1. Can you find a branch in the woods?  Great you’ve got a fishing pole.
  2. Open your EDC bottle and pull out the fishing line.
  3. Tie the line to one end of your branch or stick.
  4. Attach your hooks to your fishing line.
  5. Add your sinkers and floaters.
  6. Find a bug or worm for bait.
  7. You are now fishing, bushcraft style.

No survival kit would be complete without a way to start a fire.  And in order to start a fire, you need wood. The finger chainsaw can slice through branches with enough elbow grease. Slide two sticks in the finger holes for extra torque.

Contents:

  • 1 x Waterproof EDC container
  • 1 x Paracord
  • 1 x Fishing line
  • 2 x Hooks
  • 2 x Weights
  • 2 x Floaters
  • 2 x Sinkers
  • 2 x Swivels
  • 1 x Knife
  • 1 x Tinder cotton
  • 1 x Fire starter
  • 1 x Saftey Pins
  • 1 x Finger saw
  • 1 x Whistle
  • 1 x Carabiner

Specs:

  • Total length: 9.2 inches
  • Bottle length: 3.3 inches
  • Bottle width: .9 inches
  • EDC bottle material: Aluminum Alloy
  • Paracord length: 3 inches
  • Untied Paracord length: 4 feet
  • Weight: 0.14 pounds

ORDER NOW

Step-By-Step Guide For Performing CPR On An Adult

Everyone should know CPR. It can save lives in dire situations and is relatively simple to learn. Here’s a step-by-step guide that teaches you what you need to know.

Cardiopulmonary resuscitation (CPR) delivers oxygen to the brain and other major organs until medical professionals arrive and can better administer care. It can save the life of someone whose heart or breathing has stopped by nearly drowning or heart attack.

This is serious stuff. If you know CPR, you can save a life and keep a person from brain damage. It is, quite literally, a life and death matter. Plus, you could end up in one of those dramatic recreations like they used to feature on Rescue 911! which could be your 15 minutes of fame.

The Red Cross tells the story of a young boy who fell into a pool and was pulled out after going unconscious. After being saved by CPR, admitted to, and then released from the hospital, his father had this to say:

Myles was dismissed from the hospital the next morning and, despite everything that happened, was adamant about going to Worlds of Fun. This was the best Father’s Day gift I could have ever received, watching my wife, son and daughter reunited and healthy, playing together again! No days are taken for granted any longer!

For this reason, the American Heart Association recommends CPR be administered by bystanders and those formally trained alike. When death is on the line, it’s better to do something to try to help than nothing.

Here are some guidelines. If you’ve never been formally trained in CPR, perform hands on CPR only. This is 100-120 compressions per minute with no more than a 10 second break between cycles.

If you’re well-trained, perform CPR and rescue breaths. If you’re rusty, stick to compressions.

In 2010 the American Heart Association made a startling change to the recommended CPR steps, stating that compressions alone can be as successful as compressions and breaths together.

Let’s be honest and admit that’s kind of a relief. Basically kissing a complete stranger isn’t always the most pleasant experience.

Let’s take a look at these steps to CPR.

Check The Vitals Of The Person

Cardiopulmonary resuscitation (CPR) saves lives.

Perform the following steps:

  1. Check the scene for immediate danger. Make sure you are not putting yourself into harm’s way by going to the person. Is there a fire? Is there traffic? Live wires? If you are able to prevent danger, do so. If not, carefully pull the person to safety. Ideally you will place a blanket under the person to drag them.
  1. Check for consciousness. Tap the person on the shoulder and say loudly, “Are you OK?”. If they respond, CPR is not needed. In fact, it would be really odd, and possibly illegal if you began performing CPR on them.

You can apply first aid care or call 911 if you think it is still necessary.

  1. Call for help. If they do not respond and you are alone call for help. You want to get medical professionals on the scene as soon as possible. If someone is nearby, have them call and you can begin to perform CPR.
  1. Check for breathing. Unless you’re a trained professional do not take time to check for a pulse. Instead check for signs of breathing. See if the chest is rising and falling. Feel if there is air coming in and out of his or her mouth. If there is no signs of breathing follow these steps.

Begin Performing CPR

  1. Remember the acronym CAB. While administering CPR, use CAB to remember the correct order of the steps to CPR. The letters stand for compressions, airway, and breaths.
  1. Do compressions to restore blood circulation. Place the victim on his or her back. He or she must be lying as flat as is possible during compressions for safety. Slightly tilt their head back.

Put the heel of one hand on the breastbone 2 finger-widths above where the lower ribs meet. This will be right between the nipples. Put your other hand on top of the first, palm down. Interlock the fingers of your second hand with the fingers of your first hand. Position yourself directly over your hands. Keep your arms straight and rigid.

Perform 30 chest compressions pushing the chest down no more than two inches. Do this at the rate of 100-120 compressions per minute.

The rate of compressions would keep the beat to a song such as “Stayin’ Alive”. Sing that in your head to get the right rhythm if it helps. Or you could sing it out loud, which may either have a positive or negative effect on the person in question, depending on their preference for disco.

  1. Clear the airway. Place one palm on the victim’s forehead and lift his or her chin with your other hand. Gently pull back the head to look inside the mouth and see if there is any obstruction. If you see something obvious in the airway, such as a large football, remove that first.

Take no more than 10 seconds to look for signs of breathing. Is the chest moving up and down? Can you feel breath coming out of the mouth?

Learn CPR for survival

  1. Give rescue breaths. With the airway open, give 2 rescue breaths if you are trained in CPR. Give a one-second long rescue breath. If you see the chest rise, give a second breath. If it does not rise, tilt the head and lift the chin again. Then proceed to try your second breath.

If there is no sign of your breath entering the lungs, perform the Heimlich Maneuver. Straddle him or her with your face facing theirs. Place one fist just above the belly button and the other on top of the first hand. Thrust a few times. You are doing this to dislodge anything that may be blocking the trachea. If this is unsuccessful resume CPR.

https://youtu.be/vniHzDM9Ivs

  1. Begin again with CAB. Thirty compressions and 2 breaths are considered one cycle. After giving two breaths, resume compressions. Continue CPR until there is movement or help arrives. If you are taking turns performing CPR with another person, minimize breaks between switches.

Using an Automated External Defibrillator

  1. If you are too exhausted to continue, use an Automated External Defibrillator (AED) if one is available. This is used to jumpstart a person’s heart. Before you turn it on make sure there are no puddles or standing water near by.

Seriously. Using an AED in or around water can be a shocking experience. Yes, that was a terrible joke. No, we won’t take it back.

  1. Turn on the AED and follow the prompts.
  1. Fully expose the chest. Make sure the chest is dry. If he has thick chest hair and you are able, shave spots where the AED pads go. Shave kits are included in most AED kits. Be sure not to cut the victim when you shave him, as this can interfere with rhythm analysis.

CPR is an important skill

  1. Remove any metal the person has on his or her body. Take off earrings, necklaces, piercings, and underwire bras. Also look for evidence of a pacemaker. This should be indicated by a medical bracelet. If you believe the person has a pacemaker you need to keep the AED pads at least 1 inch from the location of the pacemaker.
  1. Attach the sticky pads that are connected to electrodes to the victim’s chest. Follow the directions in the kit when determining pad placement.

learn cpr

  1. Analyze and apply shock. First be sure that no one is touching the body. Press analyze on the AED, and it will tell you if shock needs to be administered.
  1. Leave sticky pads on the victim and resume CPR for another 5 cycles.

Put the Patient in Recovery Position

  1. Once the victim is stabilized and breathing normally, place him or her in the recovery position.

If any funny jokes came to mind while you were performing CPR, you can finally tell them. Although, come to think of it, most people probably won’t find them funny at this point, so maybe save them for later.

  1. This is a lateral recumbent or three-quarters prone position. Gently turn him or her to their side. Bend top knee and use it to keep the body from rolling onto its stomach. Bend both elbows and use them to prop up the body. This position allows victim to breathe more easily. The mouth is facing downward which prevents choking and suffocation.

Conclusion

How to save a life with CPR

This in-depth step-by step guide should instill confidence so that when a person is in danger and needing CPR, you will be able to administer it.

Ideally we would all take an accredited course that includes first aid, CPR, and AED. But remember that it is always better to try and help than to stand by and do nothing.

And if you do CPR on someone, you could also end up marrying them, just as happened to this couple:

Turns out learning CPR can saves lives and improve your love life.

This article originally appeared here at http://www.cprcertificationtrainingonline.com/how-to-perform-cpr/ and has been republished with permission.


7 Ways to Prep for an Economic Collapse

With Trump becoming president, many believe he’ll be able to pull the United States out of its financial difficulties, that everything will finally be ok. However, it doesn’t take a genius to see that things are not necessarily going to get better, especially if you look at the first moves he has made since he came into office.

Trump doesn’t have an alternative to Obamacare, and the almost $20 trillion debt is not going to vanish. In addition, Trump himself said on more than one occasion that we’re in a bubble and, if that bubble were to burst, we’re all in trouble.

No one man, not even the president, is capable of fixing all of the country’s problems. An economic collapse could be triggered by a number of things; let’s not forget that Venezuela descended into chaos after a series of socialist measures followed by the drop in oil prices.


Fortunately, the prepper movement can teach us a thing or two about surviving a dollar collapse. Now, I’m not going to talk about gold, silver, hedge funds or any of the topics you guys know much more about than me. Instead, I’m going to stick to what I know and offer you other ways to prepare, ways that won’t make you look like a crazy Doomsday prepper.

economic crisis

#1. Get Out of Debt

Trivial, I know, but it’s worth repeating a thousand times. Why else are 80% of Americans in debt? There are various theories of what would happen to debt post-collapse and none of them are pretty. The most likely scenario is that you’ll still owe money to the banks, and with an inflation spinning out of control, anything can happen.

#2. Stock Up On Basic Foods

Beans, rice, water… you’ll needs lots of if you’re going to survive a long-term disaster. Many non-preppers think that stockpiling is all about MREs and freeze-dried foods. Quite the opposite; you should be storing foods you already eat, and have a variety of them in your pantry.

#3 Stock Up On Barter Items

Before money, there was bartering, and each economic collapse or recession sees people going back to this form of trading to avoid cash. You probably heard about preppers stocking up on toilet paper, right? This cheap item is going to be one of the most sought-after item when store shelves are empty… but you don’t have to fill your attic with it, you know.

There are other items you can add to your stockpile for dark days: tooth paste, floss, gardening tools, clothes, books and so on.  Add to these food, water and medical supplies, of course, most people living in cities will be desperate for them.

#4. Always Have Cash on Hand

Unless you want your money trapped in banks and your cards locked (like people in Greece experienced during their economic collapsed), you’re going to need cash to pay for things. No, I’m not saying money will be useless; that’s not what prepping is about.

always have cash on hand


#5. Think About the Other Disasters and Emergencies That Could Affect You

An economic collapse will bring with a huge amount of problems: riots, gun fights and an increase in looting, burglaries, home invasions and so on. I’m not saying they will affect you, but you have to think about your safety and security.

#6. Become Partially Self-Sufficient

You don’t have to move out to the wilderness and live in a wooden cabin with no Internet. Starting a garden, installing a few solar panels and setting up a rainwater harvesting system are few things you can do to ensure you have food, water and energy, when the others won’t.

#7. Focus on Your Skills

No, I’m not going to suggest you should learn how to milk a cow or how to forage for wild edibles. Unless you’re interested in learning them, of course. The thing about skills is that, once you learn one, you can barter with it again and again because everyone will want you to help them.

So which skills will be useful in an economic collapse? Things like first aid, plumbing, woodworking, fixing cars, fixing computers and other electronic devices come to mind… but the reality is that any skill could come in handy.

I’m willing to bet almost everyone knows how to do something that could be useful post-collapse. The “trick” is to improve on that skill so you’re able to help as many people as possible. In addition, how about you take on a hobby you were meaning to, but never got to? Gardening, fishing, woodworking – these are just a few of the skills that could come in handy post-collapse.

Final Words

Regardless of whether or not you believe an economic collapse is coming, one thing is clear: there is a chance it will happen. So why not take a few simple steps to prep for it?

Dan F. Sullivan


Best Survival Tools? Real Life Saving Survival Tools List

Every outdoorsman knows that having a survival kit is mandatory when
out there. There are various survival tools on the market from which a
person can choose from. Though, these will vary from one individual to
another as their needs and practices vary too. A hunter, hiker and
fisherman will all have slightly varying survival tools as a result of
the activities they carry out. In each of these activities, a person
should have essential survival tools that can be the difference
between life and death.

Survival Tools List

Some of the usual survival tools that are hard to miss in any survival
quest include; a knife, flashlight and backpack. When picking the best
survival tools, one should consider some crucial factors that will
enable them to survive while in the wild. Read further to learn more
about these factors and our top 10 list of the best survival tools.

Factors to consider when choosing survival tools

  • Water – water is one of the most crucial
    things that we require to survive. But when in the wild, relying on
    boiled water can be tricky as there may not be time to boil it. So,
    having a tool that distills water is a good option.
  • Food – food perishes very fast. And having a
    tool that prolongs or keeps food for long is a good idea to prevent
    you from going hungry.
  • Fire – whether you need fire to offer warmness
    during a cold or rainy night or just for cooking, you must have a
    reliable tool to set up the fire.
  • Shelter – this is a must have for any
    survivalist who intend to spend the night in the wild. Not only does
    shelter secure the survivalist from the cold, but as well offer
    security from wild animals too.
  • Security –the wild can be a very
    life-threatening place to be. Thus, having a weapon for protecting
    oneself is really vital. Always carry one with you as you don’t know
    what to expect.

Top 10 Survival Tools list

  1. Knife

Whatever survival activity you are engaging in, a knife is a very
essential tool to have in every scenario. Whether it’s fishing,
hunting or hiking, all these practices require one to have a knife.
Most of the tactical knives have a number of uses and are not just for
cutting. For instance, survival knives can be used as a security
weapon and to break glass among other uses. Pick a knife made from
quality materials with extra features.

  1. Flashlight

Another vital tool for any survivalist is a flashlight. Similar to the
knife, a flashlight has various purposes besides lighting. It can at
times be used as a defensive weapon or to break glass. Always look at
the features of the flashlight or quality of the
flashlight
to ensure that you acquire one that just doesn’t light
but offers more. Also, pick a rechargeable flashlight with a long
runtime. Another thing to consider when picking a survival flashlight
is its quality and power of the beam.

  1. Backpack

After choosing all the survival tools that you require while out
there, you will need to look for a backpack that will carry if not all
most of the survival tools. There different backpacks on the market
and identifying the best is vital. Look for a durable and well made
backpack with several storage pockets to effectively store your
survival tools. Avoid carrying a very heavy backpack as this might
slow you down.

There is a great variety of backpacks online, and you can save money by using coupons like a Sierra Trading Post discount code.

  1. Hunting rifle

A hunting rifle is a very crucial survival tool for hunters and other
outdoorsmen too. The difference between having an accurate shot at
your game and missing may be determined by the quality of your rifle.
When out hunting, ensure you select hunting rifles from some of the
best brands with excellent features. You don’t want to spend in the
cold at might misfiring at your game.

  1. Portable water filter

We cannot do without water. No matter the activity a survivalist
engages in, they will definitely need water to drink and cook food
with. So, pick the right survival water tools that won’t disappoint
you in the long run. Some people prefer boiling water for drinking but
this usually takes a lot of time. Instead, they can acquire a portable
water filter which can allow the survivalist to drink water from any
source without stressing about it being unsafe for consumption.

  1. Binoculars

It doesn’t matter if its hunting, hiking or mountain climbing, a
binoculars are an important survival tool when out there in the wild.
They will assist you view faraway places and beauties such as the
birds in the sky, top of mountains and many other fascinating
beauties. There are different types of binoculars from which a person
can pick from. Some are good for hunting while others are great for
seeing distant places and images. Choose wisely to select one that
best suits your needs.

  1. Multi-tool

Instead of carrying various small tools separately, a person can
decide to acquire a multi-tool that has several tools in one. Such
tools include; screwdrivers, pliers, a wrench and other tools. The
multi-tool that a person picks should be durably made from materials
such as stainless steel and be long-lasting. A good example of a
multi-tool is the Swiss tool spirit plus. A multi-tool is very
essential and will help you in different scenarios while in the wild.

  1. Lighter

One survival tool that people take for granted is the lighter. There
are different tools that can be used to light fire. And a lighter is
one of them. This tool is small in size and an everyday carry item. It
will help you light the lamp, stove or even firewood depending on the
method you apply for cooking. Lighting fire in a cold environment can
be challenging and that’s why a lighter can be a great option. Choose
a quality lighter and pack it in your pocket or backpack.

  1. Duct tape

Another important survival tool that proves to be essential in
different situations is the duct tape. This tool can be used to repair
waterproofing, as an emergency bandage, to prevent blisters, and as
emergency bandage. These are some of the uses duct tape can be
applied for while in the wilderness.

  1. Plastic bag

Finally, a good survival tool that one should not forget to carry is a
plastic bag. Some of the roles a plastic bag can play out there
include: keeping food, applying it as a backup water container, dry
bag, and to keep small bits of tools. Therefore, a survival plastic
bag should be of an ideal size and built with some of the best
materials. Choose from some of the best brands as this item will store
various survival gears for you.

Conclusion

It’s clear that for a person to survive in the wild, they need
survival tools to use for security, shelter and for preparing food.
Depending on the activity you undertake, a survival tool that you
think is great for you may not be good for another person. Choose the
best survival tool in-line with your duty. For instance a hunting
rifle is good for a hunter but not that important to a fisherman. Take
your time and pick the best survival tools for a smooth and wonderful
time outdoor.

Christopher Joseph is a outdoorsman, survival enthusiast and traveler.
He has good knowledge about every tactical tools that we use in our
survival life. He likes to share his knowledge and write honest review
about tactical tools. You will find his blog here.