Building Your First Hunting AR-15: A Step-By-Step Guide

Crafting a hunting AR-15 from scratch presents a deeply engaging endeavor, offering a sense of accomplishment for firearms enthusiasts. This hands-on project can hone technical skills and allow for personalization, which ensures the final build meets the specific needs and preferences of the hunter. This process culminates in a uniquely tailored, high-performance hunting tool that embodies precision and reliability.
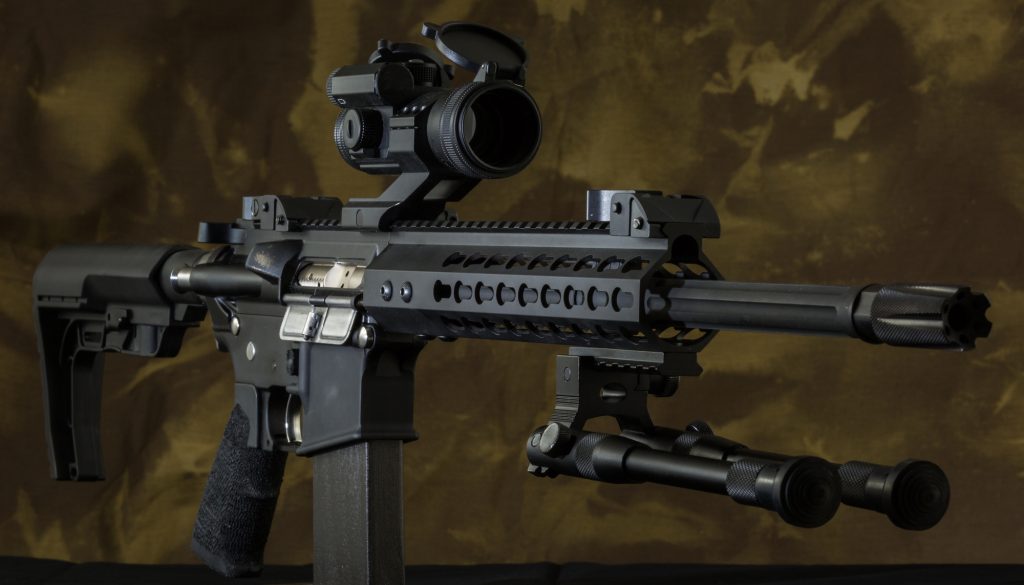
Building Your First Hunting AR-15: A Step-By-Step Guide
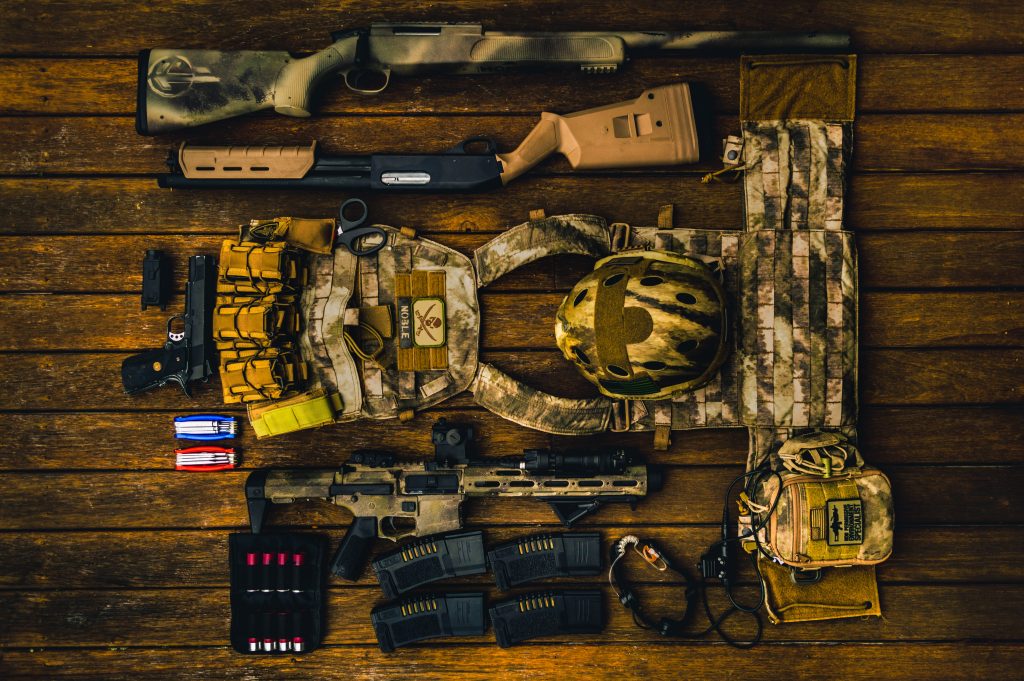
AR-15 M4 Rifle 300 Blackout

While numerous components and variations exist, this guide will cover the essential steps, providing a solid foundation for your first build. Read on to learn more. 

Understanding The Basics

Before diving into the assembly process, it’s crucial to familiarize yourself with the AR-15’s basic components and functionality. The AR-15 platform is renowned for its modularity, allowing for various customizations tailored to hunting needs. Some key elements include the lower receiver, upper receiver, barrel, stock, and handguard, each playing a pivotal role in the firearm’s performance.

On the other hand, if you’re seeking quality parts and expert guidance, it’s best to check out reputable online resources or visit BearCreekArsenal.com and similar options for more information. These resources can offer a diverse selection of AR-15 components and accessories, ideal for custom building a hunting rifle that meets specific requirements.

Planning Your Build

Embarking on your AR-15 hunting build requires thoughtful planning. This initial phase lays the groundwork for a rifle that perfectly aligns with your hunting aspirations. To plan your build properly, consider the following tips:

1. Choosing the Right Caliber

        The choice of caliber is paramount in a hunting AR-15. Popular options include .223 Remington for smaller game and the more powerful .308 Winchester or 6.5 Creedmoor for larger game. Also, consider the game you intend to hunt and local regulations when selecting your caliber.

        2. Selecting Components

        To ensure a favorable building experience, choosing the right components is crucial. Some essential components include: 

        • Lower Receiver: As the foundation of your AR-15, it’s crucial to select a lower receiver that’s compatible with your desired caliber and made of high-quality materials.
        • Upper Receiver and Barrel: These components are critical for accuracy. A longer barrel can offer increased accuracy over distance, which is beneficial for hunting
        • Stock: Choose a comfortable, adjustable stock that can be tailored to fit your body and shooting style.
        • Handguard: Opt for a handguard that provides sufficient space for accessories while ensuring comfort and heat resistance during extended use.
        • Optics and Sights: High-quality optics can greatly enhance your hunting experience by improving accuracy and range.

        Following these planning tips ensures you build your first hunting AR-15 properly and safely.

        Assembling The Lower Receiver 

        The lower receiver houses the trigger assembly, magazine well, and stock attachment point. Begin assembling this component by securing the lower receiver in a vise. Install the magazine catch, trigger assembly, and safety selector following the manufacturer’s instructions. Precision and attention to detail are crucial in this step to ensure the functionality and safety of your firearm.

        Installing The Trigger Group  

        The trigger group critically influences your AR-15’s accuracy and responsiveness. Carefully install the trigger, hammer, and associated springs. Conduct a function test to ensure the trigger assembly operates smoothly and safely.

        Attaching The Stock 

        The stock is attached to the rear of the lower receiver. Depending on the stock type, installation might involve sliding it onto the buffer tube or securing it with screws. Ensure the stock is firmly attached and wobble-free to provide a stable shooting platform.

        Assembling The Upper Receiver 

        The upper receiver assembly involves several key steps: 

        • Installing the Barrel: Secure the upper receiver in a vise and carefully install the barrel, ensuring it’s properly aligned and torqued to the manufacturer’s specifications.
        • Attaching the Handguard: After the barrel is installed, attach the handguard. This component should provide a comfortable grip and ample space for mounting accessories.
        • Mounting the Optics: Choose a scope or sighting system suitable for your hunting needs and mount it securely to the upper receiver.

        Assembling the upper receiver is a crucial milestone, combining precision and craftsmanship to create the rifle’s core. This step can bring you closer to the field-ready firearm.

        Final Assembly And Safety Check

        With the upper and lower receivers complete, the final step is to join them together. This is typically done by aligning the pivot pins and pushing them into place, securing the two halves of the rifle.

        Once assembled, conduct a comprehensive safety check. Verify that all components are securely installed and that the firearm operates as expected. Performing a function test under safe conditions is advisable to ensure reliability.

        Conclusion

        Building your first hunting AR-15 can be a complex but gratifying experience. By keeping the information mentioned above in mind, you can create a customized rifle that meets your specific hunting needs. Remember, patience and attention to detail are key to building a safe and effective hunting firearm. Whether you’re a seasoned gunsmith or a first-time builder, the journey of creating your own AR-15 can offer both challenges and rewards.

        5 Tips on How to Protect Your Hunting Rifle Scope From the Elements

        Just bought a hunting rifle scope and wonder how to protect it when you go on your outdoor adventures? Not sure how to do it or if you need to buy extra equipment?

        Hunting isn’t a hobby you can do sitting at home where you’re protected from the elements. It’s a rugged activity where you and your equipment will be exposed to everything mother nature can throw at you.

        From things like the rain, heat, or cold to accidents like dropping your rifle and scratching the lenses, there are many ways hunting rifle scopes can get damaged while you’re outside.

        Fortunately, there are many ways you can protect and weather-proof your hunting rifle scope without spending a fortune or having to worry about it constantly. In this guide, we’ll teach you how to do it yourself.

        5 Ways You Can Protect Your Hunting Rifle Scope

        Here are five things you can do to protect your hunting rifle scope from the elements. Whether you’re using an LPVO or a simple scope, you’ll want to check these tips out.

        (For more useful information about hunting rifle scopes and firearms in general, check out Shooting Mystery.)

        5 Ways You Can Protect Your Hunting Rifle Scope (For more useful information about hunting rifle scopes and firearms in general, check out Shooting Mystery.)

        Buy a Scope Lens Cover or Dust Cap

        The most effective way to prevent your scope lenses from getting damaged is by getting a scope lens cover (sometimes called a dust cap) for both ends of the scope.

        There are an unbelievable number of lens covers that you can find that will fit any size rifle scope. In fact, many rifle scope companies sell it alongside the scope.

        If your scope doesn’t come with one, you can get a pair that screws on and off, pops on and off, or flips up and away from the scope’s front and rear, allowing you to push the flaps down when you’re done.

        While this part is up to personal preference, the flip-up lens covers are the most convenient — no need to worry about where to store them after use.

        Get a Full-Size Scope Cover

        Other than the lenses, the scope’s body also needs protection. The best ones are made of a neoprene material that protects the metal parts of the scope from corrosion and scratches.

        The neoprene material is usually thick enough to absorb most normal bumps and knocks it can encounter during regular use. These covers also conform tightly to the scope’s housing, providing no extra bulk.

        Even if dirt does get stuck between the neoprene cover and the scope, the material’s soft nature means it won’t scratch or damage your scope.

        Don’t Store the Scope Outdoors

        When you’re done using your hunting rifle and scope, make sure not to leave them exposed to the elements by storing them outdoors.

        Factors like humidity, temperature, water, and oxidation will damage your scope over time, especially if you live in a more humid area or near the sea.

        The safest thing to do with your hunting rifle scope is to store it indoors, where it won’t be exposed to harsh conditions.

        You might also want to consider getting a storage case or bag for your scope and rifle, whether you always take your scope off or keep it on your rifle after use.

        Use a Sling With Your Hunting Rifle

        Using a sling with a hunting rifle is highly recommended for safety and convenience reasons. It keeps your hands free if you need to do other things like grip on trees for stability or dig the bullet out of your prey’s carcass.

        However, using a hunting rifle sling can also prevent damage to your scope. If you accidentally drop the rifle while holding it, the sling prevents it from hitting the ground.

        Using a sling with a hunting rifle is highly recommended for safety and convenience reasons.

        Imagine if you didn’t have a sling. The rifle would hit the ground hard, most likely damaging the sensitive scope, which would be a very costly mistake.

        The sling allows you to be more mobile and walk freely without the rifle getting in your way while keeping it close to the body. This reduces the chances of it bumping into trees.

        Clean Your Hunting Rifle Scope After Each Use

        One step that can keep your hunting rifle scope looking brand new for years to come is regular cleaning. This is because your scope will be splattered with dirt, dust, moisture, and other external elements.

        If you clean your scope each time after hunting and before storing it indoors (and in the case), you’ll prevent any dirt, dust, or particles from sticking to the scope.

        You’ll want to remove any excess dirt particles because some are abrasive enough to scratch the material of your rifle scope, even if it’s marketed as scratch-resistant.

        Just because your rifle scope is rated to be weather-resistant and scratch-resistant doesn’t mean you can be careless with it. It just means there’s a less likely chance it will get damaged if you are.

        How You Can Protect the Rest of Your Rifle

        While protecting your hunting rifle scope, you should also take care of the rifle it’s mounted on. Some of these tips and tricks can be done simultaneously to protect both the optic AND the weapon.

        Put Muzzle Tape on Your Barrel

        Your rifle’s barrel is one of the largest entry points where dirt, dust, and humidity enter. It’s also the part of the rifle most crucial to accuracy.

        Having any rust or corrosion inside the barrel isn’t ideal and can lead to irreparable damage. Taping the front end of the barrel with electrical tape can help cover it up.

        After shooting, the electrical tape will come off by itself. Then, Remove the extra pieces with your hands (unload the weapon first, of course).

        Before you clean the gun and put it back into storage, you can put more muzzle tape again so that you don’t forget it the next time you go hunting.

        Use Protective Anti-rust Coatings

        Using anti-rust coatings on the outside of the rifle can help keep it rust and corrosion free. Make sure to apply these anti-rust or corrosive solvents on the outer part of your rifle.

        Examples of anti-rust coatings are Rem Oil, WD-40, Kroil, and Corrosion-X. You can apply these by putting the liquids on a damp cloth and then rubbing it on your barrel’s exterior.

        Disassemble and Clean After Use

        You should disassemble and clean the parts of your rifle, especially after a particularly dusty, humid, or wet day in the field. You can do this as part of your end-of-day routine.

        Disassembling and cleaning the rifle of all oils and grime helps, especially in icy or dirty conditions. For icy conditions, cleaning up the oil prevents it from freezing and getting too sticky.

        For dirty and dusty conditions, the oil might mix with dirt and dry up as the day progresses, causing it to turn into a thick mush that will clog up your rifle.

        If you’re hunting in frigid weather, consider disassembling it and leaving it in a cold but covered area. Putting it back in average temperatures might induce condensation.

        Frequently Asked Questions

        After learning more about how to protect your hunting rifle scope from the elements, you might have some related questions. Here are answers to the most commonly asked ones.

        Can You Wrap a Scope?

        You can choose to wrap your scope in vinyl skin as an additional layer of protection while you’re out and about instead of using a neoprene cover.

        Most people buy it because you can choose custom designs or add camouflage to a plain-looking scope. Functionally, it can also repel some dirt and prevent rusting.

        However, remember that it shouldn’t be used as a replacement for a full-size neoprene scope cover. This is because it won’t protect against any bumps or falls.

        Can a Rifle Scope Go Bad?

        Sometimes, the rifle scope will go bad (losing accuracy, clarity, or reliability) even if you take care of it properly. In this case, take some time to diagnose the problem before going hunting again.

        If the rifle has just lost its zero, then all you need to do is zero it in again. However, if it constantly loses zero right after adjusting it, there might be another issue.

        If you see fogging or liquids inside the scope, it means that the waterproofing seal has broken, and you won’t be able to trust the scope for any accurate shots.

        If it makes weird sounds whenever you move it, like something is loose inside, then you’ll have to replace the scope. Check with your scope’s manufacturer for warranty claims.

        Can a Rifle Scope Lose Zero?

        If you miss even when your shot should be on target, the most likely cause is that your rifle scope has lost its zero. There are many reasons why a rifle scope loses zero.

        Sometimes, it loses zero because of excessive recoil, improper installation, incorrect scope mounts, or because you’ve dropped the scope hard.

        Some of these issues require reinstallation or even bringing it in for repairs, but you can try to zero in the rifle scope again to see if it still works well.

        Final Thoughts

        Protecting your hunting rifle scope from the elements isn’t as complicated as it sounds. Methods like buying covers for the scope and lenses help prevent damage in most cases.

        However, the most crucial way to keep your rifle scope (and the hunting rifle itself) clean and working 100% is to clean it after every use. It might take up a bit more time out of your day, but 2-3 years down the road, your optic will look almost as fresh as the day you bought it.

        How Long Do Magazine Springs Really Last?

        As a gun owner, you’ve probably assessed your firearm and examined where its reliability could be tested given a slew of survival scenarios. Undoubtedly, you’ve looked carefully at the magazine. It is after all the critical component that a magazine-fed firearm relies on to feed ammo into the chamber effectively and efficiently. Are you positive it’ll always work when you need it to? As you most likely know, a magazine contains a certain metal component which renders the entire firearm ineffective when it breaks or loses its elasticity. We are speaking of course about the spring, which is why the latest project from AmmunitionToGo.com recently garnered our attention.

        How long can a mag spring last? Does leaving a mag loaded for an extended period of time gradually damage its spring? Does the simple act of loading a mag damage its spring in any measurable way? These are the questions Ammo To Go set out to answer by conducting a mag spring torture test (or mag spring enhanced interrogation test, if any congressional committees ask about it).

        Ammo To Go’s Mag Spring Test Process

        The team at Ammo To Go spent almost a year loading, unloading, and testing the spring functionality of 13 different mags:

        • Magpul Gen 2 PMAG (30 rds)
        • Magpul Gen 3 PMAG (30 rds)
        • Magpul Gen 3 PMAG (40 rds)
        • Amend2 AR-15 mag (30 rds)
        • Lancer AR-15 mag (30 rds)
        • USGI AR-15 mag (30 rds)
        • Smith & Wesson Shield 9mm mag (8 rds)
        • ETS Glock 17 mag (17 rds)
        • Glock 17 Factory mag (17 rds)
        • Magpul Glock 17 mag (17 rds)
        • Glock 17 Factory mag (33 rds)
        • USGI 45 ACP 1911 mag (7 rds)
        • Wilson Combat 45 ACP 1911 mag (8 rds)

        First, they used a digital force gauge to establish each mag spring’s resistance. Then they subjected samples of each mag listed above to the following test protocol over the course of year.

        1. Load to full capacity; store in climate controlled environment
        2. Load to full capacity; store in shed where temperatures regularly fluctuate to over 100 °F
        3. Do not load; store in climate controlled environment
        4. Do not load; store in the miserably hot and stuffy shed
        5. Load to half capacity; store in climate controlled environment
        6. Load and unload to full capacity five times biweekly; store in climate controlled environment
        7. Load and unload to full capacity 15 times biweekly; store in climate controlled environment
        8. Load and unload to full capacity 15 times biweekly; store in the same horrible shed

        The ATG crew regularly took the mags to the range for field testing throughout the duration of the test. Their team fired one round every two seconds, and then used the same digital force gauge to determine whether the mag springs’ resistance values changed in any significant way.

        The Mag Spring Torture Test Results

        After about ten months, hundreds of hours, thousands of rounds, and countless mosquito bites, their team determined the following: zilch.

        Allow us to elaborate using the PMAGs as an example. Regardless of how frequently they were loaded or unloaded – and regardless of their storage conditions – not a single PMAG failed. The digital force gauge revealed zero significant variability in their springs’ resistance!

        This isn’t to suggest that the PMAGs weren’t changed over the course of testing. In many cases the springs put up 20-25% less resistance than they had when the mags were fresh out of their factory packaging. Even so, all of the PMAGs performed flawlessly during field testing, and the other manufacturers’ mags followed suit.

        So, They Did Even More Testing

        The test protocol revealed that factory mags are pretty much unaffected by regular usage. But they wanted to determine precisely how much punishment a mag can tolerate before its spring starts pushing up daisies. That’s why they recruited help from the only people who are bigger nerds than us: the laboratory technicians of Applied Technical Services.

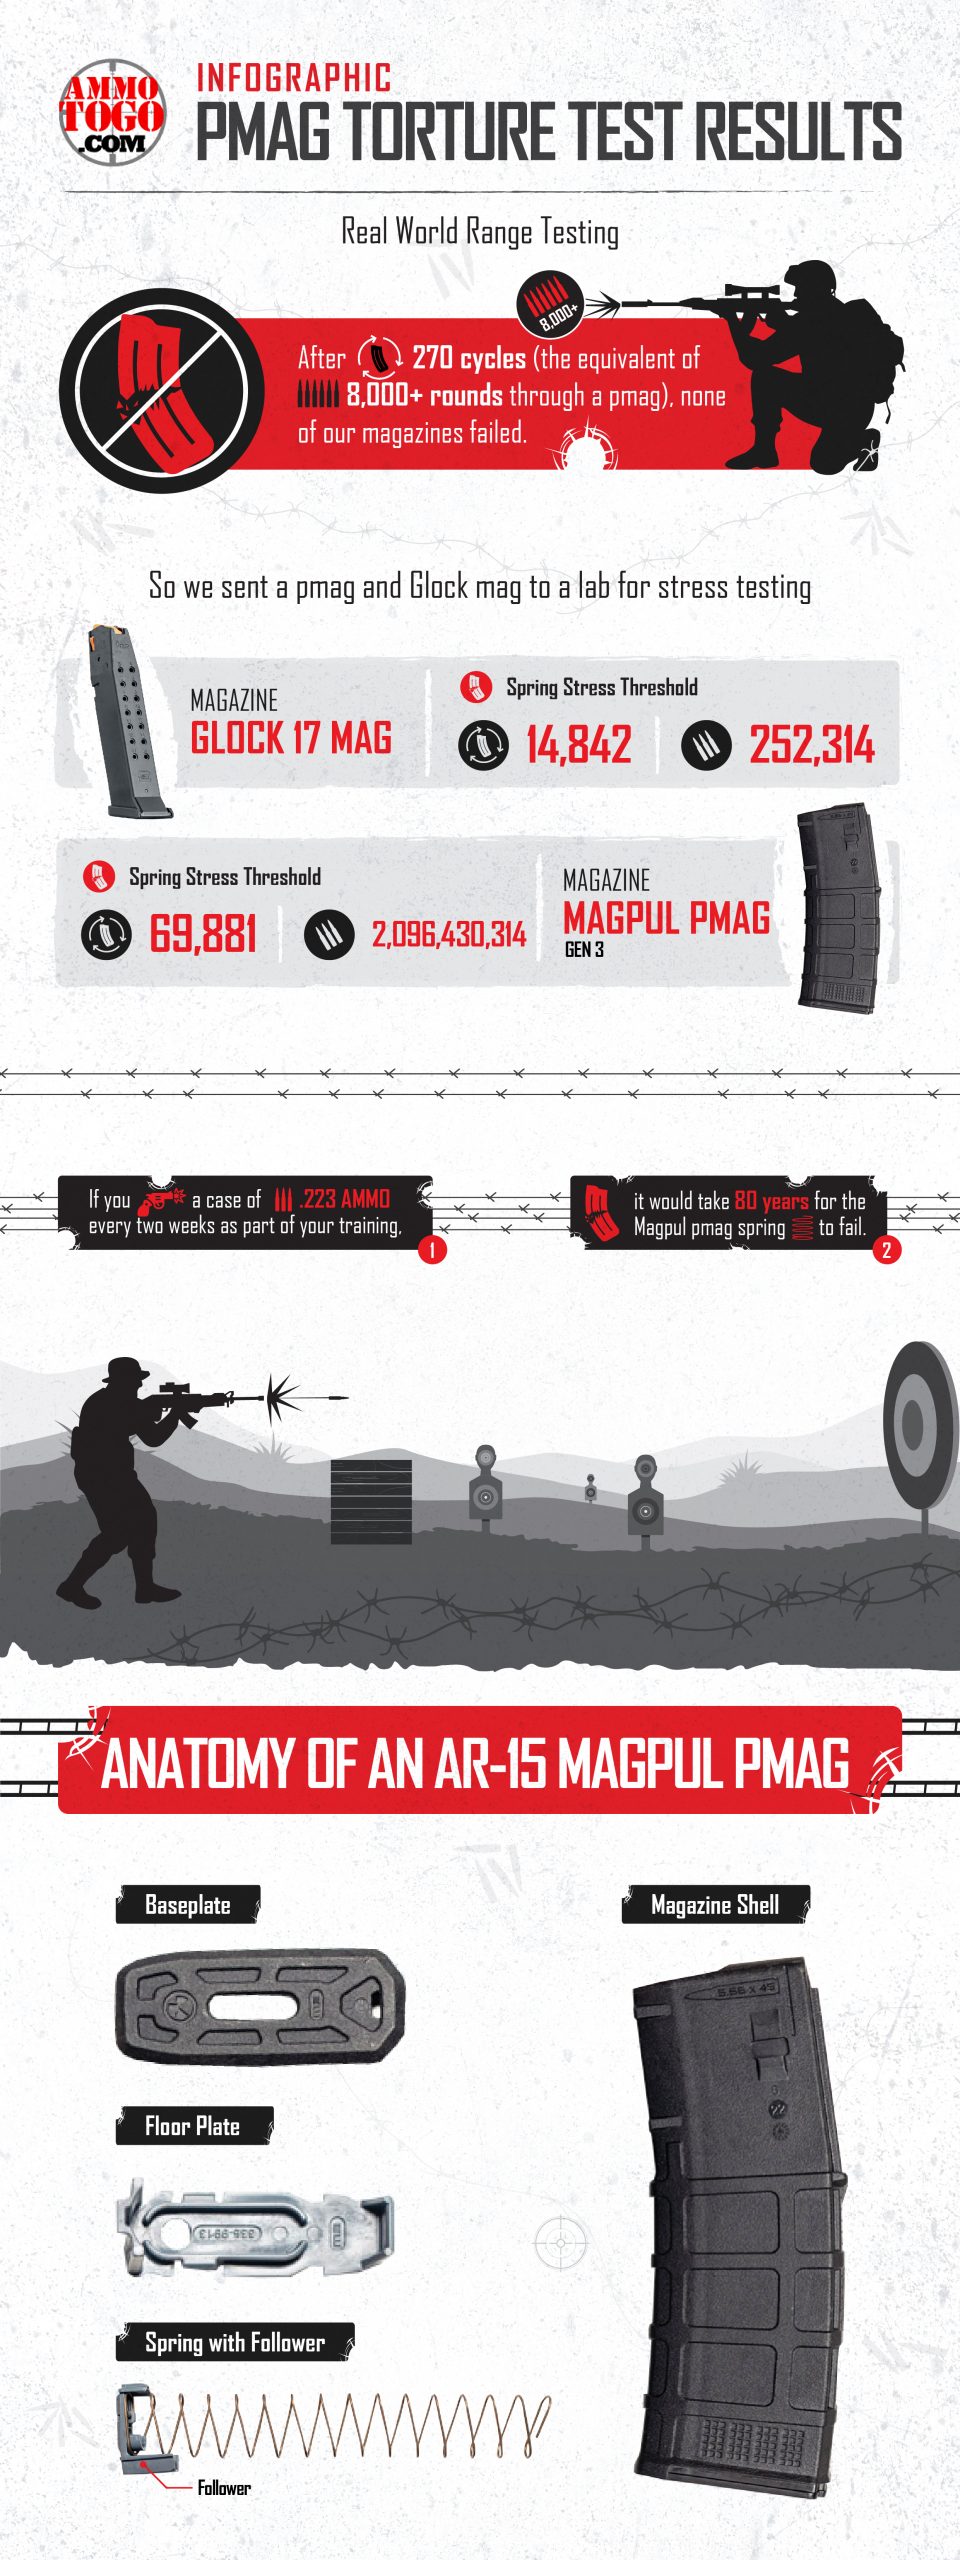
        The team gave ATS a factory 17-round G17 mag and a 30-round PMAG. They slightly modified each mag to fit correctly into their spring compressing contraption and proceeded to punish the absolute bejeezus out of the poor little springs.

        Their results were fascinating. The G17 mag spring endured 14,842 cycles (the equivalent of 252,314 rounds) before it snapped; the PMAG endured 69,881 cycles (2,096,430 rounds) before it finally gave up the ghost. To put that into context, if you were to fire a case of 223 Rem ammo every two weeks, the PMAG spring would endure for eight decades. That’s bananas!

        Infographic: PMAG Torture Test Results

        Test Limitations

        You can’t pretend that ATS’s testing perfectly emulated real world conditions. When they’re used by actual firearm enthusiasts, mags get dirty, subjected to temperature fluctuations, dropped, quickly reloaded, and otherwise mistreated. You can reasonably expect environmental damage to shorten a mag spring’s lifespan, but their tests didn’t confirm that expectation through scientific experimentation.

        Regardless, it’s safe to conclude that mag springs are outstandingly rugged. Kudos to the manufacturers for appreciating just how essential springs really are!

        Does Storing a Mag Half Loaded Extend Its Lifespan?

        Many folks believe they can protect their mag springs by “downloading” – i.e. loading their mags shy of full capacity. Their reasoning is simple enough: by avoiding full compression, the spring retains its resistance and full functionality.

        The ATG team put this theory to the test by downloading Gen 2 and Gen 3 PMAGs, as well as Amend2 AR, G17 and S&W Shield mags. After 10 months of identical use and storage conditions, they measured no significant difference in spring resistance between the downloaded mags and analogous mags that they left unloaded or fully loaded when they weren’t in use. Like we pointed out earlier, the test’s protocol doesn’t perfectly emulate real world conditions, but there’s no evidence downloading poses any actual advantage.

        Conclusion

        At the end of the day, it’s typically wear and tear or factory defects that render mags ineffective – not gradual spring deterioration. So long as you take care to maintain your firearm, you can expect reliable performance from your mag for many decades. One less thing to worry about, we say!

        5 Tips to Purchasing Gun Safe Dehumidifiers

        Protect your guns, ammo, and gear.

        Every household that owns a series of firearms should have a gun safe installed within the premises. Gun safes help to secure your firearms and eliminate the risk of unauthorized access. However, excessive humidity can gradually percolate into the safe, causing metal components to rust. Too much moisture also leads to warping of wooden parts and development of unsightly molds.

        To prevent the accumulation of moisture, it’s important to purchase a gun safe dehumidifier. Such units are frequently used to eliminate dampness, ensuring that your safe remains dry and mold-free.

        Here are 5 tips to purchasing gun safe dehumidifiers:


        • Choose the right type


        Dehumidifiers are essentially of two types: electric and desiccant dehumidifiers. The former type works by generating enough heat to evaporate all the moisture that exists within the gun safe. Most people prefer electric dehumidifiers because they’re highly effective in overly humid environments. Desiccant dehumidifiers, on the other hand, use absorbent elements to soak up all the moisture within the safe. They work just like a sponge. These dehumidifiers are perfect for those individuals who want to save up on electricity. Silica gels are often used to absorb humidity.


        • Consider your budget


        It’s important to have a certain price range in mind before purchasing a gun safe dehumidifier. Desiccant dehumidifiers are generally more affordable than their electric counterparts. In addition, they will not spike your monthly electricity bill and you won’t keep worrying about purchasing replacement parts for them. Electric dehumidifiers are more luxurious and effective at eliminating excessive humidity compared to desiccant units, making them widely popular. Your financial situation will determine your ultimate choice.


        • Level of humidity


        Some regions experience extremely humid conditions while other places are only mildly humid. The place you live will certainly influence your decision when buying a gun safe dehumidifier. Electric units use a heating element to vaporize any trace of moisture within your safe, making them perfect for highly humid environments. Desiccant dehumidifiers would best suit you if the level of atmospheric humidity is low where you live. When it gets too humid during the summer, consider getting an electric dehumidifier to offer added protection to your gun safe.keep ammo dry

        • Product warranty


        In case the gun safe dehumidifier you purchase is defective or gets damaged, the manufacturer should offer a free repair or replacement service as stipulated in the product warranty. Some companies offer full lifetime warranties for their dehumidifying units while others offer limited warranties. It’s wise to consider the terms of warranty of your preferred dehumidifier. This way, you can confidently return it when something unprecedented occurs.


        • Ease of installation


        Some dehumidifiers come with a complicated set of instructions that make it extremely difficult to set up. A good gun safe dehumidifier should offer easy installation guidelines. If you find yourself scratching your scalp in utter confusion, seek help from an experienced professional. You can call customer support to help you out, or request for a technician to come over and install the dehumidifier on your behalf.

        These few tips will help you purchase an exquisite gun safe dehumidifier that suits you.

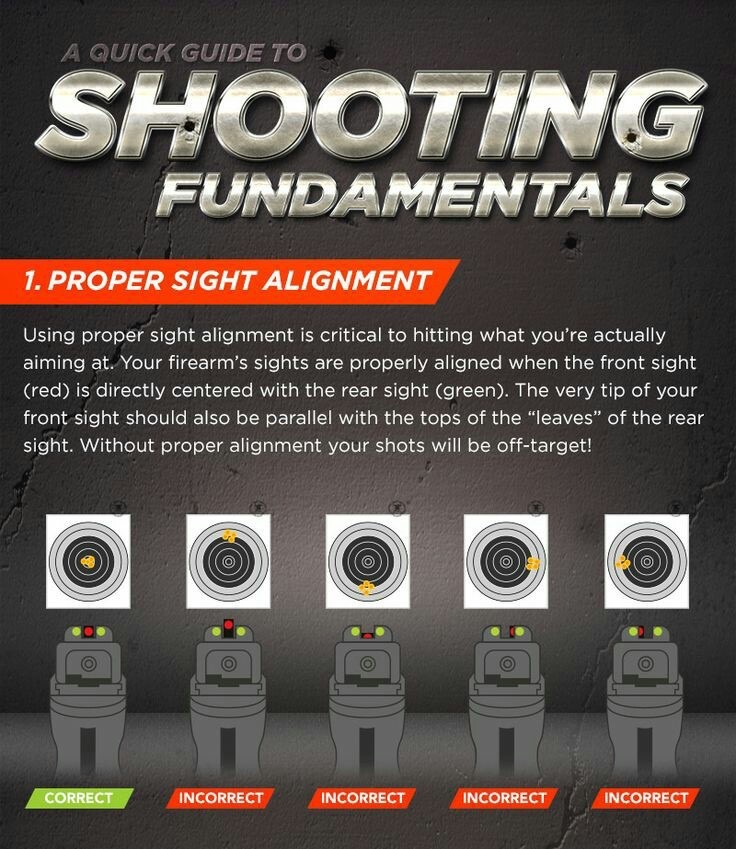
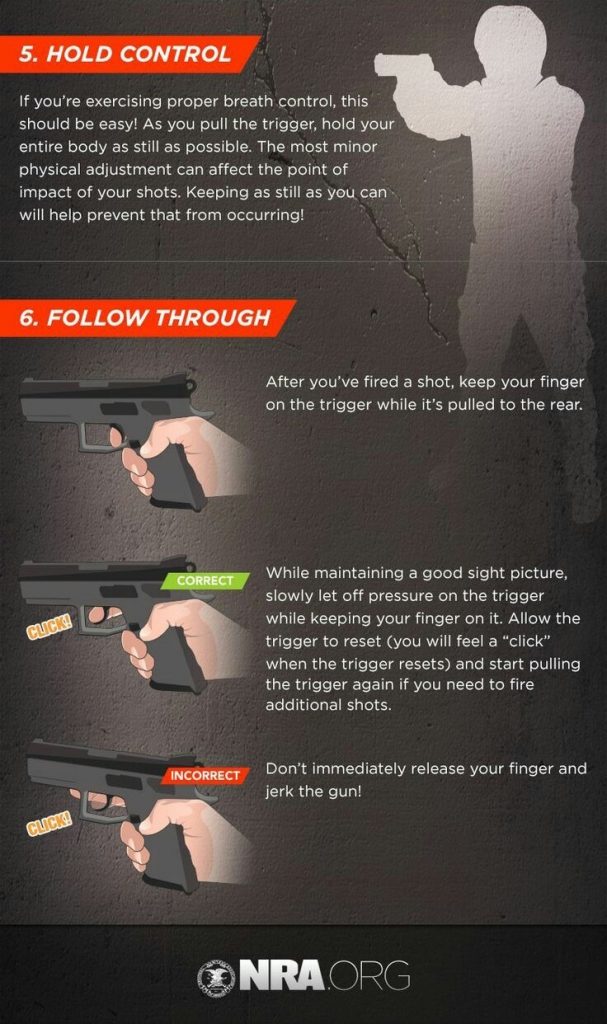
        A Quick Guide To Shooting Fundamentals [infographic]

        Shooting Fundamentals

        [source]


        5 Tips To Keeping Your Gun Safe At Home

        With the continued debate revolving around gun control, it is quite clear that there is a significant portion of the society that is of anti-gun sentiment. Anti-gun people have a legitimate basis for their claims, especially on issues to do with mass shootings and violent crime. However, if you are a legal gun holder, and would like to keep your second amendment rights, then you need to do everything within your power to eliminate any incidences that might increase the anti-gun sentiment. That’s why you need to always store your gun safely. To help you out with this, here are 5 tips to keep your gun safe at home.

        1.    Make use of trigger locks

        A trigger lock is one of the best ways to keep your gun safe at home. It prevents unauthorized individuals from making use of your gun. The whole mechanism is to stop the trigger from manipulation.  To ensure that the trigger lock gives you maximum safety, ensure that it installed when your gun is unloaded. Most new guns come with their own safety locks, reducing the hustle of acquiring one. However, if you have an older gun, you easily purchase one from your local guns dealer.

        1.    Use a gun case

        One of the risks you face as a gun holder is for your little kids to gain access to your gun and harm themselves with it. That can happen if you store your gun in drawers. To keep it safe, get a gun case. This allows you to not only lock the gun-in, but also conveniently walk around with it, away from the curious hands of minors. A gun case also allows you to leave the gun at home, with the guarantee that no one can access it. It’s one of the safest ways to handle your gun.

        1.    Purchase a storage box

        A strong box is one of the best ways to keep your gun safe at home. That’s because it is not only portable, but also has sophisticated locks, that can’t be unlocked by anyone other than the gun holder. Some of the best gun storage boxes come with customizable codes as well as biometric sensors that only the owner can open. These technologically advanced features make the gun storage box one of the best ways to keep your gun safe at home.

        1.    Keep the gun unloaded

        To ensure that chances of an accidental gun discharge are significantly reduced, always keep it unloaded. In fact, make sure that the only time you keep your gun loaded is when you intend to use it. By keeping it unloaded, you are sure that chances of an accident are close to zero.

        1.    Purchase a gun safeTop 10 Best Gun Safes 2018

        A gun safe is probably the most effective way to keep your gun safe at home. The best gun safe comes with customized racks that not only keep the gun securely strapped, but also keeps them well maintained. On top of that, gun safes have steel exteriors, which makes it almost impossible for someone other than the owner to gain access to the gun.


        Storing Your Survival Supplies

        Prepping involves gathering and storing many things. As you start spending more money you will inevitably start worrying about keeping your stores safe from theft, the elements and other issues. Also you will find that keeping them all sorted and organized becomes quite the endeavor. This is where purchasing secure weapon, food and/or tool storage can kill two birds with one stone, so to speak. For the serious prepper who wants heavy-duty, extra secure storage you may want to consider purchasing secure weapon storage and use it for other things as well.

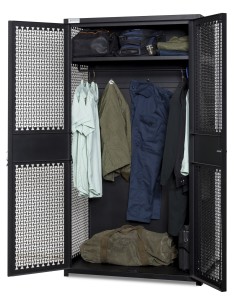
        TA 50 Storage Locker

        Materials Matter
        Buying secure storage solutions is much smarter than buying regular shelf storage units because of the most important thing: durability. As a prepper you are acutely aware of the shelf life of various things, so it makes sense that everything you choose should have built in longevity. The materials used in secure storage units and lockers are usually built to withstand much more abuse than wooden shelves bought from a general store.

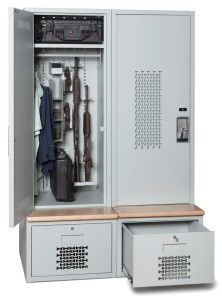
        weapon-locker-with-drawer

        Organization
        As you acquire more food, water and survival gear it becomes paramount that you organize everything. After all, what good is owning something if you don’t know where it is when you need it? Buying containers, shelves and having a dedicated storage room are all good ways to keep your supplies together and organized. Looking at secure lockers and shelf units is a good idea if you have a lot of supplies, as these products are typically larger than traditional boxes and offer more options to suit your needs.

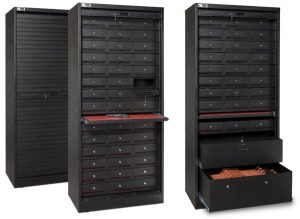
        multiple-drawer-storage

        Security Options
        If you not only need durability and organization built into your supply storage but security as well, there are two major categories offered from secure storage solution companies for this. Open and closed storage lockers.

        If you are not too concerned about breaking and entering, then having open lockers, or wall units, may be right for you since they allow easy access to your supplies. They will still have shelves and be extra durable so you do not have to think about them too much after you have put them up. They will stand the test of time.

        Closed lockers on the other hand mean lockers that have some sort of locking mechanism. These are not as easily accessible but you can always simply leave them unlocked. These lockers are great for anyone who needs secure storage for weapons or other valuables they do not want stolen.

        So essentially we are saying that while your supplies for any sort of survival, whether it is a room for a disaster, or a spot for a week away, the space you store those supplies in is also important. The best supplies can be lost if not stored correctly.