DIY ’100 Hour Candles’

DIY 100 hr candles

I am always on the look-out for homemade counterparts to store bought preparations. These DIY ’100 hour candles’ definitely fit the bill. In less than 5 minutes you have an inexpensive, refillable ’100 hour candle’ that will light up your home in the darkest of times. And for you ladies – these homemade alternatives are far more aesthetically pleasing than the store bought versions. So let’s get started.

Supplies

The supplies you need are pretty straight forward. Liquid paraffin, lantern wicks and 1/2 pint mason jars. I found my lantern wicks and mason jars at Walmart and the liquid paraffin at a local Hobby Lobby. The cost of each candle ends up being approximately $2.70 per candle. Which is about half the cost (at least) of the store bought versions.

Just as a side note, it took me forever to find the liquid paraffin. Make sure when you’re calling around that you ask for liquid paraffin and not the paraffin wax. The paraffin wax is just a wax block that will melt then solidify when it cools. If you can’t seem to locate liquid paraffin you can replace it with mineral oil and coconut oil with a ratio of 2:1.

Step One: Create Opening For Wick

I used some grass-trimming shears but you can use a knife or any other sharp tool to create your opening. Just make it wide enough to fit in the wick SNUGLY.

Step Two: Insert Wick

Instead of just putting the wick in like a candle, we’re going to place it so that it is doubled over. First, pull the wick through the canning top so the end is sticking out on the side that will face inside of the mason jar. Next you’re going to use your knife (or shears for me) to push the second end through as well. This should make the wick fit in pretty tight.

After having both ends through, pull down so that only a tiny amount of the folded piece of wick remains.

Step Three: Pour Paraffin Into Jar

Fill up your 1/2 pint mason jar with the liquid paraffin.

Step Four: Secure the Top

Separate the two ends of the wick so they are at a v-shape when they are put into the jar. This just helps the wick soak up the oil from both sides when it’s getting low. Place the top on the jar and screw the band on around it.

To Prevent Evaporation

The paraffin will evaporate if the wick is left exposed to the air. This is why the store bought versions will have a plastic cap with each candle. To prevent this from happening, simply get an extra canning lid and put it on top in between the wick and the band.

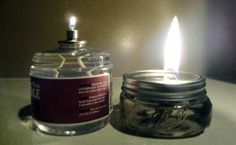
Comparing to the Store Bought Version

The benefits of making your own DIY emergency candles are substantial. First, they are cheaper. The least expensive place I found the store-bought versions were around $5.00. As I mentioned before, the homemade version comes out to about $2.70 each.

Second, they put out more light. As you can see in the picture above, the flame is significantly larger. This could end up being a liability for you. It is obviously more dangerous, but proper candle safety should prevent any injury.

Third, they are refillable. The store bought versions are made for a one-time use only.

Fourth, they are made out of glass. Once again, this is more of a personal preference but my experience with the plastic store bought versions is that they very easily squirt lantern oil from the top if you hold them too tight. The light plastic also makes me nervous that they will tip. The durable and heavy glass of the mason jars eliminates the possibility of squirting flammable material all over your house and it is definitely more stable to prevent tipping.

Read more: {source}

Homemade Emergency Canned Heat


We lost power at 4:23 am on Saturday morning. We had power restored at 11 am on Monday. It was a long few days. We were able to stay in our house. Thankfully no pipes broke and there were no major events other than the power outage.

I want to really encourage you all to be prepared for such emergencies. We have moved twice in the last year and had let our supplies dwindle. We had no propane for the camp stove. We had no firewood. Not a good situation to be in. We did have some knowledge though and that helped us to get through until we were able to get wood and propane.

You can make your own “Sterno” at home for heating water. It is an open flame. By that I mean OPEN FLAME! Especially when initially lit. The flame starts out tall and then gets shorter. I found this to be true each time it was lit (not just the very first time). 

Never to be put where it can tip over, get knocked over, be around children (we have 5 of those), etc. I decided to clear one side of my sink and put the can in the sink to hopefully minimize any accidents. The flame is burning off alcohol so it can not be put out with water. I wanted to be clear that I put it in the sink not so I could douse it with water, but in case it tipped over I would at least not have flame rolling across my floor.  I was also careful to clear the area around the sink of anything flammable.  This homemade cooking/heating gave us some hot water and our first hot meal (Spaghetti-o’s) in 24 hours.  Having a way to heat food & drinks really boosted our moral.

Supplies:

  • Large metal can & its lid
  • Roll of toilet paper
  • Isopropyl alcohol (rubbing alcohol)

How To Make:

Clean The Can: You need a large clean metal can and it’s lid. In our case, I emptied a can of crushed tomatoes into a bowl, cleaned the can and lid (be careful of sharp edges) and dried them. Do NOT throw away the lid!

The Toilet Paper: Remove the cardboard tube from the toilet paper roll. Fold the TP roll in half length wise and then in half again (you’re crushing the roll and making it as compact as possible). Insert the roll of toilet paper into the can. Wrap additional toilet paper around your hand (making a mini-roll of TP) and compact in the same way you did the large roll – use this to fill in any spaces. Repeat until you have the can tightly packed with toilet paper.


Adding Alcohol: Slowly pour the isopropyl alcohol over over the TP in the can until the TP is saturated. This took nearly 2 bottles in my case.

Use:

Hold a match to the alcohol. It should light right up. This will burn nicely for quite some time. To put the flame out simply lay the lid on top of the flame. I am told that snuffing (eliminating any source of oxygen) is the only way to put this flame out. That is why you need the lid. I used tongs to put the lid on because I had them available. Make sure the flame is out and keep it out of the reach of children.


After several uses you see a bit of charring on the TP & some blue candle wax from lighting it (we were conserving matches).


You will need to hold the pot above the flame (resting the pot on the flame will put it out). I used an oven rack across my sink.


**Please know that I am sharing this in the hope that it may come in handy one day to you or your family. YOU are 100% responsible for your safety should you choose to try this. I can make no guarantees on how well or how safe it is. As with any open flame; you must make sure there is proper ventilation. Keep yourselves safe! I used the canned heat several times before we were able to obtain propane for our camp stove and I had no problems using it. I made sure my children were no where near me when dealing with the can in any way.