5 Essential Items to Take Hunting

The first item that comes to mind for a hunting expedition is a riffle and a hunting vest, but what about all of the other needed essentials? It’s key to remember that you might be trekking out into the wilderness, and you might find yourself being there longer than expected. So, use this guide to remember the 5 important items that many hunters seem to forget.

Essential Hunting Items

1. Hunting Binoculars

One of the most often forgotten items is your hunting binoculars.

The most obvious reason is that without a pair of good quality binoculars, you might miss some animal at a distance. Forgetting your binoculars means that you may come back with less to show for, making for a less enjoyable hunting trip.

But, more importantly, you can use binoculars for navigation, to discern your path and spot sources of water, roads, and civilization at a distance.

Other Benefits to Bringing Binoculars

• Be able to decipher an animal from a rock or foliage (Also, so you know you aren’t shooting at a human!).

• See your terrain more clearly to prevent injuries or see signs of animals that the naked eye would not be able to see.

• Allows you to spot predators or wildlife you’d rather avoid.

Important Features on My Binoculars?

You don’t want binoculars that magnify too far or too near. It’s important to get the right set that matches the terrain you will be hunting in. Generally, in wooded terrain you’ll want something with less magnification, such as 8x and in open terrain you can go as high as 12x. You can go higher, but you’ll end up needing a stand or tripod.

2. Cold Weather Gear?

Staying warm while you are out hunting is crucial for any tracking expedition. Even if you have double checked the weather forecast. It is always safe to stay prepared for unexpected cold fronts. You should keep some cold weather gear in your daypack and take it with you, just in case.

If you get disoriented or injured, you might find yourself spending the night in the woods. It doesn’t matter if it’s the middle of the summer or not, it will feel cold when compared to the daytime highs. Also, you can get hypothermia even if it’s as warm as 70 degrees if you are wet and not clothed properly.

Which Cold Weather Gear Should I Bring?

You’ll want properly fitted boots so as not to reduce blood flow to your toes along with spare socks. You’ll also want:

• Clothing articles that are not made out of cotton as this material absorbs moisture and doesn’t insulate when wet.

• Keep your head warm with a hat or beanie while protecting your face with a face mask.

• Bring gloves that are not made out of cotton.

• Have spare, loosely fitting layers available to add or take away as temperatures change.

• Hand warmers that you can keep in your pockets.

• A Winter coat, one of the most important items to help keep warm. See this guide on the best winter coats for extreme cold.

3. Water Purifier

The fact is you can only carry so much water. If you are unexpectedly stuck in the wilderness for more than a day, you’ll need to find a water source. Since unpurified water can leave you sick, weak, and unable to walk your way out, you need to clean all contaminants from water.

The most obvious way to do this is by boiling your water. But, starting a fire is not always practical and in many places there may be a high danger of fire. So, the best option is to bring a water purifier.

What Can I Use a Water Purifier On?

With a water purifier at your disposal, you can obtain water from the environment around you. This includes water from a creek or any other wild body of water.

Various Types?

There are different types of water purifiers that you can purchase for your next trip. Each type will have pros and cons and you should weigh what you need vs their price and other features.

Here are a few types:

• Water filtration pump

• Squeeze or gravity flow system filters

• Tablets or drops

• Lifestraw

• Lightweight backcountry stove

4. A Compass

Although we tend to use GPS to get around these days, it still is important to carry another location device such as a compass. Hunters are frequently out in the middle of nowhere to find the best prey, putting themselves in risk of either their phone losing service, getting destroyed, or running out of battery.

There are a variety of compasses based on how you plan to use them and the difficulty of the terrain you will be in.

5. A Topographical Map

A topographical map is a detailed and accurate representation of two-dimensional features on the Earth’s surface that are natural and human-made. It will allow you to know the features of the surround area without being able to actually see them.

Why Bring it?

According to Real Tree, topographical maps are an essential when hunting out in an area that is less familiar. You can even use these maps to locate deer travel corridors.

More importantly, even if you get completely lost or disoriented, you can figure out where you are and navigate back to safety. There are plenty of stories of people who have got lost and died less than a mile from well worn trails, you don’t want to be one of them. So, bring a compass and a map.

How Can I Read One?

Topographical maps can be confusing to read without the proper training. You’ll want to spend some time learning the major and minor terrain features, how to convert from grid to magnetic north, and how to determine your exact location in a variety of ways.

What Else Do I Need?

Hunting expeditions lead one far away from civilization, making it a priority to pack properly. While there are probably 100 different things you might want to take, you have to balance between necessity and your ability to carry it.

Regardless of what you do or do not bring, make sure you have these 5 items.

5 Earthquake Preparedness Tips for Business Owners

Earthquakes are generally as a result of an instant release of energy into the earth ending in seismic waves. Earthquakes can not only happen anywhere but also anytime leading to injuries and losses. Have you ever asked yourself whether your business or employees will be safe if an earthquake occurs today? Are you ready for an emergency? If not then it’s time to get prepared. But how? Read through to learn the top 5 earthquake preparedness tips for business owners.

Are you prepared for an earthquake at work?

  • Identify potential problems

Do earthquakes usually occur in your area? Are they a threat that you have to deal with? You need to determine whether earthquakes are common and confirm whether they are a risk to your business. Start by preparing for the things that are likely to affect your business and organize yourself from there.


  • Prepare an earthquake survival kit

If a strong earthquake occurs today, you are likely to miss electricity, water, internet, sewage services and gas among other things. When you don’t have enough time, an emergency survival kit can provide you fast with important emergency supplies. A disaster survival kit may contain things such as water, food, flashlight, batteries, medications, multipurpose tools, and a map of the area.


  • Come up with a response plan

Work together with your workers so that you know what to do during and after an earthquake. You need to know who will be responsible for what and when. Regularly check the plan and ensure that you practice the safety actions. Check with those who are disabled and see whether there are plans in place for them. Also know what you will do if damages have affected your store, building or factory. Make sure you have an evacuation plan, emergency exits, and office earthquake kits. Do not forget about establishing a telephone line that workers can call in case of an emergency.

Prepare your business for an earthquake

  • Protect your financial data

What would happen to your business financial data if your store or office were damaged by an earthquake? What about other sensitive business information and customers’ data. If you want to protect your company’s records, you need to have an internal and external data backup site. Instead of storing your data in a computer hard drive use a company’s server and let your employees know. In addition to this, get a data compromise coverage from your company’s insurance. This will significantly help you with the legal and financial burden in case any information is stolen, lost or accidentally released.


  • Create a business continuity plan

How long will your business continue to run in case an earthquake occurs? For instance, if you are dealing with goods and services you may still continue to get orders even if your main store is closed. A business continuity plan involves knowing how to communicate with your suppliers and customers, how to take care of orders, and how to retrieve your company’s lost data.


These are the top 5 tips to help you prepare for an earthquake. Since natural disaster such as an earthquake can occur anytime, the success of any business will depend on how quickly it’s able to recover. Enough preparedness will allow your company to continue to run efficiently.

Leona is part of the content and community team at Specialty Fuel Services – providers of emergency fuel continuation services, in locations affected by catastrophic events.

5 Tips To Learning About Outdoor Sports

Outdoor sports are not everyone’s cup of tea, most people prefer other sports. Learning a sport may be a little difficult because most people do not engage in them regularly. However, there are easy and fun ways you can learn about sports;


  1.       Look out for outdoor sport events near your area

Nowadays, lots of outdoor sport events are held, mostly in sports clubs, ranches, etc. The easiest way to find out about such events is through the internet, mostly social media platforms. This can be a great way to learn about these kind of sports especially because you will participate and a lot of people attend these kind of events. What’s more, there are usually multiple sports taking place with competition and this makes it even more fun.


  1.       Try enclosed outdoor sports first

Hiking, rock climbing, skydiving and the other outdoor sports don’t sound fun to some people. So, instead of going for the actual rock climbing -or any of the outdoor sports- try indoor rock climbing first. Although it may not provide the same experience as the actual rock climbing, it may just ignite the interest you never knew you had. Also, it is a fun and easier way to learn about the actual outdoor sports.


  1.       Visit an outdoor gear store

Most of these store owners are professionals so, this way you learn about both the sport and gear from an expert. Also, you may have wanted to get gear for an outdoor activity you are interested in, for example hunting. You learn about the gear you want in depth and specificity for instance; the best rifle for squirrel hunting or the best bow for deer hunting, etc.

  1.       Suggest outdoor sports to your friends

Instead of you and your friends going out next time, suggest that you go for a forest hike or for biking. It is even a lot more fun when with friends than strangers and the more you take part in them, the more you learn about them. Also, don’t go for the same sports every time, try different ones. As long as your friends are for it, you will actually want to engage in them as compared to when you are alone.


  1.       Browse the internet

When trying to learn, you can never go wrong with the internet. Even though participating may be an excellent way to learn about outdoor sports, you don’t have to go that way. You can browse the internet and get all the information you require about a particular outdoor sport. You even get to know about the best places and terrains to go for the sports and the safety measures and precautions to take. Afterward, you can engage in the sport whenever you have free time.

Outdoor sports can be hectic if not well prepared for. Preparation is not only physically, but also mentally. So, if you intent to fully engage in these kind of sports then prepare well and don’t forget to get in condition.

Staying Safe in an Earthquake – How to Be Prepared

Nobody wants to confront a major natural disaster. Yet some disasters – hurricanes, blizzards, and tornadoes, to name a few – come with warning signs, allowing for minor preparation and escape.

Earthquakes, on the other hand, happen immediately and with no warning. They are so all-consuming and widespread that you cannot jump in the car and escape them.

If you are in the impact zone, you will be affected. But the degree to which you are affected can be minimized. It all depends on how prepared you are for the quake. Preparation does take some time, but you will reap the benefits many times over in the event of a major earthquake.

What Is a Quake Like?

Ordinary life immediately precedes an earthquake. You are washing the dishes, watching TV, doing homework, or putting on a helmet for a bike ride. Then you feel that initial jolt.

You may not realize it at first, thinking that it is something else – that someone dropped something heavy. Then you become aware of the noises, of chandeliers rattling, the house frame squeaking, glasses dropping and breaking, car alarms going off.

If you are indoors, items that are not secured – books, TVs, glassware, and lamps – will topple and fall. Hanging items will begin to swing. As these things are falling, you become aware that you might just become the victim of one of these falling things.

If you are outdoors, trees sway and water sloshes out of swimming pools.

The first jerk is followed by several more back-and-forth jerks. You may find it hard to stand.

Even though most earthquakes last only seconds – rarely more than thirty seconds – it will feel like forever.

Right after the shaking stops, the noise continues: dogs barking, people shouting, alarms ringing. Milder aftershocks continue for minutes or hours. Your electricity has probably gone out. Water may not be safe to drink, or water mains may be broken. Gas lines may erupt.

You have just experienced an earthquake measuring 7.0 or greater on the Richter scale.1

Predicting Quakes

Unfortunately, no one can predict earthquakes. According to the U.S. Geological Survey (USGS), no scientists have ever predicted a major earthquake, nor are any scientists expected to be able to do so in the foreseeable future.

The best that scientists can do is produce tables that calculate the probability that an earthquake may occur. The milder the earthquake, the greater the probability that it will occur within the next 30 years. More severe quakes measuring 7.0 or higher on the Richter scale – those truly life-altering, disastrous quakes – are less probable to happen.

For example, because Southern California already experiences quakes between 5 and 6 on the Richter scale about four times per year, there is a 100 percent chance of another quake of similar strength happening within the next 30 years. However, because major magnitude-7.5 quakes have happened about once every 87 years, Southern California has only a 36 percent chance of another one happening in the next 30 years.2

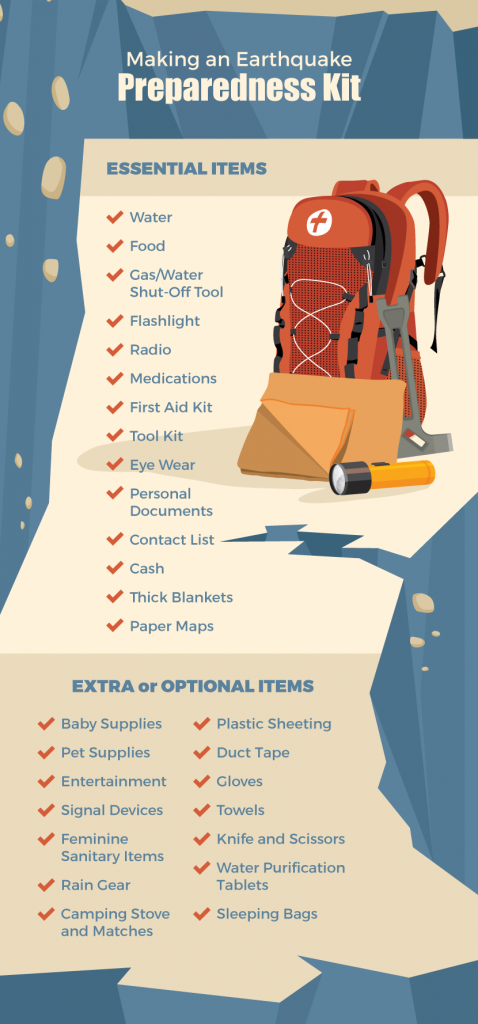
Be Ready: Making an Earthquake Preparedness Kit

To help make your recovery from an earthquake safer and more comfortable, you should stock up your home with a set of essential preparedness items. Keep these items stored in a clean, dry place.3

Essential Items

  • Water: One gallon per person for every day. Provide for a two-week supply of water.
  • Food: Non-perishable items such as canned food or dry camping food that can be reconstituted with water. Be sure to have a can opener as well.
  • Gas/Water Shutoff Tool: This specialized wrench fits gas and water shutoff valves and can be purchased at your local home improvement or hardware store.
  • Flashlight: Have both battery-powered and crank flashlights. Keep a full set of fresh batteries on hand, too.
  • Radio: Purchase a hand-crank radio.
  • Medications: These are essential daily prescription items that are needed to maintain regular health.
  • First-Aid Kit: Basic kit that has gauze, adhesive bandages, antiseptic, aspirin or ibuprofen, and heat packs.
  • Tool Kit: Small tool kit with screwdrivers, pliers, and a hammer. If you wish, you may substitute a multipurpose tool.
  • Eyewear: Extra glasses, contact lenses, and solution.
  • Personal Documents: Assemble a fireproof lockbox with prescription slips, home and car titles, birth certificates, passports, and all insurance policies, including homeowner’s insurance policy.
  • Contact List: Written spreadsheet or other type of list of phone numbers and addresses of relatives, close associates, local hospitals, and police and fire stations.
  • Cash: Several hundred dollars in small bills.
  • Thick Blankets
  • Paper Maps: Detailed maps of your local area.

Extra or Optional Items

  • Baby Supplies: Bottles, formula, diapers, food.
  • Pet Supplies: Food, ID, collar, carrier.
  • Entertainment: Books, cards, board games.
  • Signal Devices: Whistle, air horn, flares.
  • Feminine Sanitary Items
  • Rain Gear
  • Camping Stove: Stove with extra propane canisters and waterproof matches.
  • Plastic Sheeting
  • Duct Tape
  • Gloves
  • Towels
  • Knife and Scissors
  • Water Purification: Tablets or bleach.
  • Sleeping Bags

How to Make Your Home Safer in Case the Big One Strikes

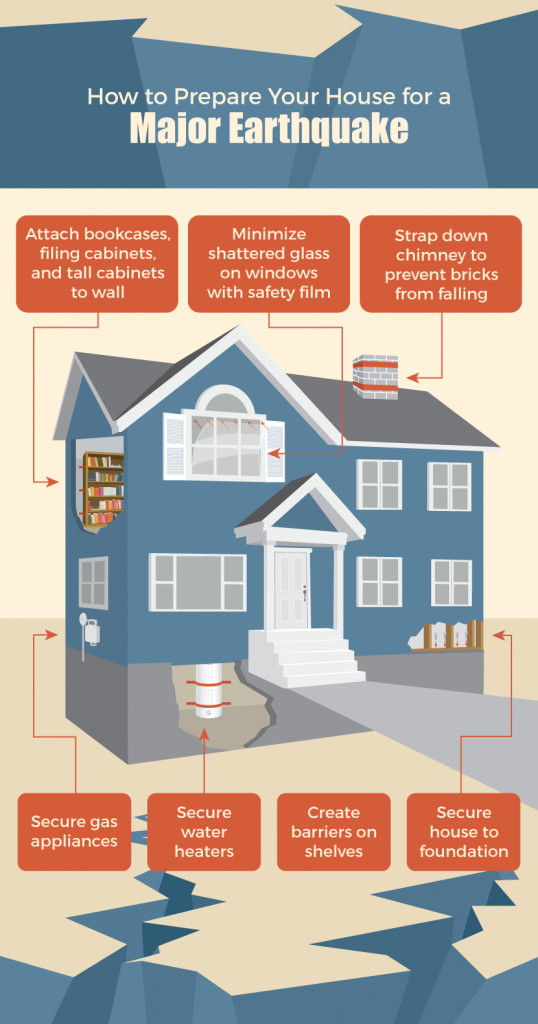
Chances are good that your home is not prepared for an earthquake. While your house may seem solid and safe, it is likely not ready for the rigors of a magnitude-7.0 earthquake. Undertake these projects now for a safer home:4

Secure Water Heaters

Secure heaters to walls with metal straps. These bands can be purchased as part of a kit, available at home improvement stores.

Attach Bookcases, Filing Cabinets, and Tall Cabinets to Wall

Affix any kind of furniture that can tip over to a wall stud, using a metal L-brace or a nylon strap.

Create Barriers on Shelves

Attach ledge barriers along the edges of shelves to prevent items from sliding off and falling.

Secure Gas Appliances

Attach flexible connections to allow appliances to shift without breaking their lines. As with the water heater, attach large gas appliances to the nearest wall.

Minimize Shattered Glass on Windows

Install clear or shaded safety film on windows. This will prevent glass from scattering across the floor.

Secure House to Foundation

Consult a contractor to install anchor bolts between the house framing and the foundation.

Strap Down Chimney

Attach reinforcing bars or metal straps to the chimney to prevent it from snapping and breaking off in the event of an earthquake.

During and After an Earthquake: Keeping Yourself and Your Family Safe

During The Quake5

DO:

  • Drop to the ground and take cover under the nearest strong piece of furniture, like a table or desk.
  • Stay indoors. Even though open outdoor spaces are safer than being indoors, falling objects can injure you as you try to move outside.
  • If you are driving, stop at the nearest clear, open area, away from buildings. Remain in the car.

DO NOT:

  • Stand under a door frame. Once standard advice, this is now outdated, as modern door frames are rarely stronger than other parts of the house.
  • Stand next to buildings, trees, or power lines, which could collapse and injure you.
  • Go to a window, as glass may break and hurt you.
  • Stand next to book cases, high pantry cabinets, refrigerators, or other top-heavy items that may fall.

After The Quake

Even though the earthquake may last only seconds, the aftermath may go on for days or weeks to come. Follow these fifteen steps, in this order:

  1. Wait for the aftershocks to end.
  2. Check yourself for injuries first before assisting others.
  3. Put on shoes to protect yourself against broken glass.
  4. Check for fires and extinguish them immediately.
  5. Shut off natural gas and water lines.
  6. Move yourself and your family to the nearest open area.
  7. Open windows to ventilate your home.
  8. Check your house for structural damage.
  9. Begin gathering water from the water heater release valve, ice cube trays, and toilet tanks.
  10. Check sewer lines for damage before flushing the toilet.
  11. Inspect the chimney for cracks that may indicate potential collapse.
  12. Keep the freezer closed for as long as possible to retain the cold.
  13. Set up charcoal grill outside for cooking.
  14. Stay at home if at all possible. Roads will be impassable.
  15. Check your emergency radio for information.

Earthquakes are devastating events. Fortunately, you and your family can remain safe by following basic safety plans.


Source: Fix.com Blog

Sources:

  1. How Long Earthquakes Last – http://quake.utah.edu/regional-info/earthquake-faq
  2. Earthquake Probability – https://pubs.usgs.gov/fs/2015/3009/pdf/fs2015-3009.pdf
  3. Red Cross Earthquake Preparedness Kit – http://www.redcross.org/get-help/prepare-for-emergencies/be-red-cross-ready/get-a-kit
  4. 6. Prepare House for Earthquake – http://www.military.com/money/home-ownership/maintaining-your-home/tips-to-make-home-earthquake-ready.html
  5. Quake: Do This / Do Not Do This – http://www.nationalgeographic.com/environment/natural-disasters/earthquake-safety-tips/

The Top 3 Pros and Cons to Using a Crossbow Versus a Compound Bow

Hunters and people who love the game of archery will need a bow, obviously. The question in their head as they shop may be which one would suit them best. Is it the crossbow or the compound bow?

Archery sport helps players develop various qualities within them. For instance, since you will learn to shoot at multiple targets, you will need to have some level of focus. Therefore, these people are keen when they perform other tasks.

Today we will analyze different pros, cons of the crossbow, and the compound bow.

Crossbow

This modern bow works precisely as a rifle. It consists of distinct features that make it stand out and increase its power. The hunter will hold it in a horizontal position when aiming at specific targets.

Pros for using a crossbow

  1. Ease of use

Hunters love a tool that is quick in function. One benefit that the crossbow features is that you do not need hours to practice shooting at a target.

As mentioned earlier, it works exactly like a rifle; therefore, you only need to press the trigger to release the arrow. People with disabilities can use the bow since you do not require both hands necessarily.

  1. Power

Once you release the trigger, the shaft moves at lightning speed. Within a few milliseconds, the arrow can dig deep into the target’s surface or animal skin. The user has to use a lot of force to remove the arrow from the surface that it strikes.

  1. Accuracy

The bow has a scope fitted at the top for the user to aim the target with. This means that you do not spend a lot of time trying to point at the game or prey. The scope also assists when the light conditions are poor. For this reason, many people rely on this tool, especially when hunting.

Cons of the Crossbow

  1. The bow is heavy. It becomes a problem when you have to carry it for longer distances.
  2. The bow releases some noise once you press the trigger, which distracts preys if you are aiming at more than one.
  1. Some states limit the use of crossbows. Users need to check with their state laws to see if they need to acquire a license to use one within the state boundaries.

Compound Bows

This is also a modern bow. The user will hold it in a vertical position when aiming at a target. You will also need to pull the string to release the arrow, unlike the crossbow where you just press the trigger.

Pros of the Compound Bow

  1. It is ideal for people who are learning how to aim and shoot. While you do this, it helps to develop your focus.
  1. The bow is not noisy. This is suitable for hunters because you have the liberty of shooting at more animals without distracting other prey around it.
  1. Most love it because it is light. It has additional straps that ease the weight, especially when walking for long distances.

Cons of the compound bow

  1.  People use much time learning how to aim. This would be a significant disadvantage for beginners. You also have to learn how to focus when aiming at your target as well.
  1. They are not as powerful. Most people prefer to use the bow for the sport rather than hunting. The strength you apply on the string determines the distance that the arrow travels.
  1. Compound bows are not suitable for individuals with disabilities. Additionally, if you have an injured arm, it would be difficult to handle the bow.

Conclusion

The type of bow you choose depends on your preference. Check www.archery-den.com/best-crossbows/ to see the most suitable bow for you. You will find a variety of bows to pick depending on your budget.


5 Tips to Learning How to Hunt


Hunting is a favorite pastime of many. In fact, people have been hunting for years and it is a sport that has been able to bring family members together for centuries. In addition to bringing people together, hunting provides a great deal of food for one’s family and also helps the environment with natural population control. While there will always be some that do not believe in the hunt, there are cultures that rely on it for survival and see it as a way of life. If you have never gone hunting before, this article will provide some tips to help you learn how to hunt.


  • Slow and steady wins the race. No matter what you are hunting for, it is important to be slow and steady in your approach. The reason for this is that animals have a keen sense of smell and can hear things from farther away than humans can. New hunters tend to find the notion of staying still and moving slow to be a hard concept to grasp at first. One of the best ways to get the hang of being still or moving slow is to use your watch. Find a place to perch or hide and stay there for at least 5 minutes before you decide to slowly creep to another area.


  • Stop when you hear noise. Whether you hear a deer, squirrel, or a group of ducks, when you hear a noise, it is best to stop and be still for a few minutes. When you stop and can be still, you can take in what is going on around you. If you make a sound and an animal is around, they will stand still and look around for a period of time. A duck may fly off into the distance while alerting others of the same species.


  • The environment can make a difference. Whether you choose to hunt during the day or in the early morning hours, the environment in which you seek animals or ducks makes a big difference. For example, if you are seeking out a duck, check to see which direction the wind is blowing. In addition, look for water holes as ducks are typically attracted to them. Setting up decoy ducks and using a good set of waders are important recommended tips for hunting ducks that should not be overlooked.


  • Bring proper tools. When hunting, it is important to field dress your prey right away or you will risk spoiling the meat. This is particularly true for deer meat but also for other smaller game. Make sure to bring along a pair of skinning shears as you should skin the fur off of smaller animals such as a rabbit or a squirrel as soon as you kill it. The reason for this is that the fur will come off easier when the animal is still warm. One of the most important reasons to handle this right away is that many animals carry fleas. Fleas can carry disease. When you skin the animal, you can get rid of the fleas before it has time to attach to the meat.


  • Dress warm and bring a canteen. It is important to dress for the weather and stay hydrated while you are out hunting. If you are out hunting for a full day you don’t want to get cold or dehydrated. Make sure you wear enough layers and bring waterproof clothing if you think there may be a chance of rain. It’s alway a good idea to workout how much fluid you need for the amount of hours you intend on hunting and pack appropriately.


32 Survival Uses For Trash Bags


Heavy-duty plastic bags, like those meant for trash and yard debris, can be used in a surprisingly wide variety of ways to help ensure your survival during a disaster situation like an earthquake, hurricane, or even Zombie outbreak. These light-weight, extremely low cost, readily available, and incredibly versatile tools should be in every B.O.B. (Bug Out Bag)  and Emergency kit.

Trash Bags

We’ve listed a few of our favorite survival uses for plastic bags, but keep in mind that this everyday item is only limited by your imagination… and whether or not you happen to have a few on hand.


MEDICAL 

While it might be the first thing that comes to mind when you think of a trash bag or yard debris bag; a clean, unused bag can be used for a wide variety of medical purposes.

Waterproof bandages – After applying the appropriate bandage to a wound, place a layer of plastic bag over the bandage to protect it from outside moisture and contamination. Secure the protective covering properly, and remove and change the bandage and covering as needed.

Fight hypothermia – The potentially deadly effects of hypothermia can be battled by utilizing a large plastic bag as a “hot box” or additional layer to trap heat next to the body. Simply cut a hole for your head (and arms if needed), and wear the bag as a pullover. You can also simply drape the bag over your body, as you might a survival blanket.

Cold Compress – Fill with snow, ice, or cold water. Fold or tie off bag and apply as needed.

Handle medical waste – Plastic bags can be utilized as gloves for handling medical waste and contaminates such as blood, organs, vomit, and fecal matter… though we’re not sure why you’d handle the last two, unless you’re cleaning up a mess. Check the bag for punctures and/or rips BEFORE you try them on as gloves.

Tourniquet – Like many other flexible materials, large plastic bags can be used as a makeshift tourniquet. While it wont be the best thing for long term use, it can make a world of difference for the short run… remember it’s all about surviving the moment, you can worry about the long-term later.

Sling – Plastic bags can be used to support and immobilize a broken or wounded arm.


WATER

Containers come in handy when you need to collect, transport, and/or treat water, but there’s even more that you can use them for when it comes to water.

Collection/Storage – Lining a trash can, hole in the ground, or other receptacle with a clean plastic bag makes the collection of rainwater safer than simply letting it fill into a potentially contaminated container. Plastic bags can also be used as scoops for collecting water from pools, streams, and other bodies of water.

Solar Still – Fully enclose the leafy green area of a tree branch, securing the plastic bag tightly at the opening. Let it sit in the sun for a few hours as the condensation builds within the bag . Carefully remove the bag when ready, and repeat the process as needed. This method doesn’t typically result in large amounts of liquid, but every little bit counts… especially during a survival situation.

Transport – Creating a sturdy double walled bag for transporting water can be done in just a few steps. Cut or tear open the sealed end of a plastic bag so you are left with a tube. Twist or tie a knot in the center of the bag so you are left with two open ends and a shape like an hourglass. Fold one side over the other and you’re left with a double walled water carrying device.

Filter/Purify – Water isn’t any good to you if it isn’t safe to drink, but a simple plastic bag can go a long way to making water potable. Learn other important tips and tricks for water filtration and purification here: H20 (Water).

Gravity Filter – Gravity filters are simple multi-layer systems that remove the majority of contaminates, and you can easily make one at home. Double wall a plastic bag as seen in the WATER: Transportation portion of this article. Cut a small “spout” hole into the lowest point possible, without destroying the integrity of the bag too much. Reinforce the spout with a bit of duct tape so it doesn’t split when filled. Next, place a coffee filter, bandana, or similar cloth or material for filtering inside the bag and up against the spout. Then carefully pack and layer the following materials into the lower portion of the bag: 2″-3″ finely crushed charcoal, 2″ fine sand, 1″ small stones, 1″fine sand, and 1″ moss, grass, or other porous material. Gently fill the bag with water, tie a knot into the top, hang it up, and allow it to do the job.

Solar Treatment / SODIS – This can be a fairly unpredictable method for treating water, especially during cloudy or winter weather, but when done properly, it can work like a charm. The SODIS method relies on the power of solar rays to purify water; this is only helpful if larger contaminates have first been removed with basic filtration methods like the one listed above. Utilizing a large plastic bag for this method should be a last resort, as not all bags are made from food grade materials. This method is only effective when using CLEAR plastic, tinted or colored materials will not work. 

Solar Shower – Fill a darkly colored plastic bag with water, hang it above head height, let it sit in the sun for a bit to warm up, poke a couple of small holes in the bottom, and enjoy a nice warm shower.


FOOD

Collecting, capturing, and storing food can be difficult during a survival situation, but a trash bag can make the task a whole lot easier.

Collection – Whether you’re raiding the wilds, a nearby farm, or grocery store, containers come in handy… and that’s just what a trash bag is, a container. No matter what you find or where you find it, you’ll need a way to carry your collected goods.

Storage – Just like with water, lining a trash can, hole in the ground, or other receptacle with a clean plastic bag makes the storage of food much safer than placing it into a potentially contaminated or uncovered container. Plastic bags can be sealed by twisting the top and adding a bit of cordage, or simply by tying a knot in the top of the bag itself.

In addition to being a great lightweight container for food items, plastic bags can be tied and hung away from the ground and the prying hands of Zombies, other survivors, and wild animals. A well-sealed bag can offer the advantage of a longer shelf-life of some foods… as long as you store it in a cool dry place.

Trapping Set them as netting for bugs and fish, or use them as sacks to quickly and more easily bag a bird, squirrel, or other small animal that lends itself to capture.


SHELTER

From additional security to being used as shelters themselves, heavy-duty plastic bags can be utilized in a number of ways when it comes to provide protection from the elements and the undead.

Tarp Tent – Just like an emergency blanket, poncho, or tarp, a plastic bag can be used to create basic Tarp Tent style shelters and protective covers. Cutting the bag down the length of one side, and slicing it along the bottom, can double the square feet of material available for your shelter or cover. Make sure to carry a bit of paracord with you to help when securing your shelter.

Tube Tent – Tear or cut open the sealed end of a large plastic bag, duct tape the tube to another bag, slide yourself inside, and rest well. The ambient heat from your body will build and help to keep your body warm… even in wet and windy weather.

Ground Cover – This one is as simple as it sounds, but it’s important too… especially when you’re sleeping in the wild. Keeping your body away from moisture and the cold of the ground can greatly increase your chances of survival.

Window Black Out – Just because you’re home doesn’t mean you have to look like you are. Blacking out your windows is an important step to ensuring you aren’t hassled by outsiders or spotted by Zombies in a post apocalyptic world. Covering your windows with black trash bags can keep the light from getting out, and you from being seen.

Quarantine – Duct tape and plastic bags can be used to create a fairly effective quarantine area, whether at home or in the field. Simply seal off an area with the bags and duct tape, and make sure it isn’t breached. You’ll need to fully cover any potential areas of transmission, such as heating vents, windows, doorways, etc. 


GEAR/OTHER

Beyond water and food collection, medical assistance, and shelter; plastic trash bags can be utilized as a substitute for many types of gear.

Rain Poncho – The only downside to wearing a plastic bag as a rain poncho is that they don’t breathe. This means that while it will hold the rain and snow out, it will also hold your sweat in. Pay close attention to your body temperature and water-loss when wearing a non-permeable covering like this.

Gear Bag / Dry Bag– Twist the bag a few times just above the line of the gear inside. Fold the excess over top of the bag and carry it upside down. This should create a relatively water-tight seal that still allows for somewhat easy access to important gear and supplies.

Water-proof Boots/Gaiters – Applied over boots, and even bare or minimally covered feet, plastic bags make an excellent material for water-proofing and protection from the elements. They can also be wrapped around the shins or legs as makeshift gaiters for travel through swampy or other exceedingly wet areas.

Flotation Device – Filled with air and twisted shut, heavy-duty trash bags are extremely lightweight and buoyant. They can be used to assist in crossing deep water by simply being held onto, or they can be applied to a raft or other flotation device.

Sleeping Bag / Mattress – Similar to being used as a Tube Tent, large plastic bags make great sleeping bags when stuff with materials like leaves, fabric, stuffing, packing peanuts, etc. Fill the bag as full as possible and crawl in, or use it as a sleeping surface for the night. Not only will this method protect you from the cold, it will help to keep away potential contaminates as well.

Washing Machine – Placing garments into a plastic bag that has been partially filled with water and soap, can actually make a world of difference when attempting to get your clothes clean. Once everything is in there, just jostle it around, empty it out, rinse your clothing, and hang them to dry. Remember, proper hygiene can go a long way to keeping you alive.

Restroom – Sometimes the plumbing goes out, but that doesn’t mean you don’t need to use the bathroom. Placed into a drained toilet or into a 5 gallon bucket, plastic bags can make dealing with waste, a much cleaner and easier process. These can also be used to line latrines when you’re worried about contaminating a nearby water source.


OTHER MISC USES

Creating smoke for signal fires, lashing, patches for clothing and other gear, And of course… collecting and removing refuse, among about a million other uses.

Because not all trash bags are made with the intent of heavy-duty use, it’s a good idea to grab a few construction grade bags from your local hardware store or garden center. Keep a few on hand in your Bug Out Bag and E-kits and utilize them as needed… though we hope you never have to.


[source]

How to Teach Your Kids to be Prepared… For Anything! [INFOGRAPHIC]

Family survival planning is a very engaging and beneficial undertaking. Not only is it important that everyone is on the same page, should disaster strike, it can be a great bonding experience to bring you all closer. In the long run, this gives you the necessary tools to become a cohesive unit of togetherness that can combat any situation, should the worst happen.

There’s such a wealth of activities you can engage in that your kids will love as well, so it doesn’t have to be a monotonous task, but rather real life lessons exploring the outdoors for example.  If you have young children, then you can start these valuable lessons from as early as five years old to really bed in some of the key lessons that can then be expanded upon, right up to their teenage years. Broadly speaking, there are a few main considerations to address as a starting point.

Shelter, food and spotting early warning signs are great kick off points for any discussion or activity and can be a recurring theme throughout your lessons. After that point, your judgment and intimate knowledge of your kids will dictate how you move forward.

With that in mind, check out the below infographic provided by MIkes Gear Reviews to get a better understanding and ideas of how to prepare your kids for anything life throws their way.

Teach kids to survive