Guerilla Gardening: Why We Think It’s A Good Idea To Plant Some Preps Along Your Bug-out Routes

Guerilla Gardening is not done by gorillas.  In fact it is usually done by little old ladies who sneak into people’s yards when no one is home.  At least that’s what I do.
Plant fruits and vegatables along your bugout routes

My first act of gorilla gardening was for my friend Joe.  He’d worked for many years on building a home whenever he had money available and help from friends.  The place was a cluttered construction site for a long time.  But as the building was nearly completed, and the construction debris cleared away, there was room in a sunny spot for a small garden.  I knew Joe wanted to grow some of his own food and where he intended to put a garden so when he left town for a week, I made my move.

I collected some discarded 4×4’s and some left over fencing and piled them into my station wagon along with some garden starts and headed over to Joe’s.  It’s a lovely place at the end of a dirt road.  I got to work with my digging fork and turned sod, weeded and formed beds.  I dug holes and erected the posts and fencing.  Then I planted the seeds and starts, salad greens, squash, peas and beans to climb the fence and a bed for perennials like rhubarb, herbs and raspberries.  I watered it all from the rain barrel.  When Joe came home and found it he was delighted.  Since then his garden has expanded to 5 times the size of the original.
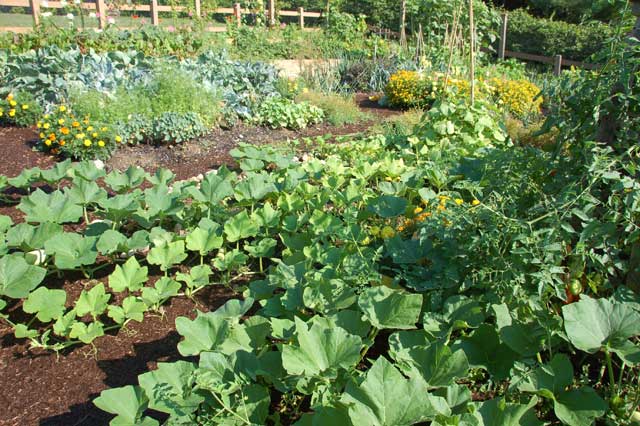
I live on a small lot in town.  The previous owner traveled often so his landscaping was concrete and grass.  Now after 5 years, there’s a native plant garden on the shady side of the house with vine maple and crabapple trees, salal, Oregon grape, red flowering currant, columbine and wild ginger.  In the sunniest part of the yard, right up against the sidewalk, I have my espaliered fruit trees with 10 different kinds of fruit grafted on to 4 trees.  There are 2 blueberry bushes and strawberry plants.  In the beds there are potatoes, squash, peas, salad greens, broccoli, cauliflower and winter greens.  A stately rhubarb fills out one corner and cosmos bloom by the fence.  What a delight to grow my own produce.  I planted greens last August to winter over so I’m eating chard, collards, kale and beets year round. The chard with their red and yellow stems brighten up the flower beds.

Gardening on a small lot

It took a while for me to figure out what grows best here in the Northwest and in my yard.  Then I had to get used to eating what I grow.  But now I’m totally addicted.  I take some with me when I travel.

This spring my elderly neighbor said she wasn’t going to garden this year.  My ears perked up.  I asked, and she said to “Garden as if it was your own.”  That garden has been under cultivation for decades so mostly what I’m doing is weeding and uncovering the volunteers.  There’s lettuce, chard and garlic in abundance.  I added a few squash and beans and covered them with a floating row cover to keep the deer and squirrels at bay.

Another friend is moving from Whidbey where he’s lived for thirty years.  He has a well-established landscape.  I’ve been weeding with him there getting his house ready to sell and hearing about his projects restoring an old house in Port Townsend where he’s planning to move.  Last week while in Port Townsend, I put a couple of big pots on his porch, filled them with potting soil and added salad starts and a couple of squash.  A friend 2 doors down said she’d keep them watered. My friend was touched to find them the next day.  I love guerrilla gardening.

[source]

Chart: When To Plant Your Survival Garden

When to Plant that survival garden.  A great idea for growing vegetables, salads and herbs right next to or on the way to where your bugout location might be.


A great guide to have handy:

Chart: When To Plant Your Survival Garden

Live Off The Grid In Your Own Upcycled Shipping Container Home

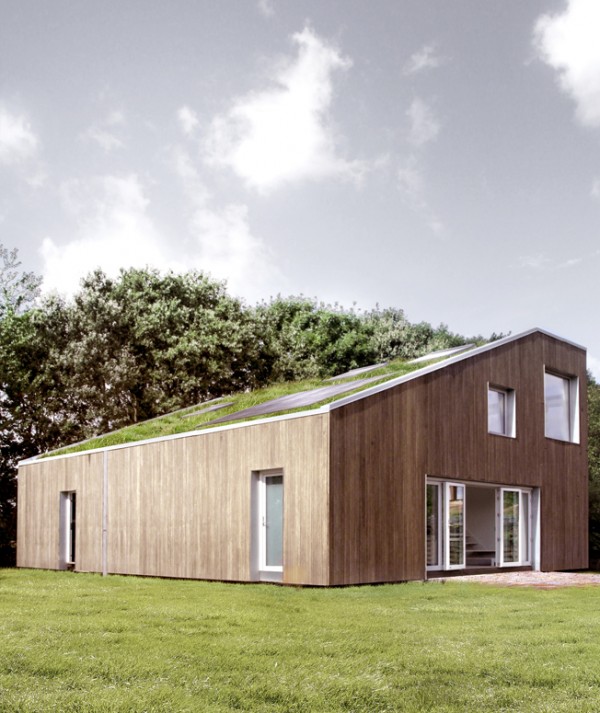
Upcycled Resource Conscious Architecture that can be exported to any place in the world. It is more than architecture; It is a sustainable product. This home would be perfect for many of those that would prefer to live off the grid, be self sufficient and use recycled materials.

upcycle-house-container-home upcycle-house-container-home-1 upcycle-house-container-home-2

To see the entire project of this Sustainable prefab house built with shipping containers. [source]

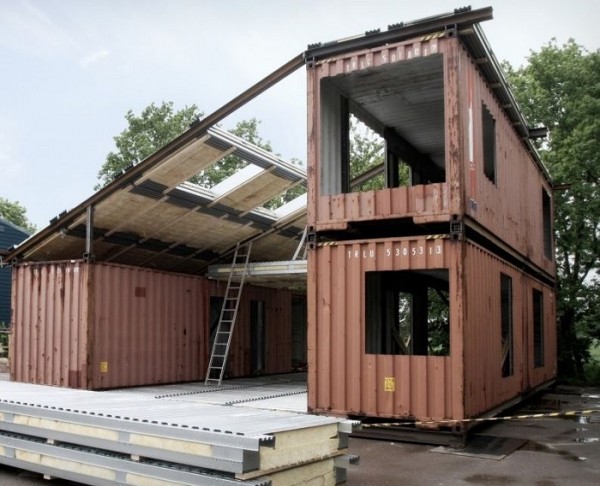
Old shipping containers used as the structural framework for the WFH- Huse. This is not just recycling; This is upcycling!

In Short:

• The WFH concept is a patented modular building system, based on a design principle, using 40 feet high standard modules as

structural system.

• The structure can be adapted to local challenges such as climatic or earthquake issues.

• The first prefabricated housing system that meets the demands in the international environment-building-standard, Active House.

• The structure can be configured to meet many different purposes, multi storey, townhouses, cluster houses or individual villas.

• Top class indoor climate, low energy consumption and environmentally sound materials.

• Very short construction-period.

• Demountable for recycling or relocation.

• Online customization-tools give clients the possibility to decide their own version of the house concerning layout, size, facade, interior etc. The configuration happens within a predefined framework that will ensure high architectural value and quality of materials.

• Cost competitive in comparison with other green houses.

• Building-components are prefabricated and on site construction can be limited. The design allows for high-quality industrial production in large numbers and distribution using standard container transport.

Facts:

• 180 square meters.

•Energy class, which is 50% lower than the standard requirements for new housing constructions in Denmark.

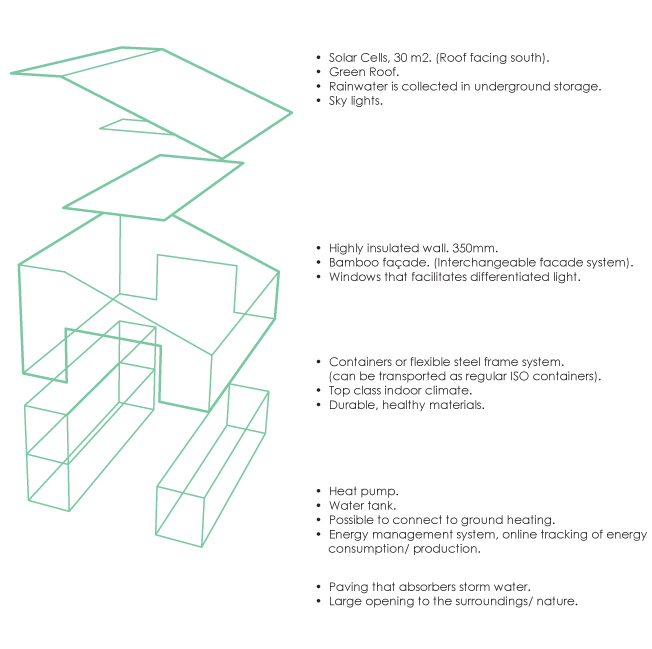
• Photovoltaic cells are integrated – area is flexible, but to fulfill the standards above min. 20 m2 solar cells for power production are needed.

With an area of 30 m2 or above a normal household using energy efficient appliances will be self-sufficient with power on an annual basis.

• Green roof solutions that are optimized for rainwater harvesting for use for toilet flushing, washing and cleaning.

• Customized façade solutions.

Design

The design is based on Nordic values. Not only according to architecture, but also design objects. These values are defined as:

Flexibility.

• Build for people, human values. – Good daylight conditions, different types of light.

• Reliable (long term) solutions. – Healthy materials, recyclable materials, design for disassembly strategies.

• Materials that age gracefully.

• Access to nature, greenery.

• Minimalistic look.

• Playfulness.

Sustainable global housing

The WFH concept is a modular concept, based on a design principle, using 40 feet high cube standard modules as structural system. The structure can be adapted to local challenges such as climatic or earthquake issues. Online customization-tools give clients the possibility to decide their own version of the house concerning layout, size, facade, interior etc. The configuration happens within a predefined framework that will ensure high architectural value and quality of materials. Building-components are prefabricated and on site construction can be limited.

FLEX space

The FLEX space is the heart of the house. It contains the living room, kitchen and can be used for multiple purposes. Parts of the room are double height, creating perfect lighting conditions. The rest of the space is one story height, defined by the landing that creates access to the spaces on the second floor. In each end of the FLEX space there is access to the surroundings and daylight. The boundary between inside and outside disappears, when the doors open. This is a fundamental part of the design; to be able to open let nature in. It is a consequence of having varying requirements for inside temperature and definitions of what domestic functions takes place inside and outside.

Geometry

The geometry of the FLEX space is defined by the two rows of modules, and can easily be modified to specific wishes regarding size. The FLEX space has a number of possible solutions for subdivisions. Both on one plan or two plans. It can also be one big space, creating a lot of light and openness. The kitchen elements are built into the wall (into the technical module). It creates more floor space and also makes connection to water and plumbing easy. The kitchen can also be extended with at freestanding element, defining the work area of the kitchen. From the FLEX space there is access to all spaces. This eliminates square meters used for logistics. It is possible to make larger openings from the FLEX space into the rooms, again creating flexible solutions within the same system.

The work area of the kitchen

From the FLEX space there is access to all spaces. This eliminates square meters used for logistics. It is possible to make larger openings from the FLEX space into the rooms, again creating flexible solutions within the same system.

Bedrooms

The size of the bedrooms is defined by the half of a module (15m2). There are four bedrooms, and they can be used for multiple purposes: A parent’s bedroom, kid’s bedroom, workspace etc. Three of the rooms have windows on two facades, creating a mixed light. It is possible to remove the wall, or part of it, facing the FLEX space. This adds flexibility to the layout and shows the structural systems ability to adapt do different needs.

Landing

The landing creates access to the second floor, but can also be used as a space for play, relaxation or work. It gives the inhabitant the possibility to draw back, but still enjoy the company of people in the house. You are in the FLEX space, but because you are on the first floor you are drawn back from the action. It is an ideal place for a quiet retreat and still being able to observe what is going on in the house.

To see the entire project of this Sustainable prefab house built with shipping containers. [source]

Could you see yourself living in one?

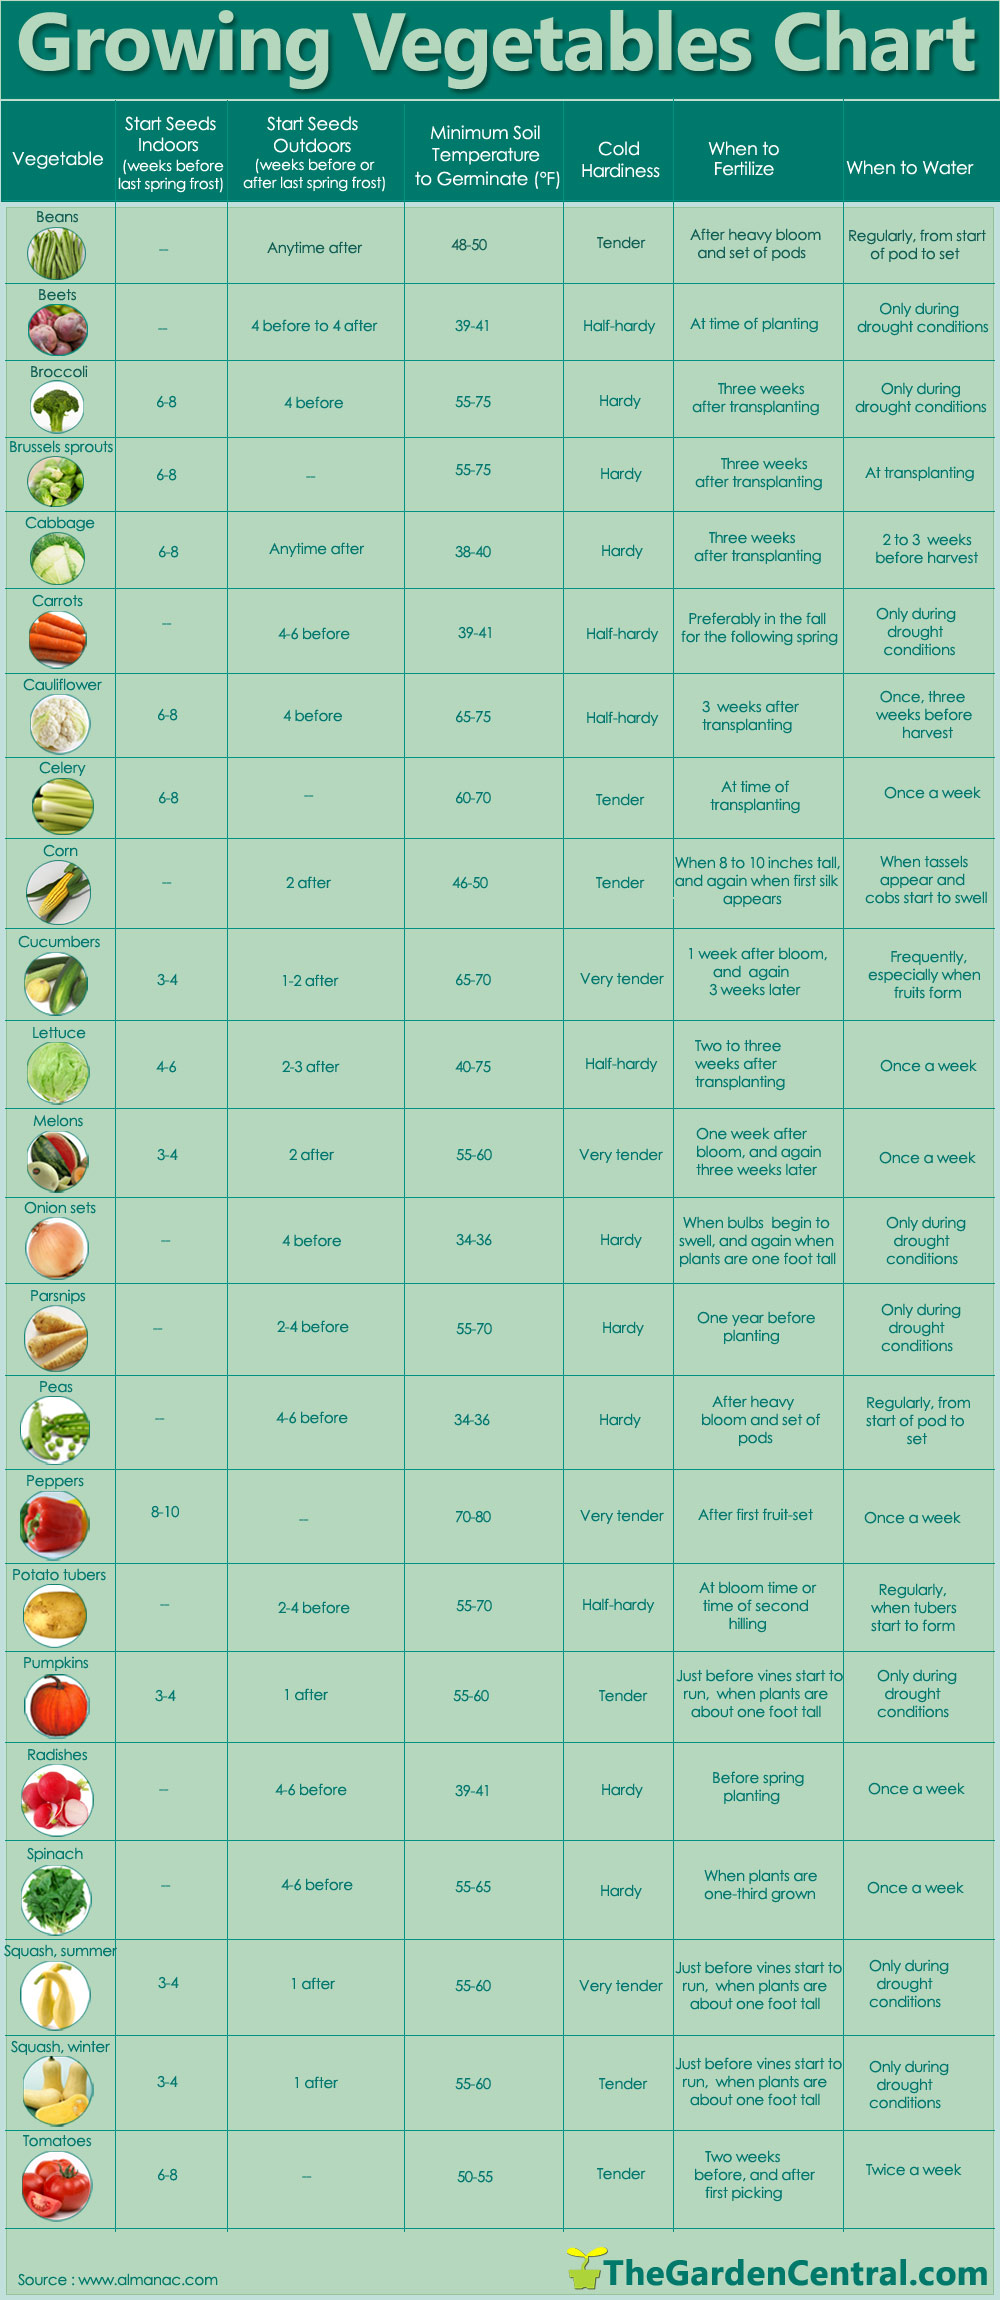
Growing Your Own Vegetables, A Chart To Help.

Knowing what to do and when to plant is critical. This handy chart gives you the guidelines to planting your own vegetables. Good information to create your own survival garden.

growing-vegetables-chart

Plant Now: Winter Sowing

Sowing The Seeds Of Love

[Source]

BELIEVE IT OR NOT, I start my summer garden in January, using a neat trick called “Winter-Sowing.” Winter-sowing is an outdoor method of seed germination (invented by Trudi Davidoff) which requires just two things: miniature greenhouses (made from recycled milk jugs) and Mother Nature. You can winter-sow your way to a beautiful garden, too…for pennies. Here’s how:

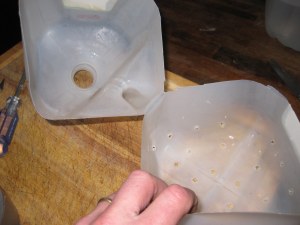
Make a Greenhouse. You can make a greenhouse from any container you like, so long as light can penetrate its walls. Like other winter-sowers, I use recyclables, including gallon-size milk- or water- jugs, and 2-Litre soda-pop bottles. With jugs and bottles, use a pen-knife to cut around the middle, almost all the way through. The uncut half-inch or so will serve as a hinge.

Next, punch out drainage holes in the bottom. A Phillips screwdriver, heated over a flame at the stove, will facilitate the hole-punching job. Punch out also a few holes along the top portion of the container. These extra holes increase air-ventilation. Ventilation, of course, is the key to preventing excess heat from building up in the greenhouse, and baking the seeds to death. If there is a cap on your jug or bottle, remove it. 

Select the Right Soil. It is essential to use a soil mix that drains well, and has a light, fluffy consistency. Pour the soil, preferably to a depth of 3 to 4 inches, into the bottom half of your container. Then moisten the soil thoroughly and let it drain.

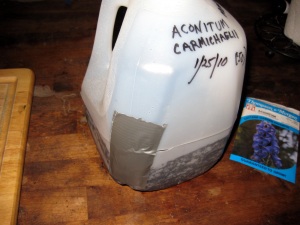
Sow the Seeds . Sow your seeds on the soil surface, and then cover them with more soil, when necessary, to achieve the proper planting depth. Gently pat the mix down, so that seeds and soil make good contact. Then replace the lid, and secure it with a strip of duct tape, as illustrated.

If you live in a cold climate, as I do, plant your perennial and hardy annual seeds first. Should these sprout during a weird warm-spell in winter, they will not be harmed. Wait until March to plant your tender annuals. More details here: What Seeds Are Best For Prepping.

Remember to Label! For each sowing, indicate with a permanent marker (or a paint-pen) the seed variety and date sown. Do not omit this step, for there is nothing worse than finding, in spring, dozens of miniature greenhouses brimming with seedlings, and not knowing what they are!

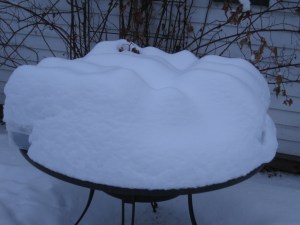
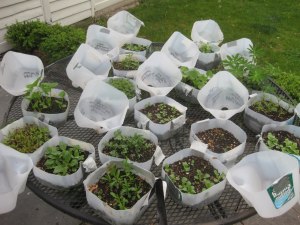
Bring the Greenhouse Outdoors. Your greenhouse, once planted and labeled, is ready to brave the outdoor elements. Select a location that is safe from strong wind, but where sun, rain and snow will be freely admitted. My assorted greenhouses go on the patio table, out of the reach of Lily the Beagle who would otherwise knock them over. For further protection from tipping, I place them in a large plastic box, with drainage holes melted in the bottom.

Relax. Now sit back and let Mother Nature do her thing. As the weather chills and warms, your seeds will freeze and thaw. These natural actions loosen the seed-coatings. This is why advance soaking or nicking of hard-shelled seeds, such as Morning Glories and Sweet Peas, is not necessary when you winter-sow.

At the first kiss of spring, but while nights are still freezing, seedlings will begin to emerge. Now is the time to check for water. Open the tops, and if the soil appears dry, moisten thoroughly but gently, so as not to disturb tender root systems. Then close the tops again. On warm, sunny days, I open the tops for hours at a time, and let the seedlings enjoy the fresh spring air. The tops, of course, are closed at dusk.

I can’t tell you how advantageous winter-sowing can be. Last year I produced an entire garden’s-worth of perennials this way (far too many, in fact), without the need for light-systems, heating devices, or fancy seed-starting kits. And, unlike windowsill-germinated seedlings, which more often than not are frail and spindly, winter-sown seeds grow up to be strong, sturdy plants, completely prepared for glorious careers in the open garden.

If I were you, I’d give winter-sowing a try. Honestly, it’s the easiest, most cost-effective way to achieve a beautiful garden.

[Source]