Written by Marc Morgan
I love to cook on a cast iron skillet. My daily cooking skillets are all “vintage” cast iron — some as much as 100 years old — and will last forever if properly maintained. I prefer the older skillets (those made before 1950) because modern skillets are heavy and inferior in comparison. This article will teach you everything you need to know about buying, cleaning, cooking and maintaining old skillets.
My wife and I are not cast iron collectors (honest, really..), we only buy what we plan to cook with. Plus we want to have enough on hand so that when our three kids move out they don’t take our working set. So we’ve been amassing enough iron to have a set for each of them. But that’s not collecting, right? That’s just good planning. Preparing for the future. Oh, and then there’s bartering. In the future, when cast iron isn’t so easy to find, we’ll have plenty for trade. We’re preppers. Not collectors. Right? Yes. Right.
 We have a variety of skillets (and a couple of round griddles) beside our stove that we cook with everyday, in sizes ranging from #5 – #10.
The #5 skillet is the perfect size for scrambled eggs, fried eggs, or warming up leftovers for 1 or 2 people.
The #8 skillet is our go-to skillet for meal preparation. It’s great for sauteing vegetables, browning meat, or baking bread. Cinnamon rolls, biscuits, cornbread. There’s nothing that doesn’t taste better when cooked in cast iron.
The #10 skillet is our favorite piece for oven-cooking bacon, burgers, or steaks.
The flat skillets are griddles and they make amazing tortillas or pancakes.
You’ll notice that a couple of the skillets on the rack are deeper than the others. Those are called chicken fryers and they are really handy when you’re wanting to fry fish or chicken or anything else that you want to deep fry.

We have some of our favorite pieces hanging on the wall just outside of the kitchen. Cast iron skillets (and trivets) make great decoration, but be sure that your wall can handle the addition of so much weight. I’ve heard stories of wallboard pulling away from wall studs when too much cast iron is hung for display. We like to say that these our bartering items for the future, but the truth is we have them hanging there just because they look pretty.

And then there’s the overflow shelving. A few of the pieces on these shelves are ones that we use, but don’t have room for on the kitchen rack. My wife’s grandmother’s gumbo pot, and a really cool (admittedly modern) cast iron wok. But most of the cast iron here is skillets waiting for the day when our kids move out and take them with them. Our hope is that, after many years watching us cook on cast iron, seeing how easy and durable and nonstick it can be, and enjoying the food we cook on it that they will start out their new lives with an already-established appreciation for the usefulness and craftsmanship of old iron.
Why buy “vintage” cast iron?
 Cast iron used to be milled in the final stages of production, after being sand cast. This milling provided a very smooth, non-stick surface. As teflon came into vogue in the 1950s, lighter nonstick pans became available and the old fashioned cast iron cookware was abandoned to the point where most of the old manufacturers went out of business.
Modern manufacturing (pretty much limited to Lodge products) does not take this extra step of milling to a smooth finish after sand casting their pans. That leaves a rough, sand-cast surface that food will stick to. We’ve yet to find a modern pan that will stand up to the scrambled egg test; cooking a scrambled egg in it with nonstick results where the only clean up necessary is a quick wipe with a towel. No scraping necessary. The old, well maintained cast iron will perform that way every time.
What to buy
Prior to the 1950s nearly every kitchen used cast iron cookware. Because it is almost indestructible, there’s a lot of the vintage iron still around. Ask your parents if they have any that was passed down through the family. Look in antique stores, flea markets, garage sales, and estate sales. Ebay is an option too. Look for that vintage very smooth cooking surface, and avoid any pans with little chunks out of the cooking surface known as “pitting.”
Here are the vintage brands to look for: Griswold, Wagner Ware (NOT Wagner 1849 – this is cheap China stuff), Lodge (more on that later), Martin Stove and Range, Wapak Hollow Ware, Birmingham Stove & Range Co.
What is the best cast iron skillet? Who makes the best cast iron skillet? In my opinion it is Griswold. They do everything right. The size, thickness and the shape of their skillets are perfect. Even their “bargain brand” Victor, which is a little shorter in height with a thinner wall, is spectacular. Wagner is my second favorite. A little thicker than Griswold and not quite as comfortable. But with a smooth surface and cooks great. Both of these manufacturers produced a lot of cast iron skillets between 1880 and 1950, so you should be able to find them.
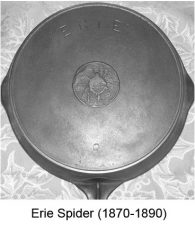
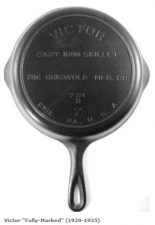
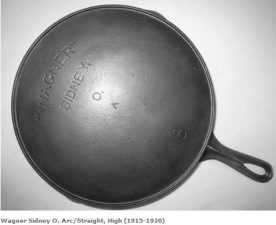
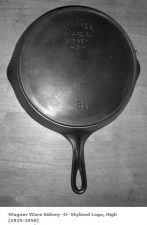
On the bottom of the pan is where the logo is. Griswold and Wagner used different logos over the years. Here is an image guide for each, so that you know the approximate date of a skillet.
Griswold:



Wagner:




Each skillet will have a number on it. This number is not the size in inches, but rather the “standardized” size of the openings in the tops of wood burning stoves. The oldest pans will have a heat ring or a rim that protrudes from the bottom of the skillet to provide a tighter fit to the stove. Each foundry used slightly different measurements for the size, but here is a general size guideline.
Sizes:
| #2 – 4-7/8″ | #3 – 5-1/2″ | #4 – 5-7/8″ | #5 – 6-3/4″ |
| #6 – 7-1/2″ | #7 – 8-1/4″ | #8 – 8-7/8″ | #9 – 9-3/4″ |
| #10 – 10-1/4″ | #11 – 10-7/8″ | #12 – 11-3/4″ | #13 – 12″ |
| #14 – 13″ |
I think that everyone should have a #5, #8 and a #10.

Another skillet to look for is an unmarked (no logo) one that has three notches in the heat ring. These are old Lodge skillets. You will notice that they are a little thicker than the Griswold and Wagner. But they still have the super smooth cooking surface. The won’t be as expensive as the others and they are great for baking. Think cornbread or Chicago style deep dish pizza.
Twenty five dollars is a good price for a #5. Forty dollars or less is what I like to pay for a #8 skillet. I’ve paid as much as seventy on Ebay for a really nice one. You don’t find many #10s “out in the wild,” as in a garage sale, or antique store. Expect to pay as much as a hundred dollars on Ebay for a #10. Remember these skillets will last forever if you take care of them. So don’t think about them the same way as you would a modern skillet.
How to Restore a Vintage Cast Iron Skillet
When you buy cast iron at an antique store or on Ebay, it will probably be cleaned already, and ready to cook on. But if you find a bargain at a garage sale, estate sale or other place, you will typically have to clean it yourself. It sounds intimidating, and if you have seen some of the scary skillets that I have found at flea markets, you probably would not have bought them. But under the crud and rust, there is GOLD! Well not really gold. But a smooth cooking surface that will make you happy to cook on it every day.
So before I outline the right way of doing it, let me tell you how NOT to do it.
- Oven Cleaner – you spray extra strength oven cleaner on a cast iron skillet and wrap it in a plastic trash bag. Seal it. Wait a day or two, and then (using rubber gloves) clean it from there. Don’t bother! This method is messy. It never gets everything off in one try. So you will have to do it as many as 4-5 times to get a clean skillet.
- Fire Bake – make a large wood fire and put the skillet into it. Let it heat up really hot. Then let it fully cool, and then clean it. This method is not advised either. The only time you really want to heat up metal really hot, is when you want to shape it. Unless you are a blacksmith, don’t do this. You might warp the skillet, and it will not be as clean as you want it.
- Drill and a Wire Brush – Don’t do this. If you use a wire that is hard enough to clean it, it is also hard enough to ruin the cast iron too.
- Dish Washer – Ahhh no. If you want to cook on cast iron, understand that you will always have to manually clean it. Never use dish soap on cast iron.
The best way to clean a cast iron skillet is with electrolysis. Rust and gunk just comes right off and you’re left with a very clean surface. This method works well, but honestly, if you don’t plan to clean a lot of cast iron, it is not worth the investment.
For your average cast iron skillet buyer, vinegar and lye are the way to clean your new finds.
Vinegar gets rid of rust. Get a five gallon bucket and put fifty percent vinegar and fifty percent water in it. Soak the complete skillet for an hour or two, depending on how much rust is on it. Vinegar is a strong acid and will eat away at the iron if you leave it in too long. Set a timer to remind you. Do not leave it in vinegar longer than necessary.
Lye is how you clean all of the gunk off a skillet. Get another five gallon bucket and put twenty percent lye, and eighty percent water in it. Soak the complete skillet in there for one to two days. Lye is a extremely strong base. It will not hurt the iron at all. You can leave a skillet in for over a year (I have) and it will not harm the metal. But lye WILL severally damage your skin if you get it on you. Use rubber gloves and eye protection at all times when using lye. Be very careful not to splash.
After using vinegar or lye, rinse off your skillet really well with water. Then take it to a sink and turn your water to as hot as you can stand it with your rubber gloves still on. Rinse with the hot water, and apply a very gentle soap like Bar Keepers Friend. Then use a brass scrub brush (brass is a much softer metal than iron) and scrub off any residual gunk or rust from your skillet. Rinse well; iron is slightly porous and you want to make sure you get the cleaner out. Then while it is still hot with the water, wipe dry and heat on a burner on your stove top to fully dry it.
Next, apply a high temperature oil (like grape seed oil, peanut oil or just vegetable oil) generously all over the cast iron skillet. Put the oiled into a pre-heated 400 degree oven for fifteen minutes. Then you are done. You will have a nicely seasoned skillet that will cook like a modern non-stick skillet.
How to Cook With a Cast Iron Skillet
A great benefit of using a cast iron skillet is that you are not limited to the stove top. Since there are no plastic handles you can put it into the oven, also. This is my favorite way to cook steaks. My wife and I prefer a nice, thick, filet mignon cut. I rinse, and then dry steaks with a paper towel 30 minutes before I plan to cook, setting them out so that the meat warms up to room temperature. Go ahead and preheat the oven now to 375 degrees.


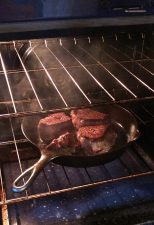

Put a #8 on the stove top and add a little olive oil to the pan. Set the temperature to high. Now I will lightly cover the steaks with the olive oil so that the seasonings will stick to the meat. I usually just do a little salt, and a lot of pepper, making sure to cover on all sides. Now that the skillet is nice and hot, take the pan out of the oven and put it on the stove top burner at medium-high temp. It’s time to put your steaks on. You want to sear on one side for five to six minutes. Do not touch the meat as it is cooking. Be patient. You will see the rest of the steak close to the cooking surface is starting to change color too. It should be beautifully seared on one side now.
Now it is time to flip the steak, then take the whole skillet and put it onto the middle rack inside your oven. Set a timer for fifteen minutes. Now you need to be patient again. Do not open the oven to check on it. Let it cook.
After the timer goes off, go ahead and remove the skillet from the oven. Take the thickest steak and put it onto a cutting board. Go ahead and slice into it to check if it is cooked enough for you. At fifteen minutes of cooking in my oven it is a perfect medium-rare steak. Add another 5 minutes of cooking for each level of steak level you prefer. Next will be Medium. Then Medium-Well. After that you really shouldn’t cook it anymore because it starts to resemble a burger at that point. 😐
Once your steak is cooked to where you like it. Remove it from the skillet and let it rest on a cutting board for five minutes. If you leave it on the skillet, it will continue to cook. Now your steak is ready to serve. That is how to cook a delicious cast iron skillet steak!
A favorite side at our house is cast iron skillet corn. Which is really easy to make. I also use the #8 for this. Melt half a stick of butter in the pan. Then add half of an onion that you have chopped up pretty small. Cook the onions till they start to turn translucent. Then poor in a 16oz bag of frozen sweet corn. Stir occasionally till the corn is fully cooked and starting to caramelize. That is it. Serve with anything.
Additional cast iron skillet recipes:
- Cast Iron Skillet Cornbread
- Fried Chicken
- Burgers
- Chicken Fried Steak and Gravy
- Cast Iron Skillet Pizza
- Caramel Pecan Skillet Brownie
- Brown Sugar Cinnamon Apple Skillet Cake
- Dark Chocolate Chip Skillet Cookie
- Skillet Blackberry Cobbler
How to Clean a Cast Iron Skillet After Cooking
Most of the time after cooking something simple like an egg, you can literally take a paper towel and just wipe the skillet clean while it is still hot. I like to add a little EVOO (extra virgin olive oil) to the seasoning on the skillet and just set it on the rack beside my stove for cooling.
Sometimes, especially when natural sugar in the food has caramelized (like in corn, or onions) there is food residue left on the pan after cooking. That requires a different cleaning method. For example, the thick-cut bacon that we like contains a lot of sugar. After cooking a batch of bacon, a quick wipe with a paper towel won’t do. Than I set it aside to cool off. I will fill the skillet with water (which you never do when the pan is hot. This will crack cast iron) and I will set it on a burner to heat up. While the water is heating I use a metal spatula or a specifically designed scraper to remove the food that is stuck on the cooking surface. Once the water boils, carefully poor out and wipe down with a paper towel. Then add a generous amount of EVOO to the surface to re-season the skillet and let it cool before putting up.
Recommended Reading
If you are interested in the history of the foundrys or would like to see all of the cooking cast iron that was produced in the past. I recommend these two books: The Book of Wagner & Griswold: Martin, Lodge, Vollrath, Excelsior and The Book of Griswold and Wagner: Favorite Wapak, Sidney Hollow Ware. These are known as the Blue Book and the Red book in the cast iron world. Everyone owns them. Well, collectors do. But we aren’t collectors. Right? Right. We just happen to own them because we like books.
There is also a Brown book, Griswold Muffin Pans, which focuses more on muffin pan information.
