Homemade Sling-Bow

by Kayak Kid

Picture of Homemade Sling-Bow
In this DIY I will be showing you how to make your very own sling-bow.  A sling-bow is basically a slingshot that’s altered to shoot arrows.  They are pretty powerful depending on what materials you use to construct them with, and can be made on a very slim budget. So without further ado lets begin!

Step 1: What You’ll Need

Picture of What You'll Need
You’ll need:

  1. A sling shot
  2. A golf tee
  3. An O-ring
  4. Two medium zip ties
  5. An old beat up arrow
  6. A few strips of duck tape

Optional:

  1. Whisker biscut

Step 2: The sling shot

Picture of The sling shot
IMG_6974.JPG
The first thing you need to do is to prep the sling shot.  The first step in doing this is to take off the existing elastic bands, and discard them.  Next take your heavy duty replacement bands and trim them until there’s 1 inch of band for every 5 inches of arrow.  For example I trimmed my bands to 5 1/2 inches, and they work perfectly with my 25” arrows.  Next put your bands on and leaving a quarter inch to a half inch of extra band extending at the end.  To test pull it back to it’s max draw and have someone measure the distance from the pocket to the extra bit of band on the sling shot.  You want this number to be less than the length of the arrow by one or two inches.

Step 3: The Arrow Rest

Picture of The Arrow Rest
IMG_6988.JPG
IMG_6989.JPG
IMG_6994.JPG
IMG_7008.JPG
The arrow rest is what is going to hold the arrow before and during the release.  You want the O-ring, to be perfectly vertical, so to do that you first need to put one of the zip ties through the O-ring and then around the end tag of the elastic band like in the picture above. Don’t tighten it all the way yet, we’ll get to that later. Then next to get the ring to stand vertical you need to counter twist the other zip tie. If you are confused at this point just reference the pictures above.  Now tighten the zip ties until the ring is right in the center, and vertical.

Step 4: Optional: Whisker Biscuit

Picture of Optional: Whisker Biscuit
IMG_7012.JPG
IMG_7011.JPG
Attaching a whisker biscuit is optional, but will help your accuracy and help preserve your arrow fletchings.  To do this put a rubber band around your O-ring using a small zip tie, like in the picture. Then slide your whisker biscuit into place.

Step 5: Arrows

Picture of Arrows
IMG_7018.JPG
IMG_7017.JPG
IMG_7019.JPG
The arrows I use are just some carbon fiber arrows I out grew or some that just have bad fletchings.  First you need to remove the fletchings and knock.  The knock should pull out with a pliers, and the fletchings are easy to remove using a pocket of your hunting knife.  You should by now have an arrow striped of everything except it’s Insert.

Step 6: Fletching The Arrows

Picture of Fletching The Arrows
IMG_7021.JPG
IMG_7023.JPG
IMG_7024.JPG
To fletch the arrows I use duck tape.  This is the best, cheapest, way I found to do it. First rip a section of duck tape about 2-3 inches long. Next crease the duck tape in the middle leaving a little bit not stuck together at the top. Then stick that part to the arrow shaft about 1 to 1-1/2 inches from the end were the knock use to be. You will get better flight and accuracy if you angle your vane’s to make the arrow spin, but it isn’t required for good performance.

Step 7: Reapeat

Picture of Reapeat
IMG_7032.JPG
Once you have repeated this to all three to five sides you are ready to cut out the actual shape your vane/feather will be. I like to use a downsized version of the original vane’s shape, and make normally three of these.

Step 8: The Nock

Picture of The Nock
IMG_7037.JPG
IMG_7038.JPG
For this I found that hot gluing a golf tee into the shaft is the best way to go.  Shooting arrows with the standard nock is OK but it seem to put more stress on your fingers, and can sometimes slip out. The last thing to do after this is to screw in your point.
Now you’re all set to shoot!  I hoped you enjoyed this instructable and wish to see more in the future.

41 Genius Camping Hacks You Must Try


1. Make pizza in your pie iron with biscuit dough.

Get the complete recipe here. You can also just use sliced bread and a little butter.


2. Line your pie iron with foil for easy clean up.

You can go from grilled cheese to apple pie pocket with practically no clean up.


3. Wrapping your meat in cabbage leaves will keep it from getting burnt to a crisp.

The cabbage is dense and moist enough to create the perfect nonstick barrier. No more accidental charred-to-a-crisp meals!


4. A miniature Tic Tac box makes a great miniature tackle box.


5. Adding sage to your campfire or fire pit keeps mosquitoes and bugs away.

6. Kids can make an adorable and easy keepsake bracelet out of duct tape.

They can stick things on, like tiny pebbles, flowers, or leaves, and create a souvenir from their nature walk. Just make sure the sticky side is on the outside.


7. Here’s an awesome s’mores hack your kids will love:


8. Stovetop popcorn (like Jiffy Pop) can be made over a campfire.

They’re so easy to transport, and kids will be amazed when the foil begins to expand. Just be careful, as the handle will become very hot.

You can also make your own out of popcorn kernels and aluminum foil. Directions here.


9. Keep extra duct tape for emergencies right on your water bottle.


10. Make eggs and bacon in a paper bag.

It’s an easy way to make multiple breakfasts at once. Get the recipe/directions here.


11. Use an acorn cap to loudly whistle for help if you’re lost in the woods.

Get the step-by-step instructions here.


Or make a willow whistle.

Get the instructions here.


12. These compact towels can dry off two people after swimming and are dry to the touch within an hour of use.

Purchase here.


13. Bailey’s dipped toasted marshmallows are a must for camping.

Toast a marshmallow over hot coals, and then dip the warm marshmallow into a cup of Bailey’s. They’re so delicious and addictive, you’ll want to make them even when you’re NOT camping.


14. Make flaming Jell-O marshmallow shots.

HOW COOL IS THIS. Fill the marshmallows with a Jell-o mixture and dip into rum. Get the full recipe/directions here.


15. Make a last-minute camping spoon with a knife and a plastic bottle.


16. Fill a gallon milk jug with water and 1/4 cup salt to use as a salt block for your cooler.

The jugs mean that you won’t get water all over your food when the ice melts. The salt will make the cold last longer — however, it also means that the water in the jugs won’t double as emergency drinking water.

Read more about it here.

17. Carry your seasonings in straws.

Just use a lighter to re-seal.


18. You can also keep seasonings, toppings, and condiments separate but organized in stackable pill containers.

Label with a Sharpie.


19. Blue cheese filled bacon-wrapped mushrooms are the savory version of a campfire s’more.

Get the full directions here.


20. This is the coolest tarp trick:

Use a small stick to help secure the main center line. When pressure is put on one end, the line will tighten evenly, keeping the grommets from being torn out.


21. Pre-make your food and vacuum seal it.

It will stay fresh longer and will be easier to pack.


22. Keep your toiletries hooked onto a shower caddy.

You can buy one here for $9.95 or make your own.


23. Slit foam swim noodles lengthwise and slip over each awning strut.

Not only are you less likely to bump into them in the dark, but they’ll be padded!

You can also use a pool noodle to cushion a canoe before strapping it to your car to protect from scratching.


24. Carry some emergency TP in an Altoids container.

Especially if you’re going to be venturing off on a hike or nature walk.


25. A 16-ounce water bottle will hold 8–9 large eggs.

Pre-scrambling your eggs will save you the trouble of having to figure out a way of transporting them. It also eliminates the need for a separate bowl and whisk.


26. This collapsible silicone coffee dripper takes up almost no space.

And it has a super high Amazon.com rating. Get it here for $10.99.


27. For fewer burrs, rub the laces of your hiking boots with paraffin before hitting the trail.

28. Corn chips (like Fritos or Doritos) make a great substitute kindling when starting a fire.


29. Make an inexpensive candle lantern out of a used tuna can and a candle.

The foil will reflect the light and create more glow. It could potentially block some wind, as well.


30. Silicone cups are unbreakable and super easy to pack.

Get ‘em here.


31. Make toothpaste dots.

Spread them out on a plate, let them dry for 2–3 days, and then sprinkle baking soda over them. Once they dry, just pop them into a resealable plastic bag.


32. Keep your TP dry in a CD spindle.

If you’re trying to save space because you’re backpacking, take the tube out and flatten the toilet paper. Keep it in a plastic bag instead.


33. Instant grits will keep ants away from your campsite.

Just sprinkle wherever you see the ants.


34. Use biodegradable trail marking tape so you don’t get lost while hiking.

Buy it here.


35. Safely remove a tick with a cotton ball soaked in liquid hand soap.

Keep it on the tick for at least 20 seconds. The tick will cease biting, back out, and will remain stuck to the cotton ball when it’s pulled away. If the tick has been embedded for awhile, keep it in a jar so you can test it for Lyme disease.

Note that there is debate on whether this actually works. Here’s a testimonial that says it does, but there’s no scientific evidence to back it up, so try at your own risk and keep a pair of tweezers in your first aid kit.

36. Your deodorant doubles as a mosquito bite itch queller.


37. Make solar camp lanterns out of mason jars and solar disks.

Get the full directions here.


38. Johnson’s Baby Creamy Oil doubles as a super effective mosquito repellent.

And you won’t smell like bug repellent.


39. Glue sandpaper to the top of your match holder.

Keeping your matches in a tupperware or stainless container will ensure they don’t get wet.


40. Cobble together a makeshift shower using a large water jug and a watering can head.

Get the full directions here.


41. Make camping sangria concentrate using a mason jar.

No, you don’t have to go camping to try this delicious sangria. Get the full recipe here.

Click here for more ingenious camping spots!

[source]

Save And Share This Infographic: What Is The Shelf Life Of Your Food?

Wasted food

According to a survey by the Food Marketing Institute, such confusion leads nine out of 10 Americans to needlessly throw away food. The survey found 90 percent of Americans “at least occasionally throw food away prematurely because they mistakenly interpret the date label to mean their food is unsafe” — and 25 percent say they always discard food on or before that date.

Related: Long Term Food Storage

The researchers blame “a lack of binding federal standards, and the resultant state and local variability in date labeling rules” for the inconsistency in date-labeling practices.”

In 2012, one national study estimated that 40 percent of the country’s food supply goes uneaten. The cost of that wasted food is about $165 billion, including $900 million in “expired” food.

A family of four, the study found, spends an average of $455 a year on food it doesn’t eat. The researchers recommend making “sell by” dates invisible to the consumer, and have the food industry establish a standard, uniform labeling system.

Types of FOOD dating

There are three types of dates on a food that is purchased. If the package says “Sell By,” be sure to purchase the food before the date listed. The “sell by” date tells the grocer how long to display the food. The food should remain good for a period of time once you get it home.

The “Best if Used By” is not a purchase or safety date. The date stamped after that term is the date the food should be used by for best flavor or quality. A “Use-By” date is the last date recommended for peak quality of the product.

All three terms are guides to help a purchaser determine the quality of the food. The food can be safe and of good quality after any of the three above open-dating terms are used.

This Infographic below explains a bit more:

FoodShelfLife-InfoGraphic3

[source]

How to Survive in Space After the Ultimate Disaster

How to Survive in Space
Source: Emergency-Management-Degree.org

How to Survive in Space After the Ultimate Disaster

Prepper’s guide to surviving in space

Could humanity actually survive the ultimate emergency: the end of the world? From black holes to starvation, these are the essentials when it comes to surviving in space after a disaster destroys our Mother Earth.

Radiation

Simply leaving Earth’s atmosphere exposes you to more radiation than is healthy.

Earth’s atmosphere protects from radiation the way a 1 meter thick slab of metal would.

Problem:
1 Sievert = +5.5% rise in risk of fatal cancers
One round trip to Mars = .66 Sieverts
The equivalent of a full body CT scan every 5-6 days.

Solution:
Prolonged habitation on planets with weak atmospheres would require living underground.
Or,
A magnetosphere (for spaceships):
Magnetic fields like what earth is encased in can deflect radiation.
Shields need to be made of fibers.
Bulky materials are weak with spaces and imperfections.
A spider’s web is strong because it is made of individual unbroken threads.
Radiation sensors can alert space travelers when they need to be behind shields.

Starvation

It costs $10,000 per lb of food sent to the International Space Station–we’re going to need to grow food as we fly.
Astronauts currently get 3.8 pounds of food per day.
This is 7,000 lbs of food per person to get to mars and back.

Introducing Space Farming!
FOR SPACECRAFT GROWTH, consider:
Plant size
Antioxidants (fights radiation)
Quick growth time
No processing equipment required

Good candidates:
Lettuce
Spinach
Carrots
Tomatoes
Spring onions
Cabbage
Radishes

This keeps you fed, but growing food also:
Reduces stress
Improves mood
Alleviates depression
Promotes social growth
Pushes mental and physical rehabilitation
And increases resistance to general illness.

FOR GROWTH ON FOREIGN PLANETS, consider terraforming:
Ideally leading to an ecosystem, with oxygen produced
Carbon dioxide reduced,
And water recycled.

Space Dust

Wait…Moondust can be deadly?
It is the consistency of flour… so it:
Slips through gaps in equipment,
Is easily kicked up,
Sticks to people

Causing:
Radioactive exposure,
Allergic reactions,
Lung cancer from inhalation.

And Mars dust might be worse.

Space Junk

Debris that orbits the earth travels at 17,500 mph.
Orbiting for millions of years.

Even a small fleck of paint
Can disable a middle-sized spacecraft.
–> Any collision then makes more spaces of space junk.

Static Electricity

Yes…static electricity can disable equipment in space.

In humid conditions, water conducts electrons off of our body.
Space is incredibly dry.

Every time equipment touches other objects in space
chance for equipment crippling static electricity occurs.

NASA has a reverse lightning rod.

Black Holes

Once you’re past the event horizon, that black hole isn’t letting you go.
Event horizon: the point around a black hole where gravity is so strong that light and radiation can’t escape.
–Meaning– We can’t see past the event horizon.

Small black holes(the size of earth) are extreme.
To get pulled past the event horizon
Would instantly turn you into a stream of subatomic particles.

Larger black holes give you more time (literally)

As you accelerate faster and faster you move through time more slowly.
Things falling into the hole in front of you slow in time more.
So in front of you, you can see things previously fallen into the hole
And behind you, you can see things from the future, rapidly approaching you.

Meanwhile you’ll “spaghetifi” because the gravity on your head (or whichever end is falling into the hole first)
will be so much more than that on your feet.

Water

Turns out there is water in space. [11]

Interplanetary dust contains both hydrogen and oxygen, at times mixing to rain down on surfaces.

Interplanetary dust is also the most carbon-rich meteoric substance.
With 30,000 – 40,000 tons of interplanetary dust raining onto Earth yearly
It could have been the origin of life on Earth.
–> And it could sustain us in space in the future.

So surviving in space isn’t a cinch. There’s a reason it’s called the final frontier.

Citations:

  1. http://www.space.com/21353-space-radiation-mars-mission-threat.html
  2. http://www.nasa.gov/vision/space/travelinginspace/radiation_shielding.html
  3. http://www.cnn.com/2013/06/27/world/europe/star-trek-shield/
  4. http://modernfarmer.com/2013/09/starship-salad-bar/
  5. http://news.discovery.com/space/history-of-space/kitchen-mars-astronauts-110829.htm
  6. http://www.sciencedaily.com/releases/2013/03/130328075708.htm
  7. http://www.cracked.com/article_19158_the-6-weirdest-dangers-space-travel.html
  8. http://www.wired.com/science/space/news/2005/04/67110
  9. http://library.thinkquest.org/03oct/01581/SpaceTravelEnglish/dangers/spacedebris.html
  10. http://www.livescience.com/19683-happen-fall-black-hole.html
  11. http://www.space.com/24422-solar-wind-makes-water-star-dust.html

Live Off The Grid In Your Own Upcycled Shipping Container Home

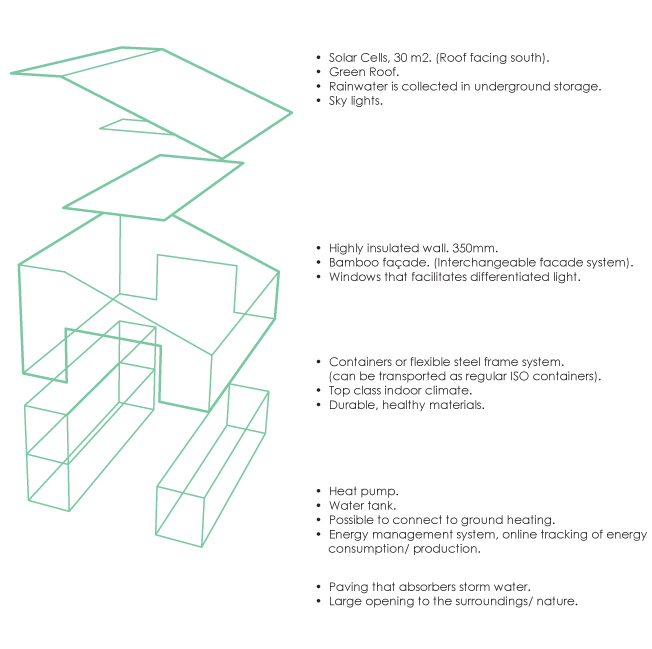
Upcycled Resource Conscious Architecture that can be exported to any place in the world. It is more than architecture; It is a sustainable product. This home would be perfect for many of those that would prefer to live off the grid, be self sufficient and use recycled materials.
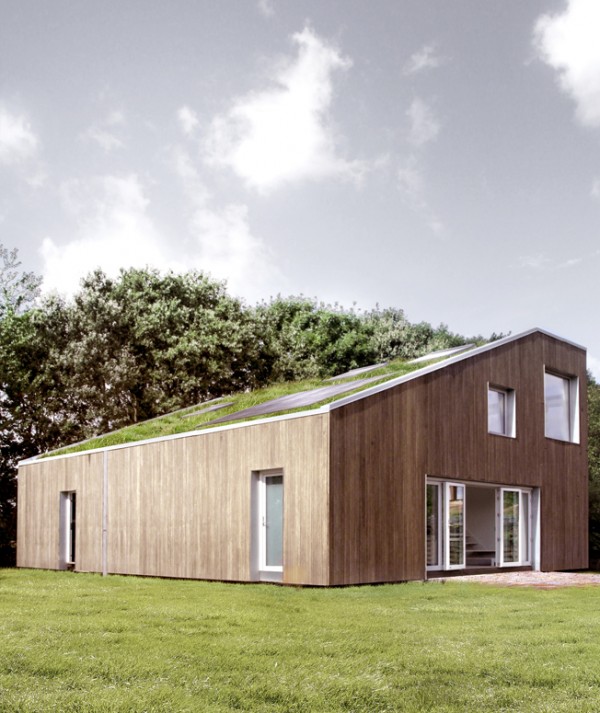
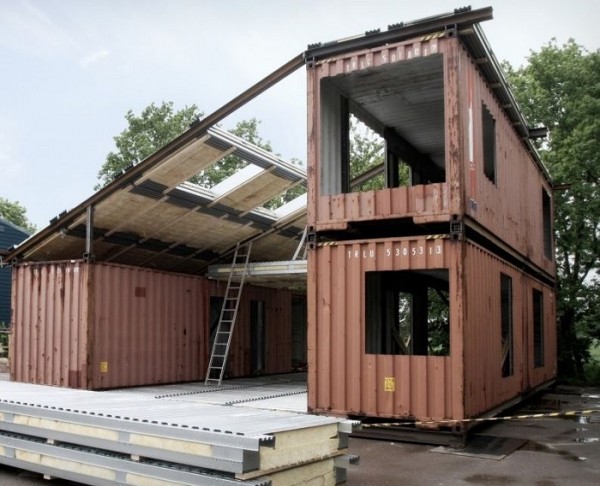
upcycle-house-container-home upcycle-house-container-home-1 upcycle-house-container-home-2

To see the entire project of this Sustainable prefab house built with shipping containers. [source]

Old shipping containers used as the structural framework for the WFH- Huse. This is not just recycling; This is upcycling!

In Short:

• The WFH concept is a patented modular building system, based on a design principle, using 40 feet high standard modules as

structural system.

• The structure can be adapted to local challenges such as climatic or earthquake issues.

• The first prefabricated housing system that meets the demands in the international environment-building-standard, Active House.

• The structure can be configured to meet many different purposes, multi storey, townhouses, cluster houses or individual villas.

• Top class indoor climate, low energy consumption and environmentally sound materials.

• Very short construction-period.

• Demountable for recycling or relocation.

• Online customization-tools give clients the possibility to decide their own version of the house concerning layout, size, facade, interior etc. The configuration happens within a predefined framework that will ensure high architectural value and quality of materials.

• Cost competitive in comparison with other green houses.

• Building-components are prefabricated and on site construction can be limited. The design allows for high-quality industrial production in large numbers and distribution using standard container transport.

Facts:

• 180 square meters.

•Energy class, which is 50% lower than the standard requirements for new housing constructions in Denmark.

• Photovoltaic cells are integrated – area is flexible, but to fulfill the standards above min. 20 m2 solar cells for power production are needed.

With an area of 30 m2 or above a normal household using energy efficient appliances will be self-sufficient with power on an annual basis.

• Green roof solutions that are optimized for rainwater harvesting for use for toilet flushing, washing and cleaning.

• Customized façade solutions.

Design

The design is based on Nordic values. Not only according to architecture, but also design objects. These values are defined as:

Flexibility.

• Build for people, human values. – Good daylight conditions, different types of light.

• Reliable (long term) solutions. – Healthy materials, recyclable materials, design for disassembly strategies.

• Materials that age gracefully.

• Access to nature, greenery.

• Minimalistic look.

• Playfulness.

Sustainable global housing

The WFH concept is a modular concept, based on a design principle, using 40 feet high cube standard modules as structural system. The structure can be adapted to local challenges such as climatic or earthquake issues. Online customization-tools give clients the possibility to decide their own version of the house concerning layout, size, facade, interior etc. The configuration happens within a predefined framework that will ensure high architectural value and quality of materials. Building-components are prefabricated and on site construction can be limited.

FLEX space

The FLEX space is the heart of the house. It contains the living room, kitchen and can be used for multiple purposes. Parts of the room are double height, creating perfect lighting conditions. The rest of the space is one story height, defined by the landing that creates access to the spaces on the second floor. In each end of the FLEX space there is access to the surroundings and daylight. The boundary between inside and outside disappears, when the doors open. This is a fundamental part of the design; to be able to open let nature in. It is a consequence of having varying requirements for inside temperature and definitions of what domestic functions takes place inside and outside.

Geometry

The geometry of the FLEX space is defined by the two rows of modules, and can easily be modified to specific wishes regarding size. The FLEX space has a number of possible solutions for subdivisions. Both on one plan or two plans. It can also be one big space, creating a lot of light and openness. The kitchen elements are built into the wall (into the technical module). It creates more floor space and also makes connection to water and plumbing easy. The kitchen can also be extended with at freestanding element, defining the work area of the kitchen. From the FLEX space there is access to all spaces. This eliminates square meters used for logistics. It is possible to make larger openings from the FLEX space into the rooms, again creating flexible solutions within the same system.

The work area of the kitchen

From the FLEX space there is access to all spaces. This eliminates square meters used for logistics. It is possible to make larger openings from the FLEX space into the rooms, again creating flexible solutions within the same system.

Bedrooms

The size of the bedrooms is defined by the half of a module (15m2). There are four bedrooms, and they can be used for multiple purposes: A parent’s bedroom, kid’s bedroom, workspace etc. Three of the rooms have windows on two facades, creating a mixed light. It is possible to remove the wall, or part of it, facing the FLEX space. This adds flexibility to the layout and shows the structural systems ability to adapt do different needs.

Landing

The landing creates access to the second floor, but can also be used as a space for play, relaxation or work. It gives the inhabitant the possibility to draw back, but still enjoy the company of people in the house. You are in the FLEX space, but because you are on the first floor you are drawn back from the action. It is an ideal place for a quiet retreat and still being able to observe what is going on in the house.

To see the entire project of this Sustainable prefab house built with shipping containers. [source]

Could you see yourself living in one?

Garlic – The Ultimate Survival Tool

Garlic may be the perfect survival tool.

Mother Earth provides survival foods.

Garlic has been used by mankind for over 7,000 years! Garlic tastes amazing, at least to us, but did you know just how powerful this herb is. It does more than just keep Vampires at bay.

Survival benefits of garlic

Just some of the Uses of Garlic that have been claimed

  • Acne
  • Athlete’s foot
  • Blood thinning
  • Cold sore treatment
  • Cold prevention
  • Cough syrup
  • Diabetes
  • Weight Loss Aid
  • Mosquito repellent
  • Pesticide
  • Psoriasis relief
  • Gas prevention
  • Ear infections
  • Splinter removal
  • Facial Skin cleanser
  • Yeast infections
  • Parasite killer
  • Fish bait
  • Mole removal
  • Hair loss help
  • Aphrodisiac
  • Reduces blood pressure
  • Toothaches

[source]