I’m Married To A Prepper . . . What Do I Do Now?

First, I would like to say congratulations! And secondly, I’m not a fan of the “prepper” label, I prefer to use “realist” or “survivalist”. With the popularity of TV shows like Doomsday Preppers, a “prepper” has become a stigma the mainstream media and often called nutty, crazy or just out there.

worried wife of a prepper


So back to your “realist” spouse, it’s important to know what exactly they are preparing for, and are you embracing or opposing it? Was it a recent event or has this been going on from the beginning of your relationship? Many “survivalists” have a specific trigger event or future fearful event that they focus on.

Communication is key, it’s better to discuss everything openly, and be partners. I have heard of the excessive “realists” that can spend everyday and almost every dollar on their preps, the ones usually portrayed on TV. With open communication and a set plan, it can bring you closer together as a couple or tear you apart. Either way, Talk it out.

In your discussions, you should find out why it’s important to prepare. “Independence, self reliance, survival, family, etc…” what makes emergency preparedness important to you and your spouse that matters most.

If you can’t be a part of it, please don’t mock it. Your spouse cares enough about you to include you. It’s easy to think, “It’ll never happen to me”, until it does. Mother nature, happens so it’s best to be as prepared as possible. You wouldn’t go on vacation without packing a suitcase…


Read more survival blog articles…


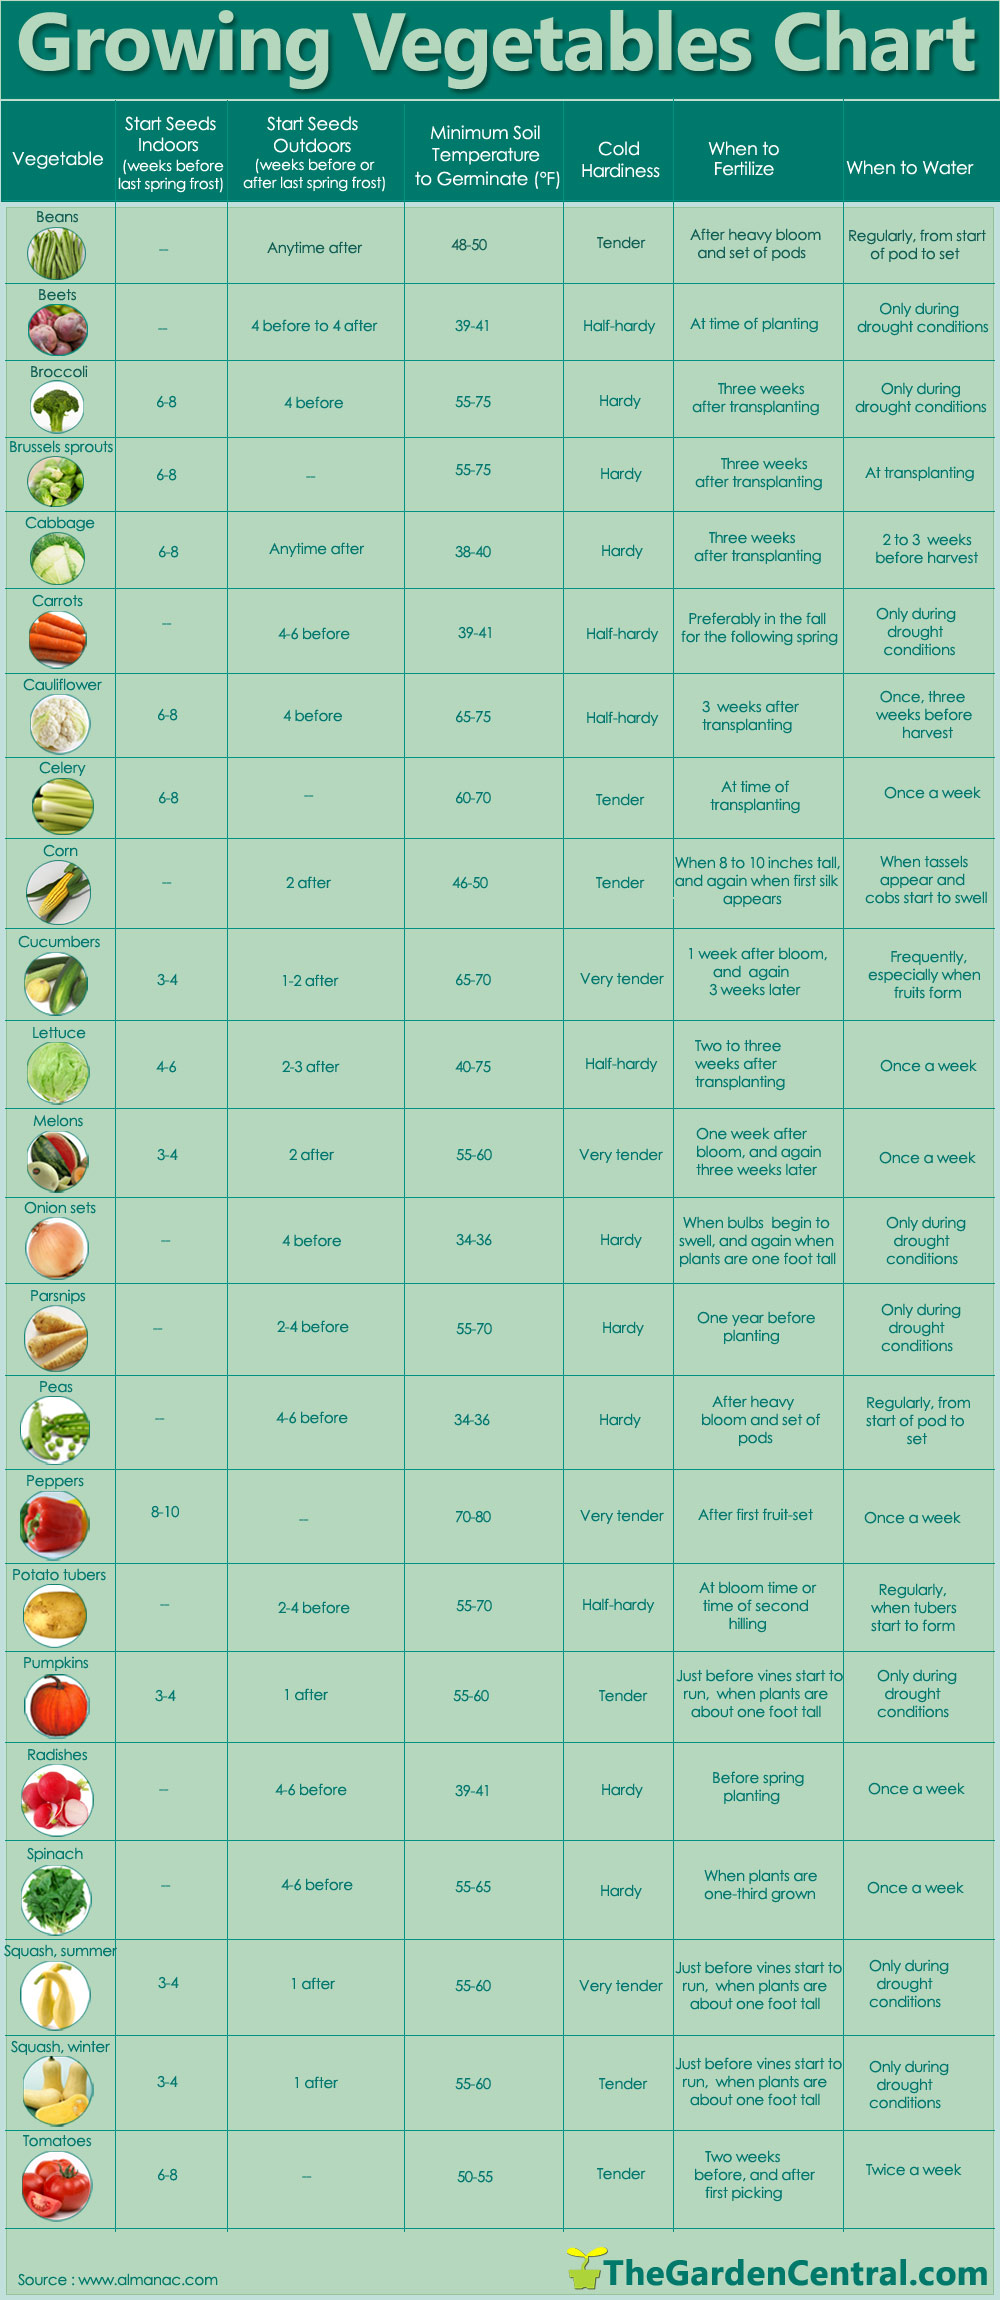
Growing Your Own Vegetables, A Chart To Help.

Knowing what to do and when to plant is critical. This handy chart gives you the guidelines to planting your own vegetables. Good information to create your own survival garden.

growing-vegetables-chart

Have You Ever Wondered How You’re Going To Store Food When The Grid Fails During The Apocalypse?

But even more pressingly, do you know how to eat well during the inevitable post-storm power outages in your neighborhood?

In my experience, while the power company spends its energies hooking up more important buildings like schools and hospitals, I spend at least the first day in the dark.  That means encouraging my family to eat ice cream before it melts and cooking hot dogs over a fire. The fridge’s cold air is fading fast and it can only be opened on a strict schedule: whenever every member of the family is simultaneously dying of hunger. By the second day, the refrigerator’s cooling powers have failed entirely. The now useless box begins to stink of rot and breakfast is served at the doughnut store. In fact, every meal is either pizza or donuts until the electric company decides to grace my street with their omnipotent presence. Although a power outage is a kid’s culinary dream, it can be an adult’s nightmare.

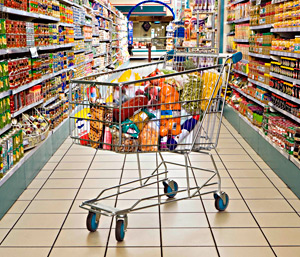
What to buy at your grocery store to prep for when you need doomsday survival.

Yet, with a little knowledge and planning, you can actually cook delicious meals without a refrigerator. After living on boats for almost four years with no or limited electricity, I have learned it is possible to eat like a gourmet without ice.

  1. Get a gas stove: With a gas-powered stove, you can heat basics like hot water even when there’s no electricity. Boiled water will be vital after the apocalypse when there is no clean, running water.  Just kidding.. sort of.  If your main stove is electric, a small camp stove with a propane tank will suffice for roughing it during a power outage.
  2. Eggs Eggs Eggs!!! Eggs don’t need to be refrigerated! Eggs can last up to a month at room temperature. You do need to turn them over every day to coat the insides of the shell with yolk. Otherwise, the shells will become brittle and crack more easily. If they smell bad, or are cracked toss them.

  1. Canned Food: Canned beans and veggies are a great way to store food. These can go great in soups, chilies, and stews, or make a nice addition to salad. Be sure to have a non-electric can opener.
  2. Fresh Vegetables: Many vegetables do not need refrigeration. Root vegetables such as onions, carrots, and potatoes can last for weeks in a cool, dark area. More perishable vegetables, like tomatoes and zucchini, can last a week in room temperature conditions.  Tomatoes even taste better when they’re not refrigerated. Use your judgement when storing food. Of course, vegetables will last longer in cool, dark places. If you live in Alaska, your food will last longer than in Jamaica. I would recommend going vegetable shopping twice a week to keep up a rotation of your stores.  Now you can make onion, garlic, and tomato egg omelets!

  1. Fresh Fruit: Most fruits do not need refrigeration. Apples, bananas, and oranges will all do fine for weeks without refrigeration. Store apples away from other fruits, however, because they have a tendency to cause other produce to decay more rapidly. Berries and peaches will last a few days without refrigeration. Don’t eat if they are moldy! Again, shop for these more perishable fruits a few times a week.
  2. Dairy Products: Butter can last weeks without refrigeration. Monitor the butter for spoil. To encourage your cheese to last indefinitely out of the fridge, wrap hard cheeses in vinegar and cheese cloths. This may prolong the life of your cheese.
  3. Rice: and other grains are perfect when you have limited power. If you have your gas stove, you can cook up a pot of rice, and add some of your fresh veggies for a great dinner.
  4. Become a Vegetarian: I would not advise storing meat when you do not have refrigeration or an ice box. If you must have meat, cured sausages such as charcuterie will keep without refrigeration. Canned fish is a great way to add protein. If you really enjoy the 19th century lifestyle, salted cod will also keep. Soak the dried, salted fillet in water for a day, and you will have fresh, desalted, re-hydrated fish.
  5. Beverages: Wine and beer store nicely and will go well with your preserved cheese! Enjoy your next power outage in French style!

Please use your own judgement when consuming any food. These are techniques the author has found useful. The author is not liable for any illnesses you may experience due to eating non refrigerated food.


Source: Off The Blueprint

How To Survive In Your Home During An Emergency

How prepared are you? According to studies only 10 percent of Americans are prepared for a natural disaster. More frightening, there are on average 50 natural disaster across the country each year. Whether it’s an earthquake, tornado, or flood you should be prepared. Below is a guide on how to survive in your home during an emergency.


be prepared with year zero survival


DIY Chicken Watering Hole (and Other Critters Too)

Easy Fill Chicken Waterer

We keep our chickens in big cages to keep them safe from predators and so we have an easy time finding the eggs. One of the biggest hassles of this is filling the waterers inside the cages, especially after it rains. I decided there had to be a better way. Here it is and it doesn’t cost a lot.
The parts list is:
1 5 gallon bucket with lid
1 new oil pan
And some 1.5″ PVC pipe, some fittings, PVC primer and cement, some gasket material, and a valveI started by using a hole saw to cut a hole in the top of the bucket for the pipe to fit through.

You can see that the hole ended up a little bigger than the pipe but I’ll take care of that.

Here is the label from the gasket material I used. It comes in sheets. This kind came from Lowe’s but I’m sure you can get some at any hardware store.I used some snips to cut the gasket into squares and to cut holes into the squares. These were my first cuts, so to speak. I had to enlarge them a little to fit around the pipe perfectly.

Here are the fittings I used. Put a gasket over the long threaded piece on the left, then put it through the hole. Put the other gasket over the fitting on the inside of the lid, then install the nut on the inside and tighten it up.

Here it is with the gasket on the upper fitting. It looks a little sloppy but I don’t think the chickens will care.

After you tighten up these fittings you need to make sure that the pipes and fittings fit together. Here is what it looks like.

Then I used the PVC primer and cement to make the connections permanent. You probably don’t want to cement the valve on at this point because you will want to put the pipe through the side of your cage. If you have the valve cemented on you will have to cut a big hole in the side of your cage and then repair it. You might want to assemble this in your chicken cage to make sure you have the height and angle of the fittings correct before you use the cement. Here is the primer and cement I used.

Next, I used a drill with a 3/16″ bit to drill four holes in the bucket about a 1/2″ above the bottom.

Here is the assembly placed into the oil pan.

Here is the assembly in the corner of the cage.

Here is the valve I used. It will keep bugs and vermin out of the water tank and it creates a vacuum that keeps all the water from pouring out.

I used a tie wrap to hold the pipe to the side of the cage and used wire to hold the bucket steady.

To fill it just turn on the garden hose, open the valve and pour water in. The pipe is big enough to let the air out while you are filling it. When you get it full just close the valve and you are done.The total cost was about $15 and now I don’t have to get my feet muddy when it rains.

source


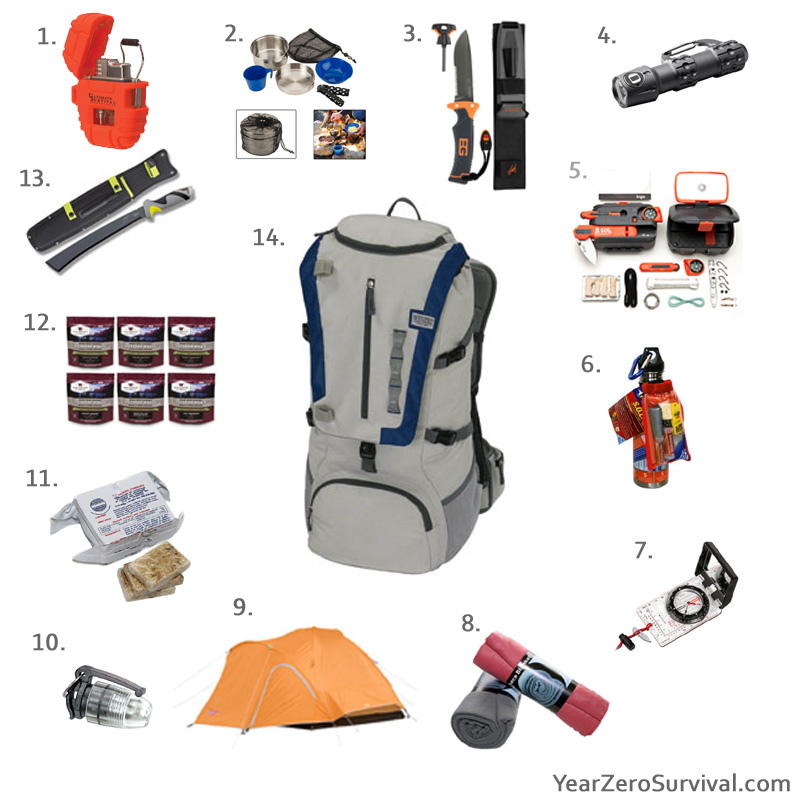
Not Quite The Perfect 72 Hour Bug-Out Pack, But Close

72_hour_bugout_bag_pack-YZS

Although this may not quite be your perfect 72 Hour Bug-Out Pack, it’s close. We would add 2 additional items, a hand gun and ammunition. (but can’t offer those)

Key Items:

1. Delta Shock and Storm Proof Lighter

2. 1 Person Stainless Steel Mess Kit

3. Bear Grylls Ultimate Fixed Blade Knife

4. Carabineer LED Flashlight

5. SOL Origin Survival Tool

6. Survival Water Bottle and Kit Combo

7. Ranger CLQ Compass

8. Warm Polar Fleece Blanket

9. Hooligan 3 Tent

10. Infrared LED Flasher

11. 2400 Calorie Food Bar

12. Cook in the Pouch – Emergency 72 Hour Meal Kit

13. Les Stroud – Survivorman – Jungle Machete

14. Escape Backpack

One additional item not shown:

15. Deluxe Hygiene Kit


This is one illustration of the items you could consider for your own Bug-Out bag. We also carry pre-made Bug-Out bags ready when you are. Depending on your location and situation, you may want to add or delete items suggested here.

Bear in mind, this pack has all the elements to last you longer than 72 hours, with the exception of the food items, and your ability to find a source of water.

What would you add or remove from yours?


5 Big Tips for Living Without Electricity

no power

When Hurricane or “Super Storm” Sandy hit here last autumn, I didn’t have power for eleven days. I was one of the lucky ones, though — I still had my house, a gas-powered stove, and gas-heated water. Here’s what I learned about living without electricity.

Light

  1. Headlamps are better than flashlights. Have one for each person.
  2. Large camping lanterns with fluorescent bulbs are great but be aware that they will only light up your immediate area. They also burn through batteries fast.
  3. Candles are traditional and don’t require batteries, but they also don’t provide much light.
  4. Another idea I’ve read about but haven’t yet tried is to charge up solar-powered LED garden lights during the day and distribute them around the house at night.

Refrigeration & Cooking

  1. If you’re not following Eve’s Tips for Living Without Refrigeration, you’ll want to get a cooler ready for your perishables. Alternatively, you can designate a freezer as your cooler. Organize your food so that you know what’s where and what you’re going to grab first.
  2. Freeze as much ice as possible — in containers, water bottles, and ice trays. If you can’t fit in or freeze all your bottles, fill them with drinking water. Set your fridge and freezer temperature settings to their coldest point.
  3. Bag your meat and ice cream to avoid a mess later.
  4. If you have the means to cook, plan and print your recipes before the power cuts.
  5. Once the power cuts, keep the fridge and freezer doors closed for at least a few hours. How long the temperature will stay down will depend on how full they are. Just be sure to grab the ice while it’s still frozen.
  6. Load up your cooler with the ice and your priority perishables. Open it as seldom as possible. Watch out for the inevitable leaks as the ice melts.
  7. Even after the ice has melted, the cold water and small size of the cooler will keep temperatures down.
  8. If you have a gas stovetop and a lighter or matches, you’re all set for cooking. You can make soups and stir-frys out of the last of your perishables, and then start on canned and packet meals. Even foods that don’t normally go in a pot can be heated by steaming them.
 

off grid living

Temperature Control

The worst part of a power outage in the late fall and winter months is losing your heat. A fireplace helps, but burning logs isn’t enough. Unless you’re already in an enclosed space, the warm air is going to be sucked away. To avoid this, you can create a temporarily enclosed space, for example by using some good tape and a few plastic painter’s drop sheets. If you manage to get your fireplace and stove into the same space, it helps to boil some water and steam up the room a little. However, it’s not wise to run gas heat in an enclosed space for long (and a gas fireplace shouldn’t be enclosed at all). Also, the steam will eventually soften up your walls.

Keeping Cool During a Summer Power Outage

Connectivity

  1. Your best tools for keeping in touch are a battery- or hand-crank- powered radio, a corded landline phone with a backup battery, and your cellphone. The landline will only last so long, but that way you can give your cellphone a rest before it’s needed.
  2. Charge up any laptops in your home. You may not have wifi after the power cuts, but they can be used to charge up any USB-powered devices, like your phone.
  3. Write down or print out any phone numbers and emergency information you may need (e.g. where the nearest shelters and pet shelters are).
  4. Solar power is a great resource if you have or can build a solar charger, but don’t hold your breath — it may take a long time to power your devices.
  5. Prepare for gas shortages by rationing the gas in your car if necessary. Walk or bike when you can.
off grid transport

Staying Positive

  1. It’s not easy in the dark, without many of your usual creature comforts. But this is just another adventure, same as if you got on a plane to somewhere exotic. You’re a post-apocalyptic pioneer, reinventing to survive and living with the bare minimum.
  2. Go back to the basics — I like to have some good books to read (especially old favorites) and some pen and paper to scribble ideas and play word games. Others prefer a deck of cards and some board games.
  3. Clean clothes can do wonders. This is when your hand-washable, quick-drying travel clothes made of wool or synthetics really pay off.

Source: Off The Blueprint


Homemade 72 Hour Emergency Food Supply Kits

You never know when some sort of disaster might happen, but you can be ready. Please note that this is only a 72 hour supply, so I like to put in some comfort foods, this is in no way similar to my longer term food storage, which is geared to a longer survival period.

MATERIALS:
One gallon plastic food container per kit (it is very hard to fit all the food into the container so I planned on using 1 gallon zip lock bags) Also added a couple of Oxygen Absorbers in each container for good measure.

Food items on the menu:

3 Day Food Supply for One

  • Day 1
Breakfast          2 Granola bars, 1 can juice
Lunch               1 pkg Lipton soup, 1 pkg crackers
Dinner              2 pkg beef sticks, 1 fruit roll
Snack               9 pieces of candy
 
 
  • Day 2
Breakfast          1 hot chocolate mix, 1 fruit roll
Lunch               2 pkg beef sticks, 1 pudding cup
Dinner              1 canned soup, 1 pkg crackers
Snack               9 pieces of candy
 
 
  • Day 3
Breakfast          1 fruit roll, I Capri Sun pouch
Lunch               1 pkg Ramen Noodles, 1 pkg crackers
Dinner              2 granola bars, 1 pkg nuts, 1 hot choco
Snack               9 pieces of candy, 1pkg cookies


  • EXTRA ITEMS TO KEEP WITH YOUR CONTAINER
 
Water- 2 liters per day
Small can opener
Plastic utensils
Garbage bag
 
 
  • ONE YEAR ROTATION

Shove the food into the container as best you can and store with your backpack or 72 hour kit.


Choosing a survival food kit.

Some food items last longer than others. Related: Shelf life of food.

Tip:  If you use mints keep them in a separate baggie or they will make your crackers taste like mint.  GOOD TO KNOW!

This “menu” is purely an example.  You can put in your jar what ever you want. Food preferences and choices are and should be up to the individual making the kit.  I realize lot of you might disagree with the food choices I have used, but it is my choice, you pack yours the way you want, with MREs and long-term food storage items.