Cool Cargo Bike from trioBike

Fighter Pilot Inspired trioBike

The trioBike is yet another iteration on the classic bicycle, but this time the concept is actually quite useful for anyone located in an urban area or close to a beach where bikes are often used as transportation for daily errands like grocery shopping.

The trioBike is essentially a pedal powered cargo hauler. The real kicker is the cargo can be anything you would like, including children. That’s right, the trioBike can safely haul 2 children up to 176 pounds in cumulative weight, all while giving you a great workout, and saving on sky high gas prices. This particular one has been covered in army green, with fighter pilot inspired shark graphic across the actual cargo carrier.

At trioBike we design, develop, produce, manufacture and sell transportation solutions for urban families. Since 2004 we have given urban families a choice to think alternative; a choice that offers a safe, cool, healthy, non- polluting way to commute through traffic congested cites around the globe. What could be more obvious? In Denmark we have been riding bikes forever, not just for fun but for everyday commuting – it is a cultural thing.

via Cargo bike from trioBike – Experience trioBikes cargo bikes here.

USA – resellers and distributors

Modernmini LLC
187 Bedford Ave Apt 7
Brooklyn, NY 11211
Tel.: + 1 917 476  4122

Making Your Own Vegetable And Nut Oils

The operation is equally simple. I think the most complicated part was mounting the expeller on a sturdy platform which could then be clamped securely to the kitchen counter.

Nut and Seed Oil Expeller / Oil Press

Nut and Seed Oil Expeller/Press

This operation uses quite a bit of cranking force at times and needs to be very securely mounted. It’s not difficult to operate (any 10 year old boy could do it) but it does take a bit of muscle, similar to hand grinding wheat for flour. I made a funnel out of a water bottle which fits the opening of the expeller perfectly and I ran a piece of clear tubing from the oil drip down from the expeller to where I set a bottle to collect the oil. At this point I was able to begin making oil and after lighting the heating lamp and filling the funnel with canola seed I was cranking away and my oil jar was filling rapidly. I wouldn’t want to set out to make several gallons of oil in an afternoon but the first time I tried it I made a quart of oil during a half hour phone conversation so it is not a real difficult or time consuming project.

You can use the oil directly from the expeller or you can let it set in a jar in a warm place overnight so the particulates can settle to the bottom and then pour or siphon the top portion of the oil which is nice and clear. I prefer to leave the sludge in with the nut oils as it gives the oil a stronger flavor and more substance but it’s nice to have a “normal” bottle of canola oil for every day cooking use.

I found the oil quality to be far better than anything I had ever tried before, which was not a surprise because anything made fresh seems to be better than what you get at the store. The oil is quite a bit darker than the oil from the store, but I found this is because it hasn’t been bleached or chemically treated – one more reason in my opinion to make it myself.

I was really interested in finding out what other types of oil I could make with this since the manufacturer says it can be used to make just about any oil you can think of. I’ve tested every oil producing seed and nut I could get my hands on and so far have had nothing but smashing success.

Some of my favorites are:

  • Walnut oil – The leftover walnut meal is wonderful in bread
  • Sunflower oil
  • Almond oil
  • Flax (linseed) oil
  • Coconut oil
  • Canola oil

Each oil has unique expelling needs as well as looks and tastes different, but all are wonderful. All leave you with an abundance of leftover seed meal which can be used as a high quality animal feed protein supplement or are excellent used in the kitchen in breads or on oatmeal.

Canola meal, which I tend to have a lot of, is not very tasty so I use it as a protein supplement for my animals. It’s around 40% protein and chickens, goats and pigs all seem to love it. It can also be used as a high quality natural fertilizer for the garden.

The manufacturer of the expeller can be found at www.piteba.com. The website has a lot of information on different oilseeds and detailed instructions for using the expeller.

[source]

Someone’s Got To Be The Cook When The SHTF – Why Not You?

Big Baby Double-Barreled Cooker

Big Baby Cooker

This design is from the book “Real Barbecue” by Greg Johnson and Vince Staten. Their philosophy with the Big Baby is to take stuff that’s more or less lying around and turn it into a smoker that works on the same principles as the $1,600 models that the pros sell. 

The essential function of a top-notch barbecue smoker is to keep the meat entrusted to it comfortably separated from flames and direct heat and yet in the path of the hot air and smoke that give it its flavor. Big Baby does this by burning a hardwood fire in her bottom barrel and using the top barrel to contain the meat and direct the smoke. The top barrel also serves as a big, self-contained drip pan that catches meat juices. And the vents and dampers located all along the air path mean that the fire can be precisely controlled, keeping it from dying or flaring up.

Besides two 55-gallon drums, the “trick” to the smoker is in making use of wood-stove kits designed to convert such drums into cheap stoves for heating storage sheds and such. The kits come with a cast-iron door, cast-iron legs on which to mount the smoker, cast-iron supports to connect the bottom drum to the one above it, plus flues to connect the two drums. From a hardware store or wood-stove shop, you toss in some dampers and a couple of neat little smokestacks for each end to let the smoke escape from the top drum.

Building Big Baby

Before you get started, make sure you have the stuff you’ll need.

The drums you should be able to find for about ten or twenty dollars; the stove kits (it takes two) are available at hardware and wood-stove stores or by mail order from Northern Hydraulics, 801 E. Cliff Rd., P.O. Box 1219, Burnsville, ME 55337, for less than forty or fifty dollars.

The two twenty-two-by-fifteen-inch grill surfaces can be had at a barbecue supply house for twenty-five dollars or so.

Add some bolts, brackets, hinges, smokestacks, fire bricks, paint and such, and you’re up to a total expense of about a hundred and fifty dollars, more than the price of a simple covered grill but considerably less than the cost of a B1 bomber, which, by the way, does a simply horrible job on a rack of ribs.

The steps are simple: Paint the barrels first, then start cutting them with your saber saw. Use a fresh metal-cutting blade (ask the guy at the hardware store or tool rental place for one), and prepare yourself for a violently annoying noise roughly akin to five hundred colicky babies with the croup. Cutting through a hollow drum with a buzzing saber saw makes enough racket that you may want to consider earplugs. Or suicide. But persevere, and cut a hole for the fire door at one end of the bottom barrel and matching holes in both barrels for the flues that connect them. Cut the top barrel in half horizontally, setting the top half aside. Then do your drilling and mounting and bolting, referring to the directions in the wood-stove kit whenever appropriate. Basically, you want to mount the bottom barrel on its legs (and we recommend connecting these to a couple of two-by-fours for a sturdier base), and then mount the fire door to it, followed by the connecting supports and the two flues (remember to insert the dampers before you bolt on the top barrel). Then you add the top barrel, bolting together the supports and flues between the two. At this point, lay the top half of the top barrel in place and mark holes for the hinges and handles. After the lid is in place, you can drill holes and bolt in place a small chain to keep the lid from falling over backwards. About now you can use the saber saw one last time to cut holes in either end of the bottom half of the top barrel and mount the two smokestacks (again, don’t forget those dampers). Drill a hole for your thermometer (an inexpensive dial-type candy thermometer works fine, and even includes a clip that will hold it in place). Line the bottom of the bottom barrel with fire bricks, which keep it from burning through. Then drill and mount the brackets that support the grill surfaces, slap those puppies in place, and call one of those fellows who delivers wood. You’re ready to barbecue!

It’s best to operate this smoker over a nonflammable surface, from something as basic as packed dirt to concrete. The Babe sits a bit low to the ground, and her firebox gets more than a mite hot, so she will send any grass in the area to Turf Heaven almost immediately. For a neater look, you could put down gravel and even border the area with bricks.

Cooking With Big Baby

Big Baby is designed to burn real wood, not charcoal. She’ll be happy with just about any hardwood – hickory, oak, mesquite, whatever – but stay away from soft stuff like pine. Build a good-sized fire in the bottom barrel and let it go for a while, maybe an hour or more, until it has formed a healthy pile of hot coals. Avoid cooking over a “fresh” fire, since such fires send up a lot of soot and creosote like goo. Go for a hot bed of coals onto which you can toss the occasional log, keeping the temperature as even as possible. Barbecue is not set-it-and-forget-it food; cooking it requires almost constant tinkering and tending to keep the heat even over a period of hours. But with a big base of coals for consistency and the proper combination of damper settings for the wind and outdoor temperature, the Babe will chug along at a constant heat for an hour at a time, certainly time enough to go out for more beer or cassette tapes.

There will be very little in the way of barbecue that Big Baby can’t handle, from a suckling pig to three twelve-quart stockpots of smoky chili. But she’s more than a simple smoker.Big Baby is a sculpture in basic black, a life-style statement, a conversation piece, a badge of honor, and a joy forever. And on a hot summer day, even when you’re not cooking anything, it still smells like barbecue.

Where To Get The Parts

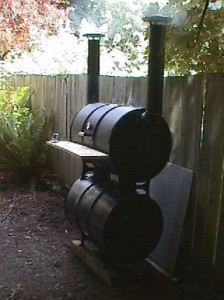
Parts for the Big Baby are available from Vogelzang International Corp. In Holland, MI.

Here are some pictures of a Big Baby smoker built by Stuart MacMillan of Seattle, WA using parts from Vogelzang. He reports that it took him about 12 hours and $275 to construct the smoker. He also reports that it works great.

bigbaby2.jpg (37861 bytes)BigBaby1

 [source]


Keep Supplies Safe During a Power Outage

Of course, the best time to prepare for a disaster is before it strikes – but, when you find yourself facing any sort of emergency before you’ve had time to prepare, you’ll want to do everything you can to protect your precious supplies – especially food and water.

Best solar generators for power outage.

Keep these tips in mind (or print them out and keep them on hand) in case you ever find yourself caught off guard.

Keeping Food Safe During a Power Outage

Of course, the biggest concern is food spoilage. You can minimize the amount of spoilage experienced by:

  1. Keep the doors to your freezer and refrigerator closed, and food will stay cold for about four hours.
  2. Keep a thermometer in the refrigerator to monitor temperatures. Food that reaches 40 degrees or higher can’t be refrozen and should be disposed of.

In addition to these tips, be sure to keep a minimum of three days of non-perishable food items on hand that don’t require running water or heating for consumption.

Keeping Water Safe During a Power Outage

In some areas, water may stop flowing to your home if the power is out. When this happens, you’ll have no choice but to rely on personal water supplies or water purification devices. It’s best to keep a supply of water on hand.

Not including washing, and cleaning, the average person needs at least one gallon of water per day to remain properly hydrated. The more water you can store, the better off you’ll be – but be sure to keep at least five gallons on hand for each adult and child in your household.

Keeping Other Survival Supplies Safe During a Power Outage

While most of your supplies are unlikely to suffer damage during a power supply, there’s always a chance that desperate neighbors come to your home for help. Protect yourself and your family by keeping the details of your supplies to a minimum. Your neighbors are far less likely to try and steal what they don’t know you have.


First Aid Guide List and Links

First Aid, learn as much as you can now for use later.

CPR is an important skill

Information to help you during a medical emergency:

Disclaimer: This information is not intended as a substitute for professional medical advice, emergency treatment or formal first-aid training. Don’t use this information to diagnose or develop a treatment plan for a health problem or disease without consulting a qualified health care provider. If you’re in a life-threatening or emergency medical situation, seek medical assistance immediately.

via First Aid – MayoClinic.com.

Survival Fitness – A Daily Workout Routine

You have something worth living for? It is why you have built up all your survival stockpiles right?

Whatever it is, find your motivation now and start using this simple Survival Fitness Daily Workout Routine. It’s easy to do at home, you do not need a gym or gym membership.

Remember, you can have all the supplies in the world, but if you cannot physically out run the hoard of bad guys or physically protect yourself with your own strength, then what purpose is all your preps for?

SURVIVAL-FITNESS

Keep your brain focused on the single message of getting stronger and constantly remind yourself of why you’re doing the things you’re doing. Start today, increase the reps as you get stronger.

Top Tip: Once you are able to comfortably walk 1 mile 5x a week, you can increase the distance or you can walk with a backpack and start placing a 5lb bag of sugar in it, then increase the number of bags as you get stronger. Remember you may have to carry a large amount of weight in a bug-out situation.


6 Easy Steps To Long Term Dry Goods Storage

Preserve Dried Goods and Store for Up to 20 Years!

A couple of months ago I was reading one of my favorite magazines, Countryside, and came across an awesome article about oven canning. I had personally never heard of it before, but was intrigued. So I followed the directions step by step and am now addicted (just one of my natural addictions) to preserving dried goods. Even though store bought dried goods will last for a couple of years, chances are within a certain length of time weavels and other bugs will get into them and they will begin to taste stale. Oven canning these goodies will preserve them for long periods of time, which is awesome for the emergency prepper, like myself.
Here is a rundown for the process of oven canning.
What you need:
Dried goods (rice, pasta, cereal, dried fruit, dried vegetables, dried herbs, etc)
Canning jars of any shape or size
Canning lids to fit the canning jars
Cookie sheet
Paper towel
Water

Step 1: Preheat oven to 200 degrees.

Step 2: Place cookie sheet into preheating oven.

Step 3: Fill jars with dried goods, leaving the lids off

Step 4: Place jars on cookie sheet in the oven for 1 hour.

Step 5: Remove carefully from oven. Take a damp paper towel and wipe the mouth of the jar with it. Place lid firmly on the jar.

Step 6: Listen for popping to indicate that the jar has sealed. As in regular canning, not all jars will seal. If the jar does not seal it could be an indication of a bad lid or a bad jar or just plain dumb luck. You can try it again for that jar or be satisfied in knowing that at least your dried goods are kept safe from bugs.

Top Tip: Another little nifty trick for those that do not want to preserve their dried goods for long periods of time, but would like to keep the little critters out is to put bay leaves in their jars and bags of dried goods.

[source]