Plant Now: Winter Sowing

Sowing The Seeds Of Love

[Source]

BELIEVE IT OR NOT, I start my summer garden in January, using a neat trick called “Winter-Sowing.” Winter-sowing is an outdoor method of seed germination (invented by Trudi Davidoff) which requires just two things: miniature greenhouses (made from recycled milk jugs) and Mother Nature. You can winter-sow your way to a beautiful garden, too…for pennies. Here’s how:

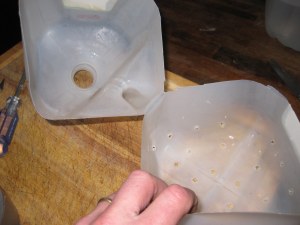
Make a Greenhouse. You can make a greenhouse from any container you like, so long as light can penetrate its walls. Like other winter-sowers, I use recyclables, including gallon-size milk- or water- jugs, and 2-Litre soda-pop bottles. With jugs and bottles, use a pen-knife to cut around the middle, almost all the way through. The uncut half-inch or so will serve as a hinge.

Next, punch out drainage holes in the bottom. A Phillips screwdriver, heated over a flame at the stove, will facilitate the hole-punching job. Punch out also a few holes along the top portion of the container. These extra holes increase air-ventilation. Ventilation, of course, is the key to preventing excess heat from building up in the greenhouse, and baking the seeds to death. If there is a cap on your jug or bottle, remove it. 

Select the Right Soil. It is essential to use a soil mix that drains well, and has a light, fluffy consistency. Pour the soil, preferably to a depth of 3 to 4 inches, into the bottom half of your container. Then moisten the soil thoroughly and let it drain.

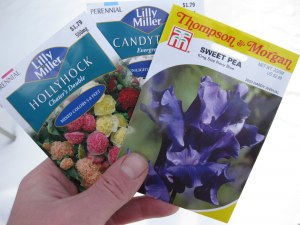
Sow the Seeds . Sow your seeds on the soil surface, and then cover them with more soil, when necessary, to achieve the proper planting depth. Gently pat the mix down, so that seeds and soil make good contact. Then replace the lid, and secure it with a strip of duct tape, as illustrated.

If you live in a cold climate, as I do, plant your perennial and hardy annual seeds first. Should these sprout during a weird warm-spell in winter, they will not be harmed. Wait until March to plant your tender annuals. More details here: What Seeds Are Best For Prepping.

Remember to Label! For each sowing, indicate with a permanent marker (or a paint-pen) the seed variety and date sown. Do not omit this step, for there is nothing worse than finding, in spring, dozens of miniature greenhouses brimming with seedlings, and not knowing what they are!

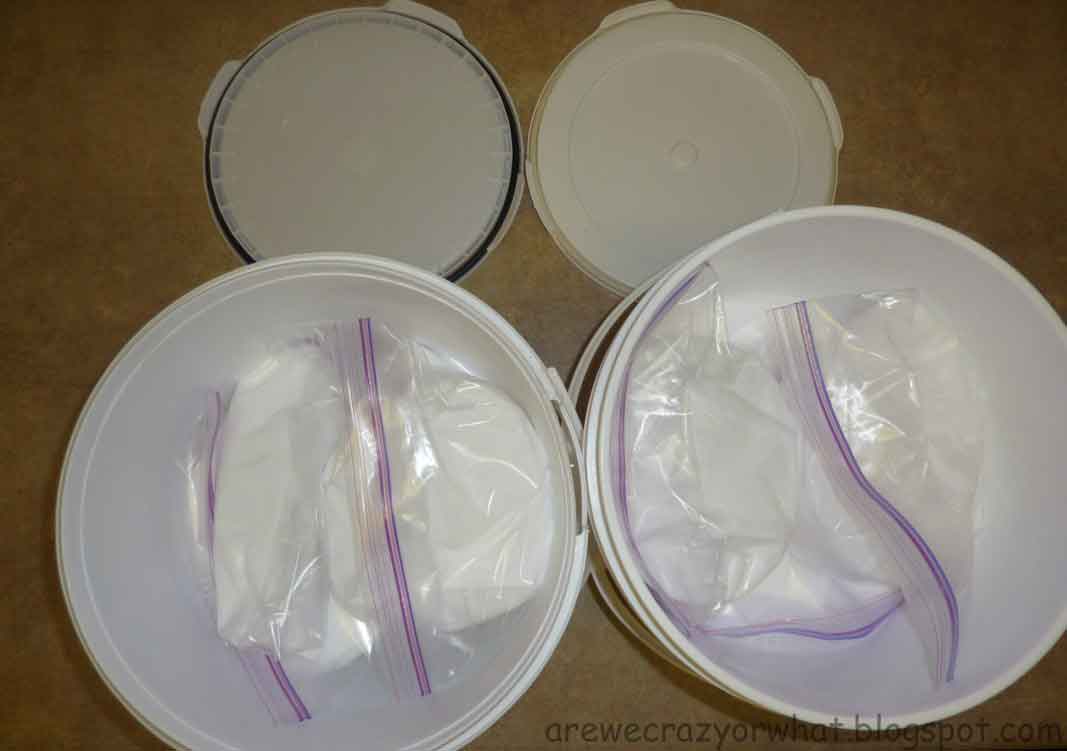
Bring the Greenhouse Outdoors. Your greenhouse, once planted and labeled, is ready to brave the outdoor elements. Select a location that is safe from strong wind, but where sun, rain and snow will be freely admitted. My assorted greenhouses go on the patio table, out of the reach of Lily the Beagle who would otherwise knock them over. For further protection from tipping, I place them in a large plastic box, with drainage holes melted in the bottom.

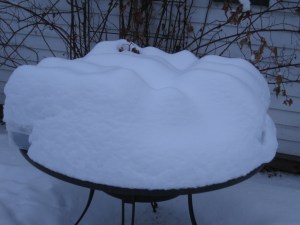
Relax. Now sit back and let Mother Nature do her thing. As the weather chills and warms, your seeds will freeze and thaw. These natural actions loosen the seed-coatings. This is why advance soaking or nicking of hard-shelled seeds, such as Morning Glories and Sweet Peas, is not necessary when you winter-sow.

At the first kiss of spring, but while nights are still freezing, seedlings will begin to emerge. Now is the time to check for water. Open the tops, and if the soil appears dry, moisten thoroughly but gently, so as not to disturb tender root systems. Then close the tops again. On warm, sunny days, I open the tops for hours at a time, and let the seedlings enjoy the fresh spring air. The tops, of course, are closed at dusk.

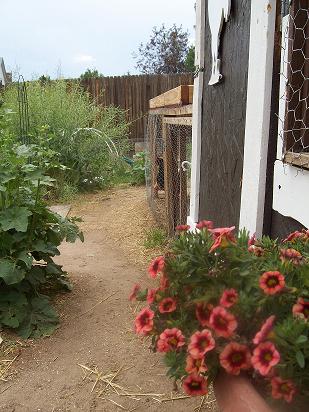
I can’t tell you how advantageous winter-sowing can be. Last year I produced an entire garden’s-worth of perennials this way (far too many, in fact), without the need for light-systems, heating devices, or fancy seed-starting kits. And, unlike windowsill-germinated seedlings, which more often than not are frail and spindly, winter-sown seeds grow up to be strong, sturdy plants, completely prepared for glorious careers in the open garden.

If I were you, I’d give winter-sowing a try. Honestly, it’s the easiest, most cost-effective way to achieve a beautiful garden.

[Source]


THE CHUNNEL: THE CHICKEN TUNNEL

[source]

Here’s a visual tour.

This is at the back of my suburban homestead.  I am standing right next to the coop.

To the left of the coop is the run.  For a year this was all the space the chickens had and I knew they needed more room.  On top of the run is a new addition…it is my lettuce box.  It provides shade for the chickens and protects them from the rain so they can still be outside.  I can grow on top of the run without losing any space.  Space is a premium here in the suburbs.  I had to figure out how to give the chickens more room without taking anymore garden space.  If we extended this run to the left, it would sit right on top of one of my prime growing areas.  So here is our solution:  a chunnel.  That’s right…a chicken tunnel.

Directly to the left of the run is the juncture where the chunnel connects to the run.

Then we travel more to the left…you see the chunnel behind my pea trellis and some chickens looking for some treats.

Then the chunnel turns the corner and heads down the western side of my yard along the fence.  I had such weeds that grew here…and now you can see not a single thing is left growing!!!

And here is the scene that causes me the most amount of joy!!!!  Every time this happens I giggle like a school girl.  All I have to do is call the girls and they come a runnin’!!!!  I am at the very end of the chunnel.  They run like there is no tomorrow and it is so fun to watch! (note: do you see there is no longer one green thing along the side of the fence!)

This side of the yard gives them lovely shade in the heat of the afternoon.  I have to say, living in the suburbs I have to protect them from lots of critters…we have foxes and birds of prey everywhere.  This is as close to free range as we can get for them and they don’t need supervision.  The chunnel is very secure and they are indeed much happier!!!

This is the very end of the chunnel and it has been fun showing you our solution of adding more room without taking much space!  Hope you have enjoyed this post.


Emergency Food Items That Can Last a Lifetime

Did you know that with proper storage techniques, you can have a lifetime supply of certain foods?  Certain foods can stand the test of time, and continue being a lifeline to the families that stored it.  Knowing which foods last indefinitely and how to store them are you keys to success.

The best way to store food for the long term is by using a multi-barrier system.  This system protects the food from natural elements such as moisture and sunlight, as well as from insect infestations.

Typically, those who store bulk foods look for inexpensive items that have multi-purposes and will last long term.  Listed below are 11 food items that are not only multi-purpose preps, but they can last a lifetime!

Honey

Honey never really goes bad.  In a tomb in Egypt 3,000 years ago, honey was found and was still edible.  If there are temperature fluctuations and sunlight, then the consistency and color can change.  Many honey harvesters say that when honey crystallizes, then it can be re-heated and used just like fresh honey.  Because of honey’s low water content, microorganisms do not like the environment.

Uses: curing, baking, medicinal, wine (mead)

Honey, a must have survival prep.

Salt

Although salt is prone to absorbing moisture, it’s shelf life is indefinite.  This indispensable mineral will be a valuable commodity in a long term disaster and will be a essential bartering item.

Uses: curing, preservative, cooking, cleaning, medicinal, tanning hides

Sugar

Life would be so boring without sugar.  Much like salt, sugar is also prone to absorbing moisture, but this problem can be eradicated by adding some rice granules into the storage container.

Uses: sweetener for beverages, breads, cakes, preservative, curing, gardening, insecticide (equal parts of sugar and baking powder will kill cockroaches).

Wheat

Wheat is a major part of the diet for over 1/3 of the world.  This popular staple supplies 20% of daily calories to a majority of the world population.  Besides being a high carbohydrate food, wheat contains valuable protein, minerals, and vita­mins. Wheat protein, when balanced by other foods that supply certain amino acids such as lysine, is an efficient source of protein.

Uses: baking, making alcohol, livestock feed, leavening agent

Dried corn

Essentially, dried corn can be substituted for any recipe that calls for fresh corn.  Our ancestors began drying corn because of it’s short lived season.  To extend the shelf life of corn, it has to be preserved by drying it out so it can be used later in the year.

Uses: soups, cornmeal, livestock feed, hominy and grits, heating source (do a search for corn burning fireplaces).

Baking soda

This multi-purpose prep is a must have for long term storage.

Uses: teeth cleaner, household cleaner, dish cleaner, laundry detergent booster, leavening agent for baked goods, tarnish remover

Instant coffee, tea, and cocoa

Adding these to your long term storage will not only add a variety to just drinking water, but will also lift morale.  Instant coffee is high vacuum freeze dried.  So, as long as it is not introduced to moisture, then it will last.  Storage life for all teas and cocoas can be extended by using desiccant packets or oxygen absorbing packets, and by repackaging the items with a vacuum sealing.

Uses: beverages, flavor additions to baked goods

foods list for off grid survival, jars and canning your own supply

Non-carbonated soft drinks

Although many of us prefer carbonated beverages, over time the sugars break down and the drink flavor is altered.  Non-carbonated beverages stand a longer test of time.  And, as long as the bottles are stored in optimum conditions, they will last.  Non-carbonated beverages include: vitamin water, Gatorade, juices, bottled water.

Uses: beverages, flavor additions to baked goods

White rice

White rice is a major staple item that preppers like to put away because it’s a great source for calories, cheap and has a long shelf life.  If properly stored this popular food staple can last 30 years or more.

Uses: breakfast meal, addition to soups, side dishes, alternative to wheat flour

Bouillon products

Because bouillon products contain large amounts of salt, the product is preserved.  However, over time, the taste of the bouillon could be altered.  If storing bouillon cubes, it would be best repackage them using a food sealer or sealed in mylar bags.

Uses: flavoring dishes

Powdered milk – in nitrogen packed cans

Powdered milk can last indefinitely, however, it is advised to prolong it’s shelf life by either repackaging it for longer term storage, or placing it in the freezer.  If the powdered milk developes an odor or has turned a yellowish tint, it’s time to discard.

Uses: beverage, dessert, ingredient for certain breads, addition to soup and baked goods.

source:

Author: Tess Pennington
Web Site: http://www.ReadyNutrition.com/


Salt: A Valuable And Needed Item In Your Preps

How and Why to Store Salt

Also Known As: Sodium Chloride or Halite

Different kinds of salt and their uses:


Table Salt: Table salt is the refined white crystal typically found in a salt shaker. It usually comes in a cardboard can and is the cheapest salt on the shelf at the grocery store. You can buy it with or without iodine added (more on that later). It generally contains an anti-clumping agent.

Sea Salt and/or Mineral Salt: (such as Himalayan Pink Crystal Salt or Celtic Sea Salt): All salt originally came from the sea so to call something sea salt is a bit misleading. Typically when something is labeled sea salt it is not refined and still has other minerals in it, whether it was mined or was processed out of sea water. The minerals salt contains vary according to where the salt was mined. Himalayan salt contains different minerals than Celtic sea salt. Sea salt that has been collected after water has evaporated or distilled also has other minerals from the ocean. There are a lot of “gourmet” salts on the market so it’s important
to read the label.

Koshering and Pickling Salt: Koshering salt (commonly known as kosher salt) generally consists of salt without additives I say generally because there are some brands that do contain additives, so always read the label. Kosher salt has a large flat grain helpful for the koshering process, and if it does not have any additives it can be used for canning. Pickling salt is refined salt with no anti-clumping agent and is used for canning – it has a very fine grain so it will dissolve quickly in liquids. Using table salt for canning discolors the food because of the additives.

Rock Salt and other salts: Rock salt (the kind found at the grocery store) is salt typically used in ice cream makers and is not approved for human consumption; again, it’s important to read the label. There are other types of salts available such as salt used in water softeners or salt used to help melt ice on roads. These are not meant for human consumption and should not be placed in food storage.

Why Salt is Important:

Salt is an important part of a healthy diet. Salt helps to balance electrolytes and is needed for proper cell function.Without salt we will die.

Which Type of Salt to Store:

If you are eating from your food storage you may not be eating a lot of processed foods and the salt that you have stored could be your main salt intake. So it’s important to decide what kind of salt is best to store for your family. Iodine was added to salt to prevent Goitre. You can get iodine from other sources of food such as seafood, soil (if it is contained in the soil you grow your food in) or seaweed such as kelp or dulse. Also, most multi-vitamins contain iodine. The only down-side to storing salt with iodine is that it can turn yellow after time. If you’re storing salt as a trading item (see below), yellow salt might not look so appetizing. However, it’s still safe to eat and will store indefinitely. If you store table salt without iodine it will usually just contain an anti-clumping agent and will store indefinitely. Sea salt and mineral salt will also store well but not indefinitely. They would deteriorate according to the other minerals they contain. So reading the labels and doing an internet search on the minerals contained in the salt would give you an idea of the shelf life.

Table salt is cheapest of all the varieties of salt therefore it is easy to obtain a year’s supply for your family, which should be between 3-5 pounds a person, in a relatively short time. If you’re on a budget, like me, table salt might be your best option. You may also want to stock-up on pickling salt if you plan to preserve things from your garden. You would have to calculate how much according to the estimated yield from your garden for a given year. Pickling salt and table salt will store indefinitely, even if moisture seeps into the container, it can be laid out and dried.

Salt Storage:

Here’s what I did:

I bought two 25 pound bags of salt from a big box store. The bags do not contain iodine and this was my only choice from this store. I have a food saver but decided that I did not want to waste my storage bags because salt will not go rancid even if it’s exposed to air.

I used heavy duty plastic bags, I thought Mylar would be overkill here.

I scooped the salt into one gallon bags. I did not fill the bags all the way because I did not want the plastic to break.  They will probably be retrieved by one of my children in our food rotation process so I wanted to make sure they were light enough to carry. I poured the salt into a pitcher because it’s very hard to pour a bag into a bag.

Food grade 5 gallon bucket.
Bags ready to go in.
I put two to three bags in 5 gallon food grade containers.
Then I labeled them and put them up.

Other Important Notes:

  • Salt should not be confused with Epsom salt (also known as magnesium sulfate) – they are completely different compounds.
  • Never store salt in metal containers. Salt leaches metals and/or elements out of the metal. You could wind up with a poisonous substance in your salt.
  • Also something to consider is using/storing salt to be used as a bartering item. A lot of preppers store canned goods and processed food, which already contain salt, so they don’t give much thought to plain salt. In our culture today salt has been associated with heart attacks and other health afflictions resulting from the over consumption, therefore, many people might not store enough salt or store it at all. At some point, processed food might become scarce and salt would once again be a valuable item as it was in ancient times.
 

10 Unbelievable Ordinary Things That Could Be Potential Lifesavers

Learn to survive

10. Sanitary Pads | Bleeding Wounds Treating


The sanitary pad’s origin lies in nineteenth-century battlefield hospitals to treat bullet wounds. Only after World War I did they take on their now-traditional use of female hygiene. In case of emergency, when medical attention may not be available, bleeding wounds treating will be a necessity. The pads could be quit handy to cover the wounds.

9. Compact Mirror & Whistle | Fire And Rescue


It is a lifesaver when used as a silent emergency beacon. It can be effective in both sun and moonlight, and can even start fires on a sunny day. Although a rescue team passing by still may miss your signal; an auditory signal from a whistle is certain to attract their attention.


8. Super Glue | Emergency Wounds Suture


Have a superficial wound that needs stitching? No medical staff, no needle and thread or no sewing training? No problem. While it will not do much for penetrating wounds like gunshots, super glue as an emergency suture can quickly bind and protect minor lacerations that otherwise could become infected.


7. Gunpowder | Sterilizing And Cauterizing Wounds


You’ve seen it in the movies: guy gets shot, breaks apart a few bullets, pours the gunpowder over the wound and lights it. Guess what? While excruciatingly painful, it does exactly what is needed by sterilizing and cauterizing the wound.

6. Charcoal & Cheesecloth | Water Purification


Charcoal is amazing for some other uses than cooking: water purification. Drill a hole in the bottom of any type of plastic container, line it with the cheesecloth, place charcoal in it and pour in water – and voila, an instant water purification system! Afterwards, you can let the charcoal dry and cook your dinner with it.

5. Chewing Gum | Suppress Appetite


The simple act of chewing a gum can suppress your appetite, thereby preserving limited food supplies for longer periods, while aiding in necessary saliva production.


4. Vinegar | Antibacterial And Microbial


Vinegar is a great antibacterial and microbial that can treat skin burns, inflammations and infections. As a cleaning agent it sanitizes and deodorizes, and can mask any odors which you’re afraid might give away your position to wildlife. A small amount mixed with water can also be swallowed to relieve an upset stomach, or to remove parasites from any contaminated water or undercooked venison you may accidentally consume.


3. Condoms | Water Storage


Condoms are useful in another way than sex: water storage. Durable and stretchable, a condom can hold up to a gallon of water. They can also be used to protect against water, as a stretchable cover for valuable items like matches and walkie-talkies.


2. Harmonica | Maintaining Focus And Concentration


Musical tones – regardless of the source – have been shown to stimulate both the creative and pleasure centers of the brain; to help maintain focus and concentration; and to reduce anxiety and pain. The harmonica just might help maintain your sanity until the situation normalizes.


1. Baking Soda | Reliever of Upset Stomachs


Most effective as a reliever of upset stomachs, there is an even better reason to have baking soda handy: fire. In an emergency, an inexpensive alternative for water, baking soda easily puts out cooking and other small fires that may occur while hunkered in your bunker.

Source:  caspost.com
 

The best source of all your survival gear needs.


“Soup”er Prepper Storage Idea

When I came accross this article, I immadiately thought this stoarge solution would be perfect for my canned goods prep. So easy, stackable and organized. I had to share.

“Soup”er storage idea

Ok, I’ve been known to re-purpose things before like when I made a tote bag out of business cards for a friend.  Or when I made candy dishes from gladware packaging. (I’ll show that one soon – stay tuned!) You get the idea.  Anyway, it’s just the way my mind works, I see something for what it is but then my mind switches gears and starts designing what it could be.

That’s what happened with my project for today.  It actually came out of need.  I don’t like stacking my cans.  They never stay orderly.  They always fall over.  Or they get pushed to the back of the cupboard and I forget what I have and it BUGS me.  So, I made this.

Yes, I know you can by self-rotating Can Stackers for food storage but the small ones are $32 and frankly, I’d rather make my own and so that’s what I did.  I had everything on hand except for the soda so the out-of-pocket expense was $3.50.  Here’s how I did it….

1- First, I needed an empty fridge pack of soda.  My kids were thrilled to find rootbeer in the fridge.  I  bought it specifically for the packaging – is that wrong?  Not really, just backwards, I guess.

2- On the back end of the container I cut out a space that is large enough to put a can of soup in.
3- I grabbed some decorative paper (I used about 3 sheets of 12×12 scrapbook paper)  and folded it into place to cover the box.  I put everything in place, creased my edges and cut out my opening to fit the one I had cut in step 2.  Then I just took some Mod Podge and glued all the paper into place.  I did the back end of the box first and let it completely dry.
4- Once the back end was done drying, I grabbed another piece of paper and repeated the steps until the front part is covered.  And, just to make it more decorative, I used a coordinating paper for the front.
5- Then I added a label to the front and added a coat of Mod Podge over the whole thing – this gives it a little more strength and will keep the papers from tearing.
So, that’s it.  To use it, I just always add my soups to the back and take from the front, that way they are properly rotated.  And, the best thing, I don’t have to stack my soups anymore.  Plus, each soup flavor is kept together which means no more hunting through my pantry for the flavor needed.  I can have a box for chicken noodle, cream of chicken, corn, peas, whatever… And, I can make as many as I need and my cupboard is organized.

Source: Then She Made...


U.S. Explodes Atomic Bombs Near Beers To See If They Are Safe To Drink

by 

So you’re minding your own business when all of a sudden, a nuclear bomb goes off, there’s a shock wave, fires all around, general destruction and you, having somehow survived, need a drink. What can you do? There is no running water, not where you are. But there is a convenience store. It’s been crushed by the shock wave, but there are still bottles of beer, Coke and diet soda intact on the floor.

So you wonder: Can I grab one of those beers and gulp it down? Or is it too radioactive? And what about taste? If I drink it, will it taste OK?

This could happen, no? Not to everybody, but let’s say it happens to you. Have you been wondering what to do?

Well, wonder no longer.

Thanks to my friend, science historian Alex Wellerstein, we are now in possession of a 1957 U.S. government study called “The Effect of Nuclear Explosions on Commercially Packaged Beverages,” which addresses this very question: After the bomb, can I drink the beer?

Written by three executives from Can Manufacturers Institute and the Glass Container Manufacturers Institute for the Federal Civil Defense Administration, the study says that after placing cans and bottles of soda and beer next to an actual atomic explosion, after measuring subsequent radioactivity and after actual taste tests, go ahead: Grab that can, pop it open and drink away.

“These beverages could be used as potable water sources for immediate emergency purposes as soon as the storage area is safe to enter after a nuclear explosion.”

If you can make it to the store, you can drink. How do they know this?

Well, in 1956, the Atomic Energy Commission exploded two bombs, one “with an energy release equivalent to 20 kilotons of TNT,” the other 30 kilotons, at a test site in Nevada. Bottles and cans were carefully placed various distances from ground zero. Notice, on this list, some of them are “returnable.”

The closest containers were placed “less than a quarter-mile away,” says Alex, “a mere 1,056 feet,” the outliers a couple of miles off. Some were buried, some left in batches, others were placed side by side. These images, copied from bad photocopies, are in the report. The cans, as you can see, survived.

Lots of bottles survived, too. Some were shattered by flying debris, fell off shelves, or got crushed by collapsing materials, but a surprising number stayed intact.

Will the beer be radioactive?

As for radiation, they checked, and found that bottles closest to ground zero were indeed radioactive, but only mildly so. Exposure, the authors say, “did not carry over to the contents.” The sodas and beer were “well within the permissible limits for emergency use,” which means, says Alex, “It won’t hurt you in the short term.”

Will it taste good?

But what about taste? Post-bomb beer might not poison you, but will it keep its flavor?

The report says, “Immediate taste tests [gotta wonder who got that job] indicated that the beverages, both beer and soft drinks, were still of commercial quality, although there was evidence of a slight flavor change in some of the products exposed at 1,270 feet from Ground Zero.” The most blasted beers were “definitely off.”

The first tasters then passed samples to selected laboratories for further testing, and this time the contents were rated “acceptable.” So here’s your government’s considered advice: Should you find yourself near an atomic blast and run short of potable water, you can chug a Coke or a beer, but don’t expect it to taste great.

What’s the lesson here?

There’s a second lesson here, Alex thinks. Because beverages in bottles and cans keep you safely hydrated in dire emergencies, it makes sense to keep a six-pack or two or three (or four), in the basement, just in case. What if there’s no lootable convenience store conveniently close by?

“For me, the takeaway here is that the next time you find yourself stocking up on beer, remember, it’s not just for the long weekend,” he says. “It might be for the end of days.”


If you want to see the government report, you can find it here. Alex Wellerstein’s analysis Beer and the Apocalypse (which I used to write my story) appeared on his blog, Restricted Data.