
A report released today by the US Geological Survey (USGS) today shows that Americans are sucking dry the aquifers that irrigate their crops and supply their drinking water. Between 1900 and 2008, the US lost 1,000 cubic kilometers (240 cubic miles) of groundwater. That’s twice the volume of the water in Lake Erie.

It gets worse. The rate of groundwater depletion is accelerating, according to the study of 40 major US aquifers. Between 1900 and 2008, the US lost an average of 9.2 cubic kilometers of groundwater annually as the growth of cities and industrial agriculture tapped underground reserves. But between 2000 and 2008, groundwater depletion jumped 171% to an average of 25 cubic kilometers a year. In just those nine years, the amount of water pumped from the Ogallala aquifer, which supplies a large swath of the US, was equivalent to 32% of the water that was depleted from the Ogallala during the entire 20th century.
“Although groundwater depletion is rarely assessed and poorly documented, it is becoming recognized as an increasingly serious global problem that threatens sustainability of water supplies,” the USGS scientists wrote.
Climate change likely contributed to the spike as droughts reduce rainfall and snowmelt. In California, for instance, a falloff in Sierra Nevada mountain snow that supplies water to the state’s multibillion-dollar agriculture industry led to increased pumping of groundwater in the Central Valley.
And in a scary feedback loop, sinking aquifers are contributing, albeit only slightly, to a rise in sea levels. Much of the agricultural water pumped from aquifers ends up as runoff transported by streams and rivers into the ocean. (Depleted aquifers also result in the land sinking relative to ocean levels.) “Groundwater depletion in the US in the years 2000-2008 can explain more than 2% of the observed global sea-level rise during that period,” the study states.
If the groundwater pumping ceases, rainfall will slowly recharge aquifers, though that process can take hundreds or thousands of years. That time is likely to increase as climate change results in a drier, drought-stricken world.
[source]
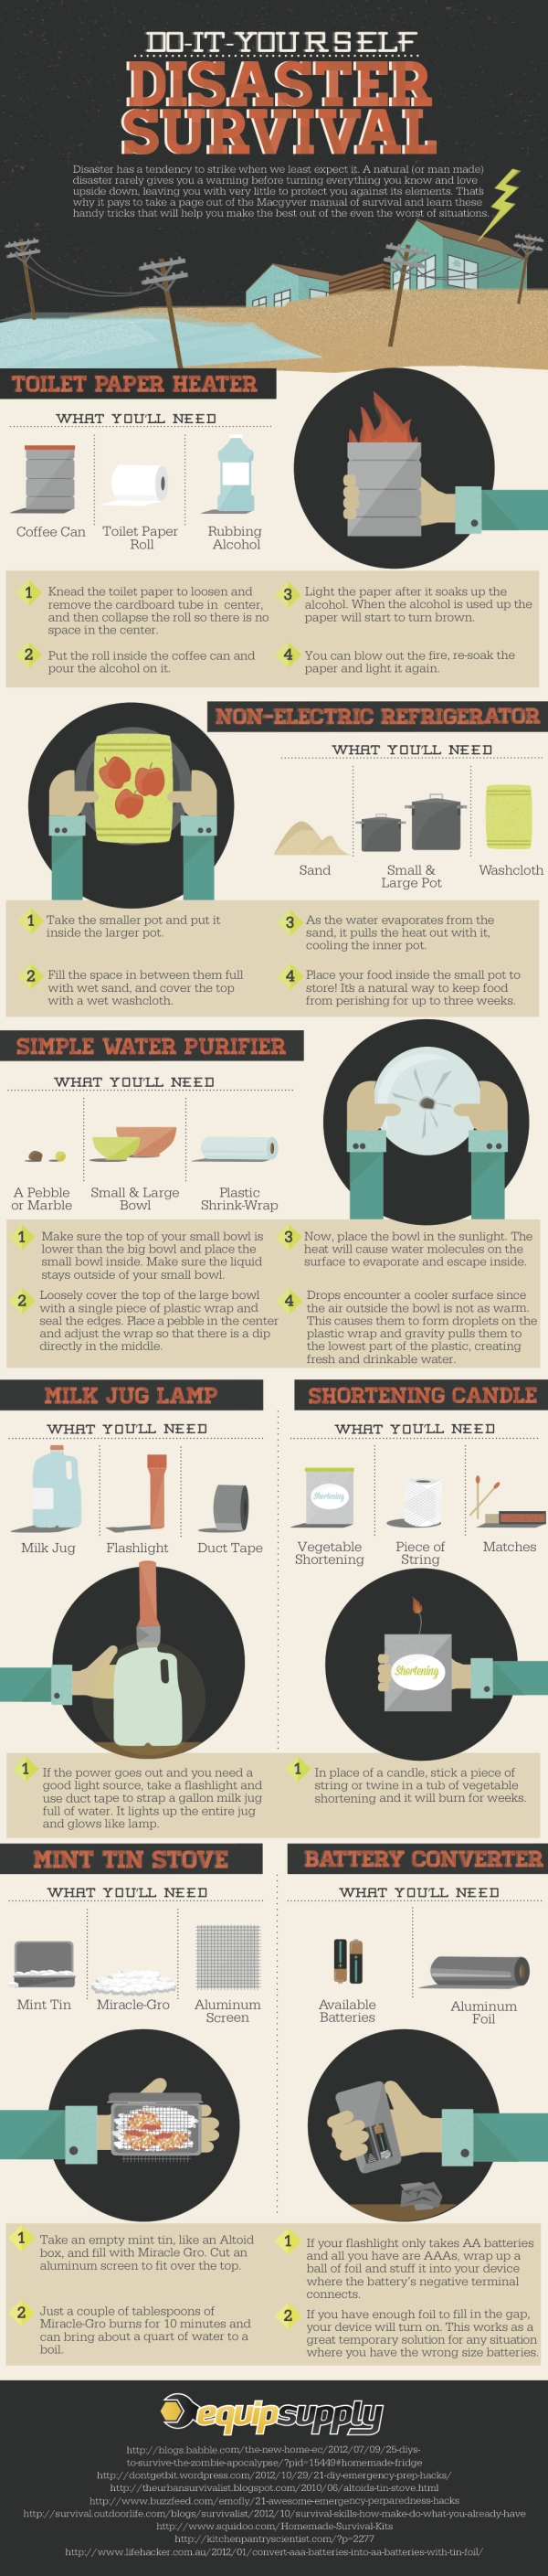
I found a very affordable way to store rice, beans, flour, noodles and any other food item (my dry stock food is stored in 15 of them). This is also a great way to store any paper products or paper towels, matches, and anything else that has to be kept dry, away from heat, and bug proof.
Go to a bakery in your area (groceries stores, bread bakers or cake bakers), and ask for their icing or dough pales with lids. Generally, they are more than willing to give them to you for FREE. Ask them when they get their shipments in, and find out when they empty the buckets. Make sure to find out when they throw the buckets in the trash. For me, I go in no later than Thursday, because they throw the buckets out on Friday and Saturday.
Be sure to clean the buckets out with a little bleach. You can then use them to store food, fuel disks, tooth paste and floss. I even made first aid kits out of two of the buckets.
You can stack them easily, label them with a marker, and lift them with ease. The buckets take up just a little space, and protect my emergency food and supplies.
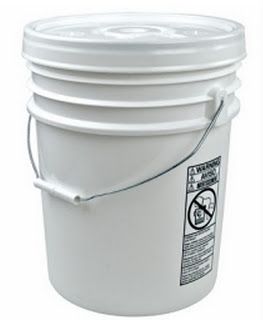
There was a lot of interest in building these, so I found these instructions. There are many ways to build something like this. I encourage you to change this design, make it better, and figure out what works best for you as there are different rod designs based on fishing technique.
These are mostly made of PVC pipe. I picked up 10 foot lengths of 1/2 inch PVC and 3/4 inch PVC for about $1.50 each. You can make several of these fishing rods with that much PVC pipe.
First, I used a hacksaw to cut pieces of both the 1/2 inch PVC and 3/4 inch PVC that were 10 inches long. Why 10 inches? No particular reason, you can make them whatever size you want.

I used some sandpaper to smooth the edges that I had sawed and to remove the markings from the outside of the PVC pipes.

You’ll need a 3/4 inch slip cap, a 1/2 inch slip cap, a 3/4 to 1/2 threaded connector (female/male), and a 1/2 to 1/2 inch threaded connector (female/female). These fittings cost around $0.60 each.

I didn’t need to use any adhesive to get the pieces to stick together. You’ll want to be able to remove the slip caps later on anyway, since you’ll be putting you’re fishing tackle into the handles.
I drilled 3 holes all the way through the 1/2 inch PVC pipe with a 3/32 inch drill bit.

I used pieces from medium sized binder clips to make the eyelets of the fishing rod.

Remove the silver parts and use pliers to bend them until they look like the one on the right.

Then, clip it into the holes that you drilled through the 1/2 inch PVC. You’ll need to do this three times.

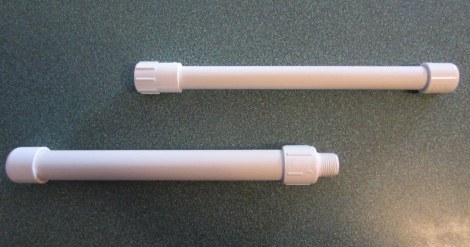
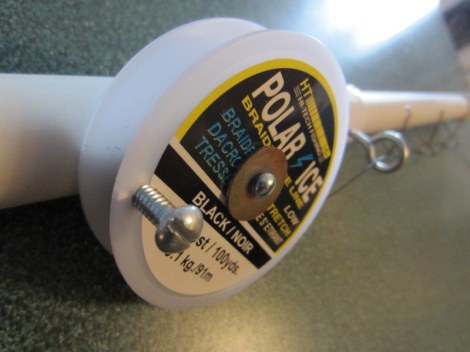
We opted to use a premade ice fishing reel because it would have been difficult for our kids to build an improvised reel. However, I’ll show you a quick way to make one after I show you how we attached these. We paid $2.96 each for the reels.
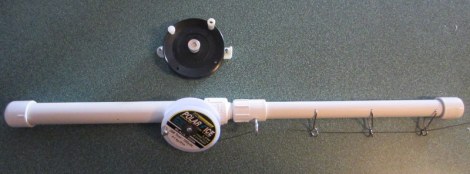
We disassembled the reels and used the white plastic piece on the left as a guide for where to drill the holes into the 3/4 inch PVC pipe.

I used the same 3/32 inch drill bit from before to make the holes and then screwed the white plastic piece into the 3/4 inch PVC.

Then, you simply screw the two pieces together and you’ve got yourself a fishing rod! Don’t forget that the slip caps come off of each end, leaving you with plenty of room for storage in both sides.

This improvised reel is made from a spool of fishing line and a few pieces of hardware. I drilled a hole into the 3/4 inch PVC with a 7/64 inch drill bit. To secure it to the rod, I simply put a screw through the center of the spool and used a washer to make it more stable. Be sure not to tighten things too much or the reel won’t spin.
I put an eye screw into the 1/2 inch PVC to act as a guide for the fishing line and threaded a bolt into the plastic part of the spool to act as a handle for the reel.
The improvised reel works okay, but the action is not as smooth as the premade one. However, it is a little bit smaller and doesn’t cost as much.
It breaks down nicely for storage. I cut some pieces from an old bike tire inner tube to band the two halves together.
All of the external pieces are removable and can be stored inside the handle with exception of the reel itself.
So, there you have it! Go have some fun and let me know how it turns out.

I have included two ways to make this flat braid. The first is simply the normal braiding method, and the second is more of a finger weaving method. The structure of the braid is basically the same for both methods, but because of the difference in the way tension is put on the strands, the two methods produce somewhat different looking results.
Method #1
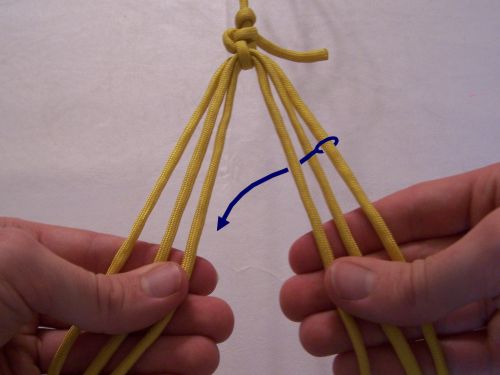
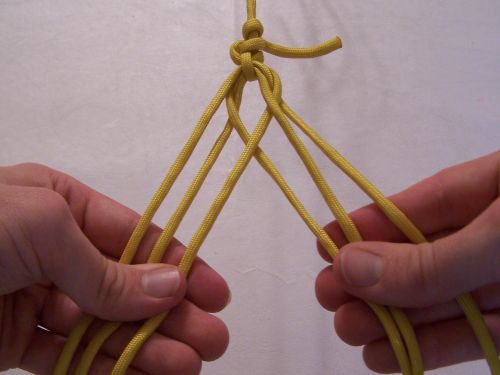
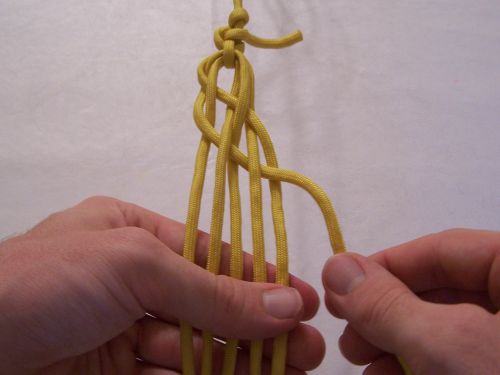
To start the braid, hold three strands in each hand. Bring the outside right-hand strand over middle right-hand strand, under the inside right-hand strand, and transfer it to the left hand as indicated by the arrow, keeping it on the inside of the other left-hand strands.
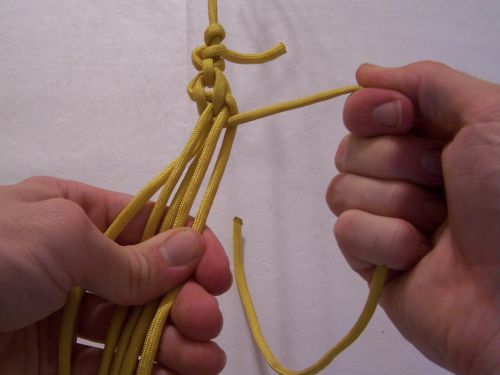
Now take the outside left-hand strand and bring it through the other three left-hand strands going under-over-under, and transfer it to the right hand, keeping it to the inside of the other right-hand strands.
Here you can see both steps have been done. These two steps are repeated for the rest of the braid.
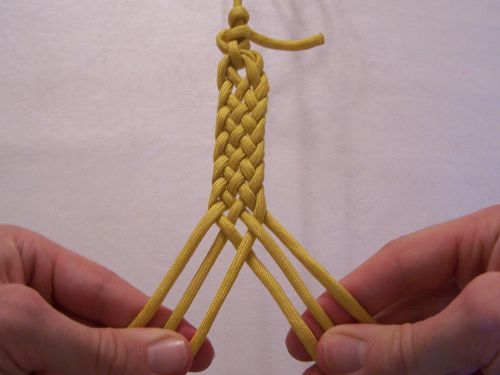
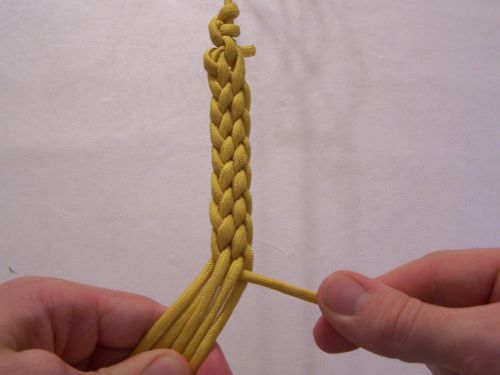
Here you can see several passes of the braid completed.
Method #2
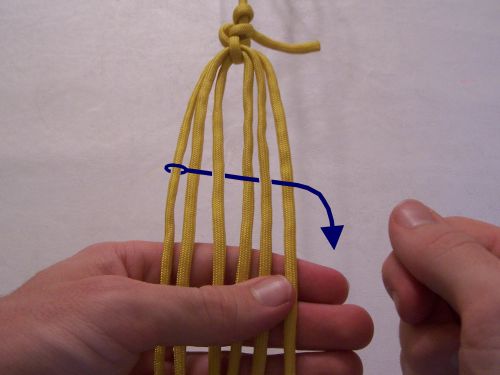
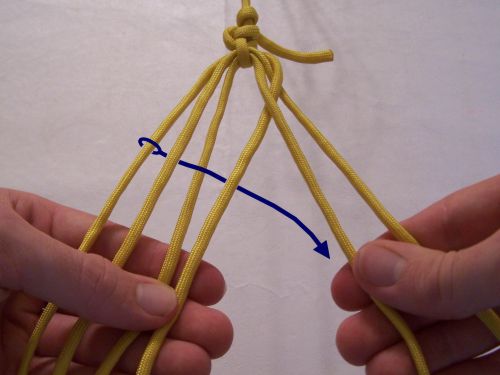
For this method, hold all six strands in the left hand. Take the farthest strand to the left and weave it through the other five strands going over-under-over-under-over, and then bring it down alongside the farthest right strand as shown by the blue arrow. It is as though the farthest left strand is used as a weft and the other strands are used as warp.
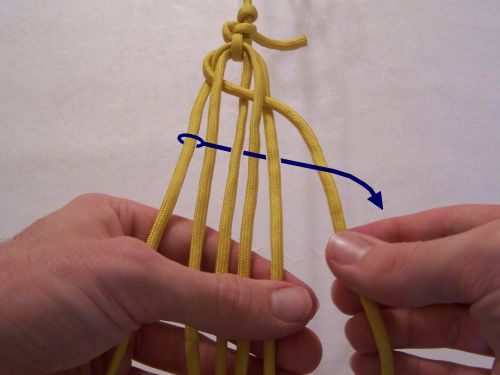
The weaving process is repteated with each strand in sequence. The strand most recently woven through becomes the farthest strand on the right, and the strand that is now the farthest on the left is the next one to be woven through.
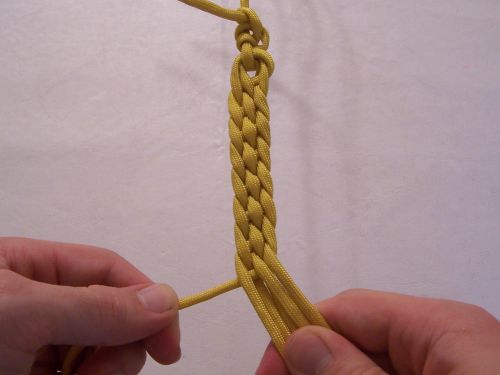
Here you can see what it looks like after two steps are done without being pulled tight.
In order to make this method work, it is necessary to pull tight on a strand after it has been woven through the others. Illustrated here is what the two completed steps look like when tightened.
Here is what the braid looks like after several more passes are completed.
Here is a view of the backside of the work.
 Freeze dried foods are flash frozen and then dried.
Because their bulk and weight have been greatly reduced, dehydrated foods are more compact and convenient for storing and require very little space. They offer quick mobility in the event of an evacuation alert. For example, one case of regular canned food weighs approximately 24 pounds. The same item of dehydrated foods would weigh from 36 to 45 ounces, and would be packed in just one #10 can. Dehydrated foods have approximately double the yield of regular canned foods even though their cost is much lower.
Most of us already eat dehydrated foods daily. Foods like pasta, cereal, beans, cake and baking mixes, as well as many fast foods. In dehydrating foods, water is slowly removed by cooking it out of the food item, without cooking the food itself.
You can see how the Freeze drying process works:
Freeze drying is a process which is suitable for a wide variety of industrial products. These include agrochemicals, pharmaceutical intermediates, biological products, foods and flavorings.
The purpose of freeze drying is to remove a solvent (usually water) from dissolved or dispersed solids. It is an excellent method for preserving materials that are unstable in the presence of water. In addition, freeze drying can be used to separate and recover volatile substances and to purify materials.
The freeze drying process is particularly suitable for products which are sensitive to heat, subject to oxidation, or shear sensitive.
Typical nylon military spec cord is made up of 7 strands which are composed of 3 individual twisted braded lines. Civilian cord on the other hand is generally is made of 7 strands each of which are made up of two individual lines braid twisted together.
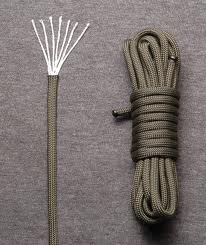
There are technically 6 different types of Military cords and all are specked to have a minimum elongation (stretch) of 30%. Only two have breaking strengths over 550 lbs…Type III and Type IV (750 lbs). Typical 550 paracord is appx 4mm or 5/32 in diameter.
Now you know the facts. If your investing in the real thing, look for the true 550 rating. Be wary of bargain “Paracords”. You may be getting decent cordage depending on your needs but more than likely will not be getting the real “550 Paracord” you were originally looking for.
You never know…your life could depend on it!