

[source]


My first act of gorilla gardening was for my friend Joe. He’d worked for many years on building a home whenever he had money available and help from friends. The place was a cluttered construction site for a long time. But as the building was nearly completed, and the construction debris cleared away, there was room in a sunny spot for a small garden. I knew Joe wanted to grow some of his own food and where he intended to put a garden so when he left town for a week, I made my move.
I collected some discarded 4×4’s and some left over fencing and piled them into my station wagon along with some garden starts and headed over to Joe’s. It’s a lovely place at the end of a dirt road. I got to work with my digging fork and turned sod, weeded and formed beds. I dug holes and erected the posts and fencing. Then I planted the seeds and starts, salad greens, squash, peas and beans to climb the fence and a bed for perennials like rhubarb, herbs and raspberries. I watered it all from the rain barrel. When Joe came home and found it he was delighted. Since then his garden has expanded to 5 times the size of the original.
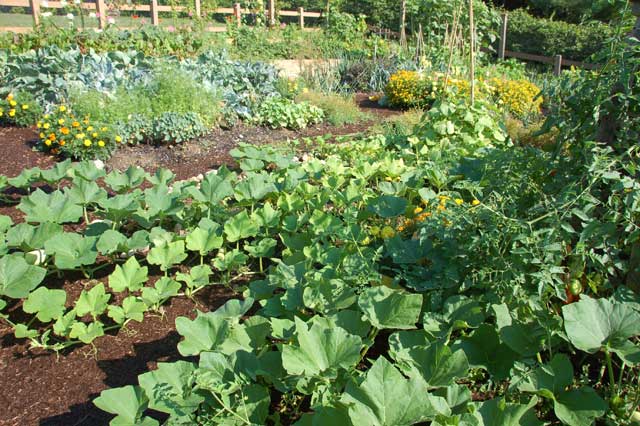
I live on a small lot in town. The previous owner traveled often so his landscaping was concrete and grass. Now after 5 years, there’s a native plant garden on the shady side of the house with vine maple and crabapple trees, salal, Oregon grape, red flowering currant, columbine and wild ginger. In the sunniest part of the yard, right up against the sidewalk, I have my espaliered fruit trees with 10 different kinds of fruit grafted on to 4 trees. There are 2 blueberry bushes and strawberry plants. In the beds there are potatoes, squash, peas, salad greens, broccoli, cauliflower and winter greens. A stately rhubarb fills out one corner and cosmos bloom by the fence. What a delight to grow my own produce. I planted greens last August to winter over so I’m eating chard, collards, kale and beets year round. The chard with their red and yellow stems brighten up the flower beds.
Gardening on a small lot
It took a while for me to figure out what grows best here in the Northwest and in my yard. Then I had to get used to eating what I grow. But now I’m totally addicted. I take some with me when I travel.
This spring my elderly neighbor said she wasn’t going to garden this year. My ears perked up. I asked, and she said to “Garden as if it was your own.” That garden has been under cultivation for decades so mostly what I’m doing is weeding and uncovering the volunteers. There’s lettuce, chard and garlic in abundance. I added a few squash and beans and covered them with a floating row cover to keep the deer and squirrels at bay.
Another friend is moving from Whidbey where he’s lived for thirty years. He has a well-established landscape. I’ve been weeding with him there getting his house ready to sell and hearing about his projects restoring an old house in Port Townsend where he’s planning to move. Last week while in Port Townsend, I put a couple of big pots on his porch, filled them with potting soil and added salad starts and a couple of squash. A friend 2 doors down said she’d keep them watered. My friend was touched to find them the next day. I love guerrilla gardening.
For many people not used to purchasing outdoor gear, it can be quite overwhelming finding the best equipment and the best deals available in the market. You surely do not want to fall into the trap of buying gear that is too expensive only to find better quality at a better price sold somewhere else; This is why you need to know some of the best ways to get an outdoor gear with minimal risks.
Here are a few of the best ways of purchasing an outdoor gear.
With the internet available and readily available, shopping for gears should be effortless. You can find all the outdoor gears nowadays and even exclusive discounts at online shops. Sites like Amazon and eBay have a wide range of shops selling all kinds of equipment for winter and summer seasons, and all you need is an internet connection to search for them.
At the end of winter season, most skin shops close and open up camps for summer activities such as bicycle riding. It is the perfect time for you to shop for winter gears like skies, snowboards and others from these shops as they will try to get rid of these items and will end up selling them at very low prices to get rid of the bulky items. A great way of having a good deal with the shops is getting to know the employees or owners, and this can save you a lot of money.
If you are interested in finding serviceable and reliable gear, you do not have to buy the latest equipment on the market. Of course, the latest gear will be a little more expensive, but you can visit gear rental shops where you can find items that the shops are trying to sell at the end of the rental season. These items you will find them at very low prices. However, it is crucial that you perform a thorough check on the gear before purchasing them.
It is a good idea to have someone with you when going to purchase outdoor gear especially if it is your first time. Your friend might have a better idea that will help you a long way into your purchase. Also if you have a friend who works at gear shops, they will be able to help you and advise you on the different type of gears accordingly. Some shops also offer special deals to their employees’ friends and family.
Getting a job at an outdoor shop will help you get exclusive discounts from the shop. It will work great for you especially if you are passionate about the outdoor gears. Many shops have great offers for their employees, and most people fill up their garages efficiently using these offers.
The best way to purchase outdoor gears is being patient and checking out for the best offers in the market. If you are planning to make a trip, then it is best that you plan earlier and get the gear early enough before the trip. Using the above tips, you should be able to secure great deals from outdoor shops and also online shops that will save you some cash, and you will even get quality gears at the same time.

We’ve all seen those “survival” shows, claiming that one dude can wildly run around the woods, procuring all the necessities of sustenance through fashioning a makeshift spear from an old boat propeller and skewering a 10-point buck …but entertaining as that is, it just doesn’t work like that.
Securing meat sources is not one of those parts of bugout life you simply leave to chance “because we saw them do it on TV”, so thinking that we’ll be able to remain fat and happy only off an abundance of hares might not be productive. And, even if this were possible for the best of the backwoods experts, the rest of us need to consider the fact that we may not be that good. Being forced to learn such a craft during a survival situation is certainly not an optimal scenario.
However, even thinking that we’ll be able to make the tree line by the crack of dawn, carrying only ye olde’ Ruger 10/22, and taking home enough meals to feed the mobile homestead may probably be a disappointing fallacy, as well. Depending on where you live and how abundant game may be in your area, there’s a good chance you’re going to have to throw out all the stops in your quest to feed you and especially your loved ones.
This is why learning the ancient art, wilderness methods, and backwoods traditions of trapping should be one of your top priorities. That is, if you want to sustain yourself on more than just the MREs you brought along for the ride.
It should be said right off the bat that not every type of bugout bag requires a comprehensive trapping kit. In fact, you might even be doing more harm than good if you load up your 72-hour emergency bag with heavy traps, depending on your fitness level and skill.
The reason I would not ordinarily advocate bringing along a long-term trapping kit in your 72-hour bag is simply because of the philosophy behind the scenario. Your 72-hour bag is simply meant for a temporary survival situation, in which you are hoping to be found and rescued shortly thereafter. Carrying along a large trapping kit doesn’t make sense, and that weight would better serve you if it were replaced by medical supplies, food, and signaling options.
However, that’s not to say that a modestly small trapping kit isn’t worth the weight entirely. Though, snares are considered a ‘low-probability’ trap, meaning that it is unlikely you’ll snag Peter Rabbit with one…if you set 20, you might just snag his brother too.
The strength of using lightweight snares is that these traps are nothing but rigged metal wires or cables (depending on what cable-weight suits your strategy). This shouldn’t take up large amounts of space and won’t weigh you down. In addition, they can also be used for other applications.
In the event that you lose your cordage, snares would do just fine in a pinch. They can be great for making shelter, trip cords, hafting, and if you were good enough to bring only stainless steel containers, you can use snares to hang your water bottle over the fire for boiling and cooking.
The weakness of using snares is their tendency to serve as a ‘one-time-use-only’, kind of trap. If the wrong critter happens to wander into the snare, which was set to catch a meal half its size, then you can pretty much say goodbye to that setup. Especially in freezing temperature scenarios, snares can even become brittle. When that happens, all bets are off.
While snares are a great way to go in a short-term scenario, your long-term strategy should include substantially more trapping gear than that. Remember, even if you brought along 30 snares, depending on the kind of game wandering through your area (which isn’t always possible to know off the bat), you might tear up all your snares within a week.
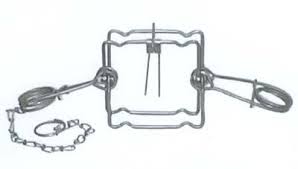
One of my favorite kinds of traps is the Conibear, which is considered a ‘body grip’ trap. Fortunately for those of us who are lovers of the backwoods and of the creatures who dwell therein, Conibear traps offer one of the most humane methods of the craft, offering almost a total likelihood of instant dispatch for the critter. Simply put, it wanders into the trap, trips it, and our furry MRE wakes up in small game heaven.
In addition, these traps are considered a ‘high probability’ trap, meaning that if something wanders into it – well, then that critter’s goose is definitely cooked. Unlike snares, where the animal has a fairly high chance of escaping (or being taken by a hawk, who’s probably laughing all the way back to its nest), Conibear traps will kill instantly, and secure the animal until you come and harvest.
It is usually recommended that you carry an assortment of #110, #120, and #220 Conibear traps, as each number indicates its size and spring-strength. The smaller #110’s are usually good for little critters, such as squirrels and rabbits, but the heftier #220’s will even snag a beaver. Strategize accordingly, but be aware that the bigger the trap, the harder it snaps, which increases your likelihood of broken fingers and lots of cussing–if handled carelessly, that is.
Also, bear in mind that if you bring along a trapping kit for sustained wilderness self-reliance, then you will need to be mentally and physically prepared to carry the additional weight. While the #110’s are a pound, and #220’s only weigh in at 2lbs, that weight can add up quickly.
In this glorious age of modern trapping methods and gear, we now have traps that are rather easy to set, will last two decades if maintained, and are far more reliable than in the olden days. Of course, we’ve all heard the legends of Davy Crockett-types, ramblin’ through the woods with a musket and moccasins–but even these guys trapped to survive and make a living.
Simply put, trapping offers the survivalist, backwoodsman, bushcrafter, and explorer the means by which to hunt… without being present. Set enough traps (the proper way of course), and you’ve increased your chances of harvesting meat from the land. Do this while hunting or fishing, and you’ve increased your chances even higher. If you don’t use traps and rely only on hunting, then you’ve left your survival to the hard chance that game will just so happen to blunder into your sights–within range–and present you with a somewhat clean shot.
By the way, it might also be worthy to mention: traps will kill silently. Food for thought.
The understanding behind trapping is that it’s based on the concept of residual returns through increasing your chances, elevating your probability of acquiring meat sources. The more traps you bring, the better your chances. If frontiersmen thought this was important, then it must have been. Of course, I’d trust a Davy Crockett over “survival dude” any day of the week and twice on Sunday.
[source] – American Preppers Network
Nobody wants to confront a major natural disaster. Yet some disasters – hurricanes, blizzards, and tornadoes, to name a few – come with warning signs, allowing for minor preparation and escape.
Earthquakes, on the other hand, happen immediately and with no warning. They are so all-consuming and widespread that you cannot jump in the car and escape them.
If you are in the impact zone, you will be affected. But the degree to which you are affected can be minimized. It all depends on how prepared you are for the quake. Preparation does take some time, but you will reap the benefits many times over in the event of a major earthquake.
Ordinary life immediately precedes an earthquake. You are washing the dishes, watching TV, doing homework, or putting on a helmet for a bike ride. Then you feel that initial jolt.
You may not realize it at first, thinking that it is something else – that someone dropped something heavy. Then you become aware of the noises, of chandeliers rattling, the house frame squeaking, glasses dropping and breaking, car alarms going off.
If you are indoors, items that are not secured – books, TVs, glassware, and lamps – will topple and fall. Hanging items will begin to swing. As these things are falling, you become aware that you might just become the victim of one of these falling things.
If you are outdoors, trees sway and water sloshes out of swimming pools.
The first jerk is followed by several more back-and-forth jerks. You may find it hard to stand.
Even though most earthquakes last only seconds – rarely more than thirty seconds – it will feel like forever.
Right after the shaking stops, the noise continues: dogs barking, people shouting, alarms ringing. Milder aftershocks continue for minutes or hours. Your electricity has probably gone out. Water may not be safe to drink, or water mains may be broken. Gas lines may erupt.
You have just experienced an earthquake measuring 7.0 or greater on the Richter scale.1
Unfortunately, no one can predict earthquakes. According to the U.S. Geological Survey (USGS), no scientists have ever predicted a major earthquake, nor are any scientists expected to be able to do so in the foreseeable future.
The best that scientists can do is produce tables that calculate the probability that an earthquake may occur. The milder the earthquake, the greater the probability that it will occur within the next 30 years. More severe quakes measuring 7.0 or higher on the Richter scale – those truly life-altering, disastrous quakes – are less probable to happen.
For example, because Southern California already experiences quakes between 5 and 6 on the Richter scale about four times per year, there is a 100 percent chance of another quake of similar strength happening within the next 30 years. However, because major magnitude-7.5 quakes have happened about once every 87 years, Southern California has only a 36 percent chance of another one happening in the next 30 years.2
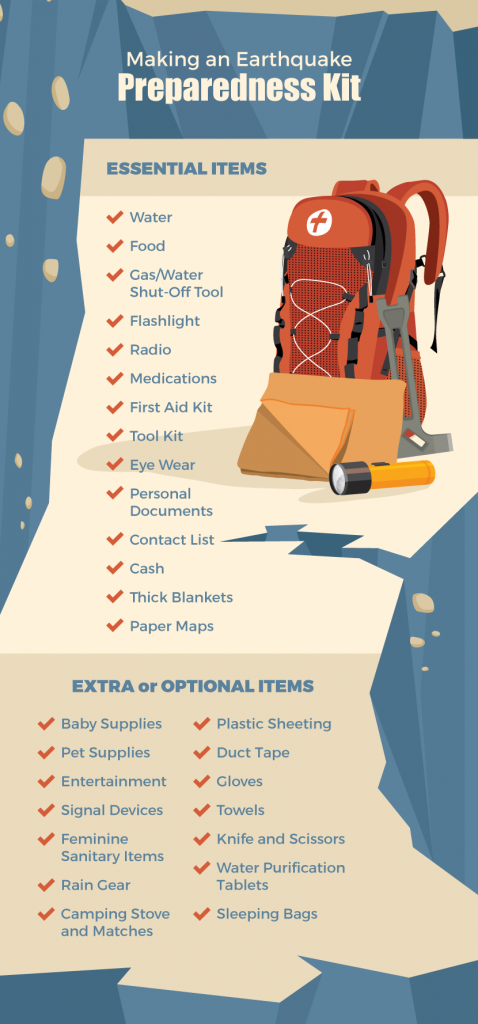
To help make your recovery from an earthquake safer and more comfortable, you should stock up your home with a set of essential preparedness items. Keep these items stored in a clean, dry place.3

Chances are good that your home is not prepared for an earthquake. While your house may seem solid and safe, it is likely not ready for the rigors of a magnitude-7.0 earthquake. Undertake these projects now for a safer home:4
Secure heaters to walls with metal straps. These bands can be purchased as part of a kit, available at home improvement stores.
Affix any kind of furniture that can tip over to a wall stud, using a metal L-brace or a nylon strap.
Attach ledge barriers along the edges of shelves to prevent items from sliding off and falling.
Attach flexible connections to allow appliances to shift without breaking their lines. As with the water heater, attach large gas appliances to the nearest wall.
Install clear or shaded safety film on windows. This will prevent glass from scattering across the floor.
Consult a contractor to install anchor bolts between the house framing and the foundation.
Attach reinforcing bars or metal straps to the chimney to prevent it from snapping and breaking off in the event of an earthquake.
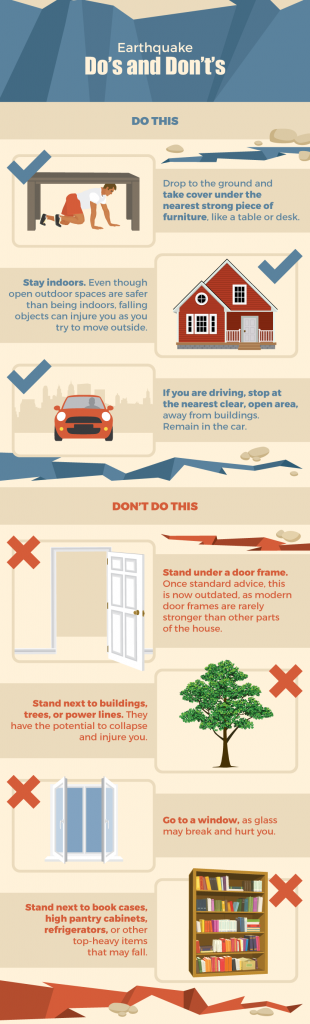
DO:
DO NOT:
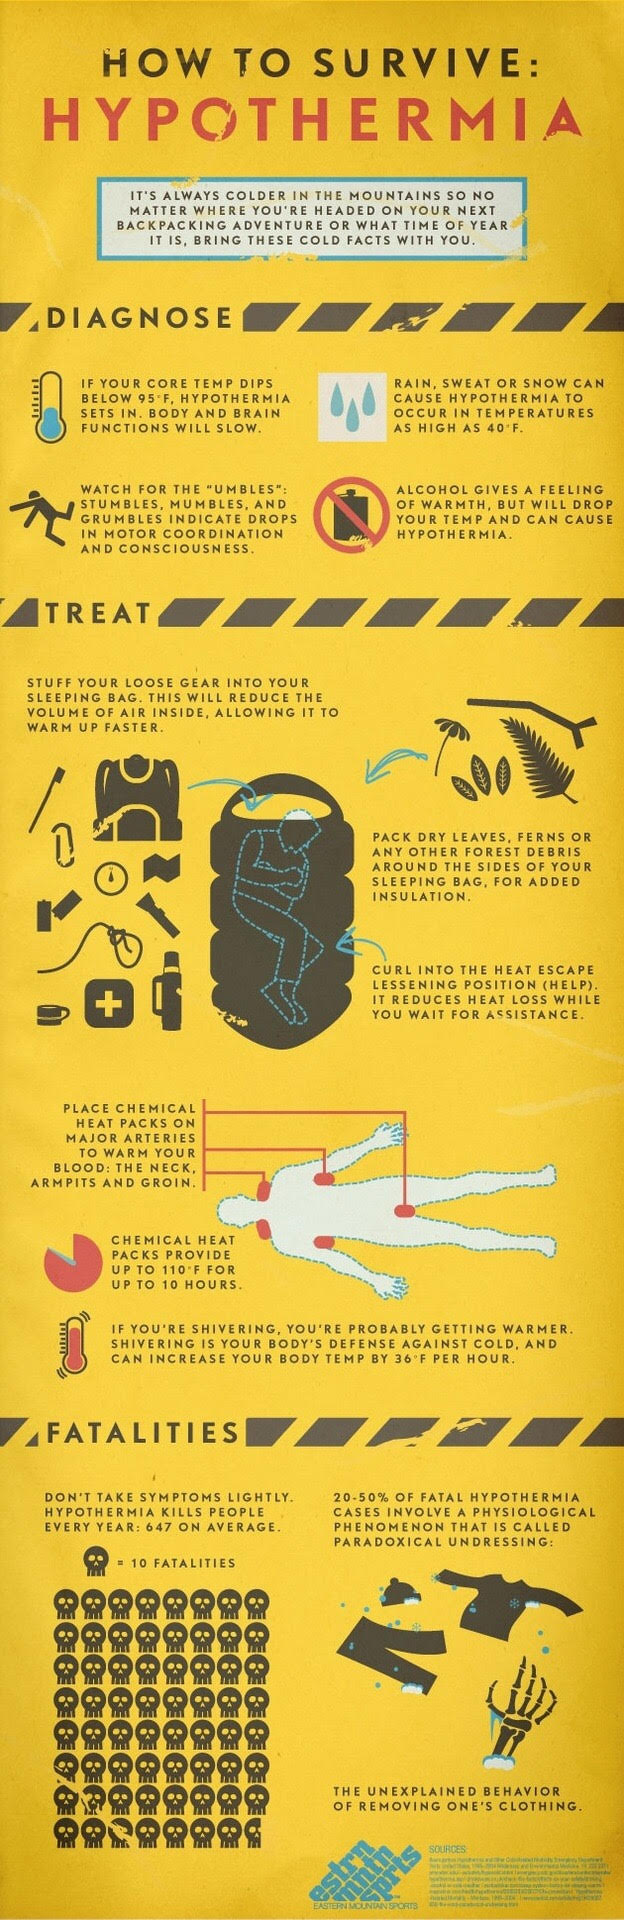
Even though the earthquake may last only seconds, the aftermath may go on for days or weeks to come. Follow these fifteen steps, in this order:
Earthquakes are devastating events. Fortunately, you and your family can remain safe by following basic safety plans.

Source: Fix.com Blog
Sources:
You would think that everyone would understand the obvious, adding a first aid kit to your survival planning and preps. But like many things this is one survival item often overlooked.
Whether it’s a natural disaster, car crash or a zombie outbreak, medical treatment will always be needed in an emergency situation.
We suggest that you consider having at least 3 different types of first aid kits:
While kit contents will vary, your basic kit should include at least the following:
The intermediate kit will include more of each of the above items, plus the following:
Your more extensive deluxe medical kit can be expected to include not only the above, but some or all of the following:
If you need access to prescription medicines, you should consider stocking up on them now and adding these:
Also, adding a medical encyclopedia with detail and instructions for basic surgical and other medical procedures would be good to have on hand. You might even invest in taking a First Aid training course at your local Junior College or continuing education center.
Year Zero Survival has a great selection of survival first aid kits for the home, car, and workplace. Now is the time to act, be prepared.