In a world where we rely heavily on grocery stores for our daily needs, the thought of them running out of food can be a scary one. While it’s unlikely to happen on a large scale, it’s important to know what steps we can take to survive if it does.
The first thing to consider is the reason for the shortage. Is it a temporary issue such as a supply chain disruption, or a long-term problem such as a natural disaster or economic collapse? Understanding the cause will help determine the best course of action.
In the event of a temporary shortage, it’s important to not panic and rush to hoard food. This will only exacerbate the problem and leave others without the resources they need. Instead, focus on purchasing what you need for the immediate future and consider alternative food sources such as local farmers’ markets or community gardens.
In a long-term shortage, it’s important to be prepared with a stockpile of non-perishable foods such as canned goods, dried fruits and vegetables, and grains. It’s also wise to learn how to preserve food through techniques such as canning, drying, and pickling.
Another important aspect of surviving a food shortage is knowing how to grow your own food. This can be done on a small scale through container gardening or on a larger scale through traditional gardening methods. Learning basic gardening skills and having access to seeds and gardening tools can make a big difference in a food shortage scenario.
Finally, it’s important to remember that community support can be invaluable in times of need. Consider joining or forming a community food co-op or sharing resources with neighbors and friends.
In conclusion, while the idea of grocery stores running out of food can be daunting, there are steps we can take to prepare and survive. By being informed, resourceful, and community-minded, we can weather any storm.
As a gun owner, you’ve probably assessed your firearm and examined where its reliability could be tested given a slew of survival scenarios. Undoubtedly, you’ve looked carefully at the magazine. It is after all the critical component that a magazine-fed firearm relies on to feed ammo into the chamber effectively and efficiently. Are you positive it’ll always work when you need it to? As you most likely know, a magazine contains a certain metal component which renders the entire firearm ineffective when it breaks or loses its elasticity. We are speaking of course about the spring, which is why thelatest project from AmmunitionToGo.com recently garnered our attention.
How long can a mag spring last? Does leaving a mag loaded for an extended period of time gradually damage its spring? Does the simple act of loading a mag damage its spring in any measurable way? These are the questions Ammo To Go set out to answer by conducting a mag spring torture test (or mag spring enhanced interrogation test, if any congressional committees ask about it).
Ammo To Go’s Mag Spring Test Process
The team at Ammo To Go spent almost a year loading, unloading, and testing the spring functionality of 13 different mags:
Magpul Gen 2 PMAG (30 rds)
Magpul Gen 3 PMAG (30 rds)
Magpul Gen 3 PMAG (40 rds)
Amend2 AR-15 mag (30 rds)
Lancer AR-15 mag (30 rds)
USGI AR-15 mag (30 rds)
Smith & Wesson Shield 9mm mag (8 rds)
ETS Glock 17 mag (17 rds)
Glock 17 Factory mag (17 rds)
Magpul Glock 17 mag (17 rds)
Glock 17 Factory mag (33 rds)
USGI 45 ACP 1911 mag (7 rds)
Wilson Combat 45 ACP 1911 mag (8 rds)
First, they used adigital force gauge to establish each mag spring’s resistance. Then they subjected samples of each mag listed above to the following test protocol over the course of year.
Load to full capacity; store in climate controlled environment
Load to full capacity; store in shed where temperatures regularly fluctuate to over 100 °F
Do not load; store in climate controlled environment
Do not load; store in the miserably hot and stuffy shed
Load to half capacity; store in climate controlled environment
Load and unload to full capacity five times biweekly; store in climate controlled environment
Load and unload to full capacity 15 times biweekly; store in climate controlled environment
Load and unload to full capacity 15 times biweekly; store in the same horrible shed
The ATG crew regularly took the mags to the range for field testing throughout the duration of the test. Their team fired one round every two seconds, and then used the samedigital force gauge to determine whether the mag springs’ resistance values changed in any significant way.
The Mag Spring Torture Test Results
After about ten months, hundreds of hours, thousands of rounds, and countless mosquito bites, their team determined the following: zilch.
Allow us to elaborate using the PMAGs as an example. Regardless of how frequently they were loaded or unloaded – and regardless of their storage conditions – not a single PMAG failed. The digital force gauge revealed zero significant variability in their springs’ resistance!
This isn’t to suggest that the PMAGs weren’t changed over the course of testing. In many cases the springs put up 20-25% less resistance than they had when the mags were fresh out of their factory packaging. Even so, all of the PMAGs performed flawlessly during field testing, and the other manufacturers’ mags followed suit.
So, They Did Even More Testing
The test protocol revealed that factory mags are pretty much unaffected by regular usage. But they wanted to determine precisely how much punishment a mag can tolerate before its spring starts pushing up daisies. That’s why they recruited help from the only people who are bigger nerds than us: the laboratory technicians ofApplied Technical Services.
The team gave ATS a factory 17-round G17 mag and a 30-round PMAG. They slightly modified each mag to fit correctly into their spring compressing contraption and proceeded to punish the absolute bejeezus out of the poor little springs.
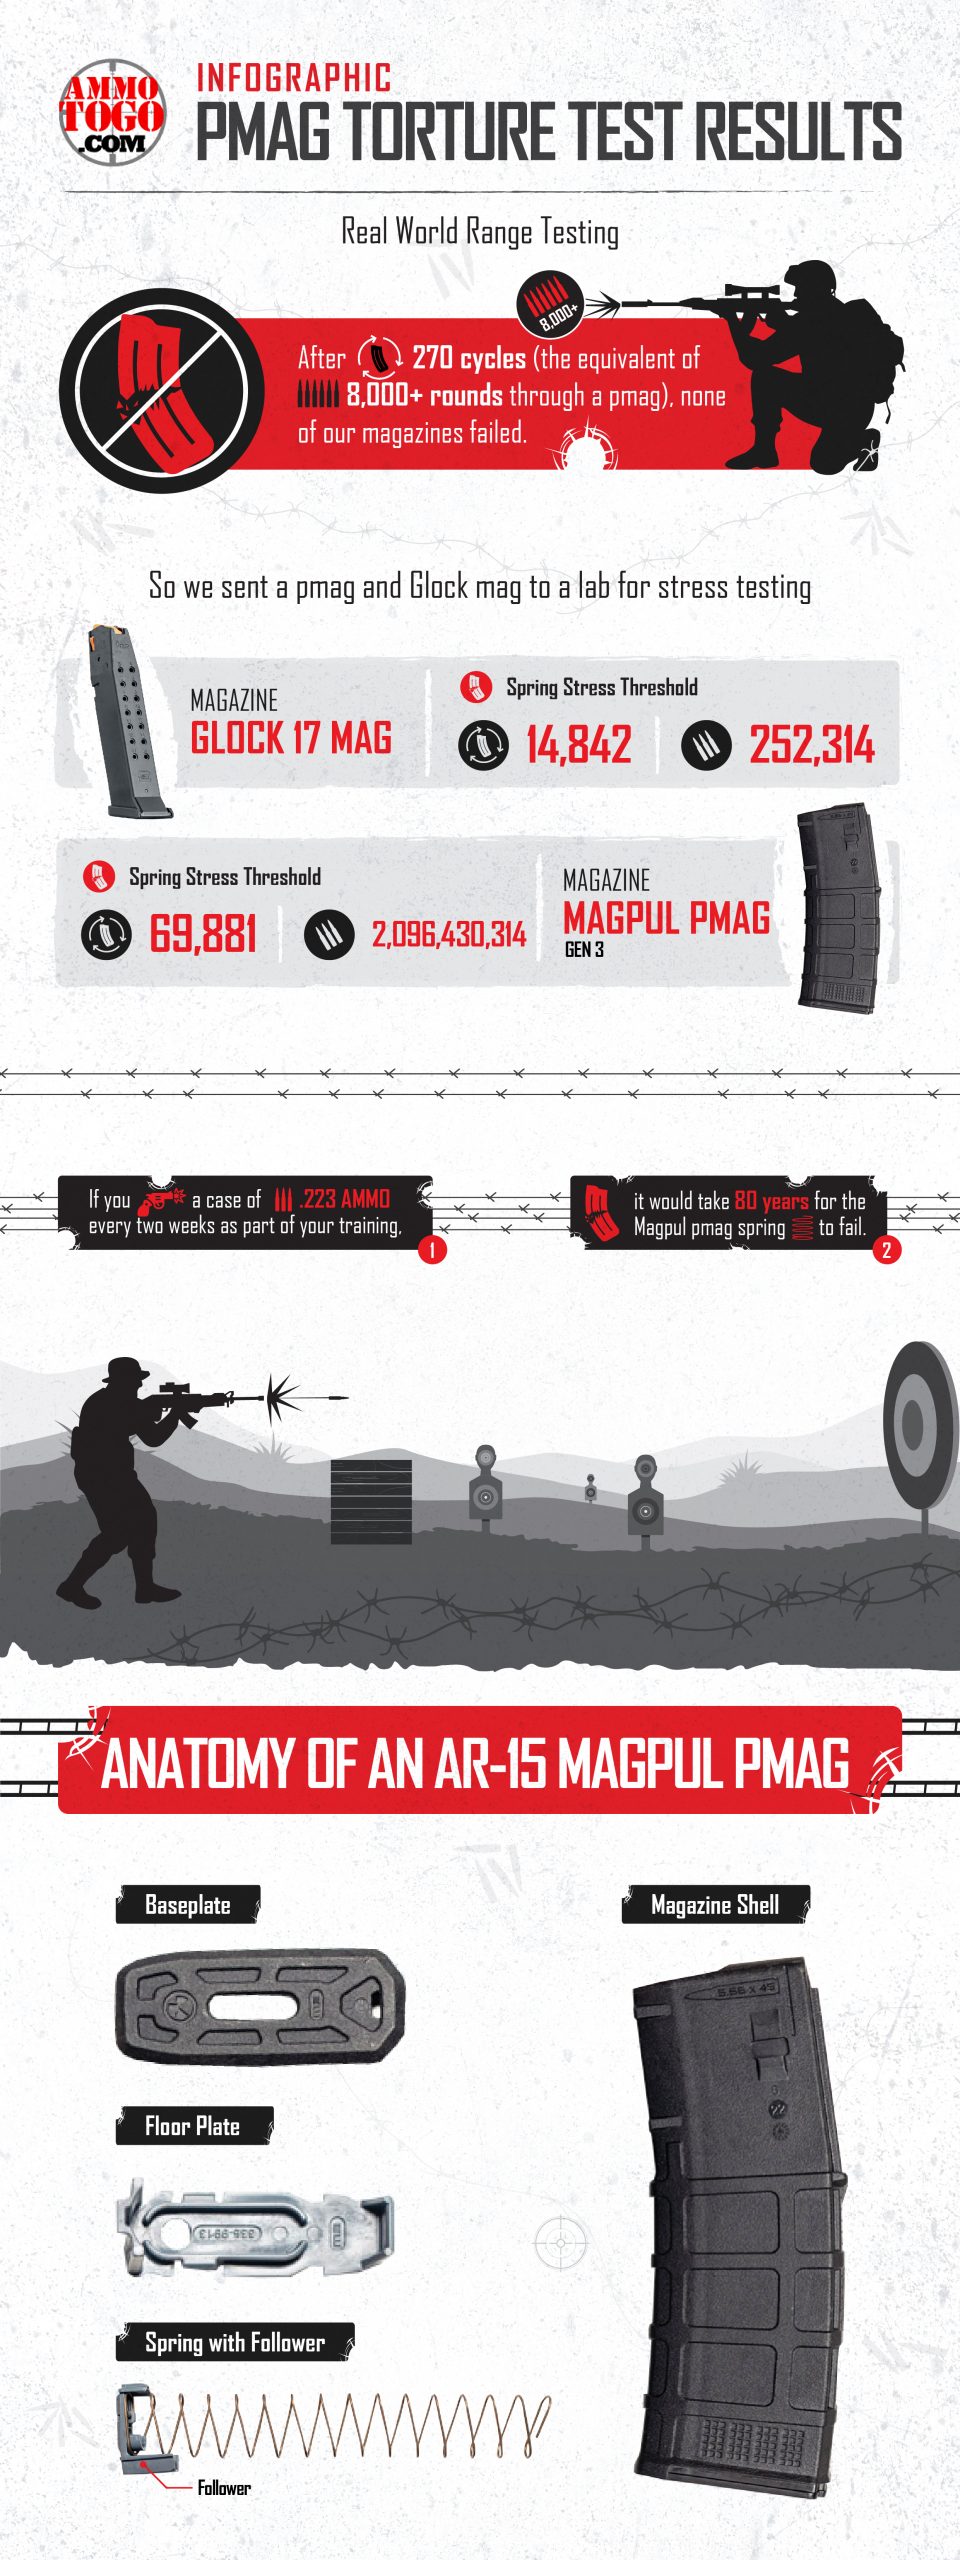
Their results were fascinating. The G17 mag spring endured 14,842 cycles (the equivalent of 252,314 rounds) before it snapped; the PMAG endured 69,881 cycles (2,096,430 rounds) before it finally gave up the ghost. To put that into context, if you were to fire a case of 223 Rem ammo every two weeks, the PMAG spring would endure for eight decades. That’s bananas!
Test Limitations
You can’t pretend that ATS’s testing perfectly emulated real world conditions. When they’re used by actual firearm enthusiasts, mags get dirty, subjected to temperature fluctuations, dropped, quickly reloaded, and otherwise mistreated. You can reasonably expect environmental damage to shorten a mag spring’s lifespan, but their tests didn’t confirm that expectation through scientific experimentation.
Regardless, it’s safe to conclude that mag springs are outstandingly rugged. Kudos to the manufacturers for appreciating just how essential springs really are!
Does Storing a Mag Half Loaded Extend Its Lifespan?
Many folks believe they can protect their mag springs by “downloading” – i.e. loading their mags shy of full capacity. Their reasoning is simple enough: by avoiding full compression, the spring retains its resistance and full functionality.
The ATG team put this theory to the test by downloading Gen 2 and Gen 3 PMAGs, as well as Amend2 AR, G17 and S&W Shield mags. After 10 months of identical use and storage conditions, they measured no significant difference in spring resistance between the downloaded mags and analogous mags that they left unloaded or fully loaded when they weren’t in use. Like we pointed out earlier, the test’s protocol doesn’t perfectly emulate real world conditions, but there’s no evidence downloading poses any actual advantage.
Conclusion
At the end of the day, it’s typically wear and tear or factory defects that render mags ineffective – not gradual spring deterioration. So long as you take care to maintain your firearm, you can expect reliable performance from your mag for many decades. One less thing to worry about, we say!
Are you thinking about raising birds for eggs or meat? Well, you have two options: chickens or quail. Chickens and quail are both popular poultry birds. They are easy to raise and take care of, but there are some differences between them. In this article, we will compare the pros and cons of raising chickens and quail, so you can decide which bird is the best for you.
What are Chickens?
Chickens are domestic birds that have been bred for thousands of years. They are popular for their meat and eggs. Chickens come in different breeds, colors, and sizes. They are social birds that love to be around other chickens. Chickens are easy to raise and care for, but they require more space than quail.
Pros of Raising Chickens:
Eggs: Chickens lay larger eggs than quail. They can lay up to 300 eggs per year. Chicken eggs are also easier to handle and sell.
Meat: Chickens are larger than quail, so they provide more meat.
Companionship: Chickens are social birds that love to be around other chickens. They are fun to watch and can be great pets.
Pest Control: Chickens love to eat insects, so they can help control pests in your yard or garden.
Cons of Raising Chickens:
Space: Chickens require more space than quail. You need at least 2 square feet of space per chicken in the coop and 8 to 10 square feet of outdoor space per chicken.
Noise: Roosters can be noisy, especially in the early morning. If you have close neighbors, they may not appreciate the noise.
Mess: Chickens can be messy. They scratch the ground to look for food, which can make a mess in your yard or garden.
What are Quail?
Quail are small game birds that are native to America, Asia, Europe, and Africa. They are popular for their meat and eggs. Quail are smaller than chickens, so they require less space. They are also quieter than chickens and are less likely to make a mess in your yard or garden.
Pros of Raising Quail:
Eggs: Quail lay smaller eggs than chickens, but they lay more eggs. Quail can lay up to 300 eggs per year, and their eggs are considered a delicacy in some countries.
Meat: Quail are smaller than chickens, but they provide more meat per pound than chickens.
Space: Quail require less space than chickens. You only need 1 square foot of space per quail in the coop and 2 to 3 square feet of outdoor space per quail.
Quiet: Quail are quieter than chickens. They are less likely to disturb your neighbors.
Cons of Raising Quail:
Fragile: Quail are fragile birds. They can get scared easily and can be prone to injuries.
Flighty: Quail are more flighty than chickens. They are not as social as chickens and may not be as friendly.
Temperature Sensitivity: Quail are sensitive to temperature changes. They need a warm, dry environment to thrive.
Which bird is the best for you?
Now that you know the pros and cons of raising chickens and quail, you can decide which bird is the best for you. If you have a large yard or farm and want larger eggs and more meat, chickens may be the best choice for you. If you have limited space, want more eggs, and a quieter bird, quails may be the best choice for you.
Another thing to consider is the reason why you want to raise birds. If you are looking for a fun and social pet that can also provide you with eggs and meat, chickens may be the best option. If you want a bird that requires less space and is easier to care for, quail may be the better choice.
Final Thoughts
Raising chickens and quail can be a fun and rewarding experience. Both birds are easy to care for and provide eggs and meat. However, there are some differences between them that you need to consider before making a decision.
Chickens require more space and can be noisier and messier, but they lay larger eggs and are more social. Quail require less space and are quieter, but they are more flighty and fragile.
Ultimately, the best bird for you depends on your individual needs and preferences. Consider the pros and cons of each bird and decide which one is the best fit for you. Whether you choose to raise chickens or quail, you will enjoy the benefits of fresh eggs and delicious meat.
In summary, chickens and quail are both great options for raising birds. Chickens are larger and more social, while quail require less space and are quieter. When deciding which bird to raise, consider your space, needs, and preferences. With the right care and attention, both chickens and quail can provide you with fresh eggs and meat for years to come. Happy homesteading!
Are you looking to add more nutrient-dense foods to your diet? As a millennial, you can grow your own with ease! You can easily grow plants with high nutritional value right in your own home with just a few practical tips. From leafy greens and microgreens to sprouts and tomatoes, there are many plants that are easy to grow and packed with vitamins and minerals.
Leafy greens: Spinach, kale, and lettuce are just a few examples of leafy greens that are packed with vitamins and minerals. Grow them in pots or raised beds and provide them with plenty of sunlight. Harvest the leaves regularly to encourage new growth. Practical tip: Grow leafy greens in well-drained soil and provide them with plenty of sunlight. Harvest the leaves regularly to encourage new growth. (Reference)
Microgreens: Quick-growing microgreens, such as broccoli, radish, and wheatgrass, are packed with nutrients and can be grown in a sunny windowsill or under grow lights. Practical tip:Grow microgreens in well-draining soil and provide them with plenty of light. Harvest the greens when they are just a few inches tall. (Reference)
Sprouts: Alfalfa, mung bean, and clover are just a few examples of sprouts that are easy to grow and packed with vitamins, minerals, and antioxidants. Soak the seeds overnight and then drain and rinse them daily until they sprout. Keep the sprouts in a sunny windowsill or under grow lights. Practical tip: Soak the seeds overnight and then drain and rinse them daily until they sprout. Keep the sprouts in a sunny windowsill or under grow lights.
Tomatoes: Tomatoes are packed with vitamins and minerals and are easy to grow in pots or in the ground. Provide them with well-drained soil, plenty of sunlight, and water and fertilize as needed. Practical tip: Grow tomatoes in well-drained soil and provide them with plenty of sunlight. Water regularly and fertilize as needed. (Reference)
Bell peppers: Bell peppers are packed with vitamins and are easy to grow in pots or in the ground. Provide them with well-drained soil, plenty of sunlight, and water and fertilize as needed. Practical tip:Grow bell peppers in well-drained soil and provide them with plenty of sunlight. Water regularly and fertilize as needed.
By growing these plants, you can enjoy fresh, nutrient-dense foods right in your own home while also saving money on groceries.
The information provided in the step-by-step guide is based on commonly accepted techniques and materials for building a lean-to shelter in outdoor settings. These techniques and materials are often taught in outdoor survival and camping courses and can be found in various reputable sources such as wilderness survival manuals, camping guides, and outdoor education websites. It is always recommended to research and consult multiple sources before attempting to build a shelter or any outdoor skill.
Here is a step-by-step guide on how to build a lean-to shelter:
Materials needed:
2 poles or branches
Rope or cord, bungie cords
Tarp, large sheet of plastic or natural foliage
Optional: stakes or rocks for anchoring
Step 1: Find two sturdy poles or branches that are approximately 6-8 feet in length. These will be used as the main supports for the lean-to shelter.
Step 2: Use rope or cord to tie the two poles together at the top to form an inverted V shape.
Step 3: Find a flat, even surface to build the shelter on. Clear away any debris or rocks from the ground.
Step 4: If available, use stakes or rocks to anchor the two poles in the ground.
Step 5: Drape a tarp or large sheet of plastic over the poles, making sure that it covers the entire space between them.
Step 6: Use rope or cord to tie the tarp or plastic sheet securely to the poles. Make sure it is pulled taut so that it will not flap or billow in the wind. (also can use bungie cords)
Step 7: If needed, add additional support to the shelter by using more rope or cord to tie the tarp or plastic sheet to nearby trees or bushes.
Step 8: If desired, add additional insulation to the shelter by placing blankets, sleeping bags, or other natural materials on the ground inside the shelter.
Congratulations, you have built a lean-to shelter!
Remember to test it out and make any necessary adjustments before using it in the great outdoors.
Are you new to prepping and feeling overwhelmed by the thought of getting started? Prepping doesn’t have to be an all-or-nothing endeavor. With a 90-day plan, you can gradually build your emergency preparedness supplies and knowledge, without breaking the bank or feeling too overwhelmed.
Here’s a simple guide on how to start prepping in 90 days:
Week 1-4: Start with the basics
Create a list of emergency supplies you need for survival, such as food, water, shelter, and first-aid supplies.
Invest in a reliable emergency radio and a first-aid kit.
Week 5-8: Expand your supplies
Increase your food and water supplies to a 2-week supply.
Purchase a good quality tent or shelter for your family.
Invest in a good quality water filtration system.
Week 9-12: Enhance your prepping skills
Learn basic survival skills like starting a fire, building a shelter, and purifying water.
Join a local prepper group or online community to learn from other experienced preppers.
Practice using your emergency supplies, so you know how to use them when it really counts.
By following this 90-day prepping plan, you’ll have the essential supplies and knowledge to better protect yourself and your loved ones in case of an emergency. Remember, prepping is a journey, not a destination, so keep learning and building your supplies over time.
Don’t worry, you can become prepared for anything in just 90 days!
Here’s some more tips to help you start prepping in 90 days:
Week 1-2: Research and Planning
Make a plan: Before you begin prepping, it’s important to have a plan in place. Determine the types of emergencies you may face in your area and create a plan for each scenario.
Research potential disasters and emergencies in your area
Identify your family’s specific needs and vulnerabilities
Create a budget and a prepping checklist
Week 3-4: Emergency Food and Water
Gather emergency supplies: Start with the basics such as a first aid kit, flashlights, and batteries. Then gradually add to your supplies over time, including survival food, water storage, and shelter options.
Build a bug out bag: A bug out bag is a portable kit that contains essential items to help you survive for 72 hours. Make sure your bug out bag includes basic supplies such as food, water, shelter, and clothing.
Gather emergency supplies: Start with the basics such as a first aid kit, flashlights, and batteries. Then gradually add to your supplies over time, including survival food, water storage, and shelter options.
Assemble a comprehensive first aid kit
Purchase and organize emergency supplies like flashlights, batteries, and communication devices
Learn survival skills: Knowing how to start a fire, filter water, and navigate without a GPS can be crucial in a disaster scenario. Take classes or watch online tutorials to learn these essential survival skills.
Practice emergency drills with your family
Review and update your prepping plan and checklist
By following these steps, you can start prepping in just 90 days. Remember, prepping is a process, and it’s important to take things one step at a time. Start small and gradually build up your supplies and skills over time. With dedication and persistence, you can become better prepared for whatever emergencies may come your way.
An EMP attack can wipe out our power grid, communication systems, and technological infrastructure, plunging us into a catastrophic situation.
Be Prepared for the Worst
Don’t wait for a disaster to happen, be proactive and prepare yourself and your family for an EMP attack. Create an emergency kit with essential supplies, such as non-perishable food, water, medicine, and first aid supplies. Keep a backup generator, solar charger, or alternative sources of power for your electronics.
Secure Your Home
Your home is your castle, and protecting it is crucial in a post-EMP world. Secure your home with sturdy locks, window bars, and reinforced doors. Keep a supply of self-defense items, Guns, Knives, Ammo, etc. Install security cameras and motion sensors to detect any intruders.
Learn Survival Skills
In a world without technology, survival skills are essential for your survival. Follow websites like YearZeroSurvival.com and learn the skills to survive. Learn essential survival skills, such as first aid, hunting, fishing, and self-defense. Practice fire-making, shelter building, and water purification techniques.
Stay Informed
Knowledge is power, and staying informed is crucial in a disaster situation. Stay updated on the latest news and developments regarding EMP attacks. Follow credible sources and experts on survival and emergency preparedness.
In conclusion, surviving an EMP attack requires preparation, vigilance, and a resilient mindset. By following these essential tips, you can increase your chances of surviving and thriving in a post-EMP world.
Some Additional Resources:
https://www.ready.gov (Official website of the U.S. Department of Homeland Security)
https://www.fema.gov (FEMA – The Federal Emergency Management Agency’s official page on EMP)
When it comes to year zero survival, having a reliable vehicle can mean the difference between life and death. Whether you’re trying to escape a disaster zone or navigate through the wilderness, the right vehicle can help you get where you need to go safely and efficiently. But with so many types of vehicles to choose from, how do you know which one is best for year zero scenarios?
Off-road Vehicles: The Ultimate Survival Machine
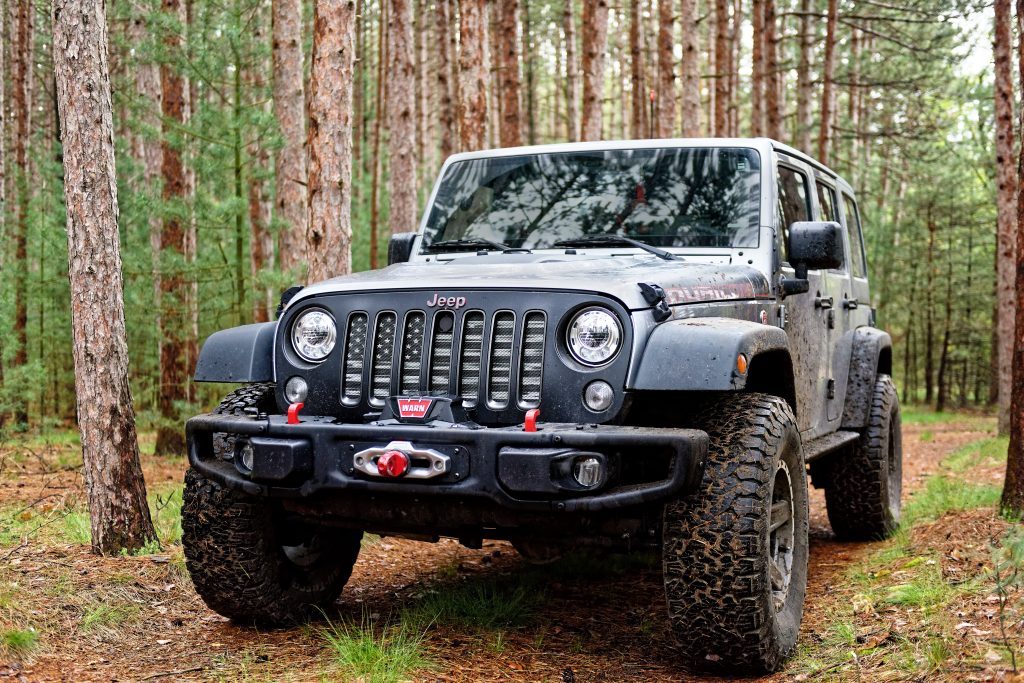
When it comes to year zero survival, an off-road vehicle is the ultimate survival machine. These vehicles are designed to handle the toughest terrain, from rocky mountainsides to muddy swamps. They’re equipped with four-wheel drive and high ground clearance, allowing you to navigate through rough terrain with ease. Some popular off-road vehicles for year zero scenarios include the Jeep Wrangler, Toyota 4Runner, and Land Rover Defender.
Motorcycles: Lightweight and Agile
If you need to cover a lot of ground quickly, a motorcycle may be the best choice for year zero survival. These vehicles are lightweight and agile, making them ideal for navigating through traffic or escaping dangerous situations. They also require less fuel than cars or trucks, which can be a valuable resource in a year zero scenario. Some popular survival motorcycles include the BMW GS Adventure, Honda CRF450L, and KTM 500 EXC.
Boats: The Ultimate Escape Vehicle
If you’re facing a coastal or river-based disaster, a boat may be the ultimate escape vehicle. Boats are ideal for navigating through flooded areas or escaping dangerous situations on land. They also provide a way to fish for food and collect water, which can be essential for long-term survival. Some popular survival boats include the Zodiac MilPro FC 470, the Wavewalk 700, and the Grumman 17-foot aluminum canoe.
Conclusion
When it comes to year zero survival, choosing the right vehicle can be a matter of life and death. Whether you opt for an off-road vehicle, a motorcycle, or a boat, the key is to choose a vehicle that is reliable, fuel-efficient, and able to handle the toughest terrain. By investing in a quality vehicle, you can increase your chances of survival and improve your overall quality of life in a year zero scenario.